
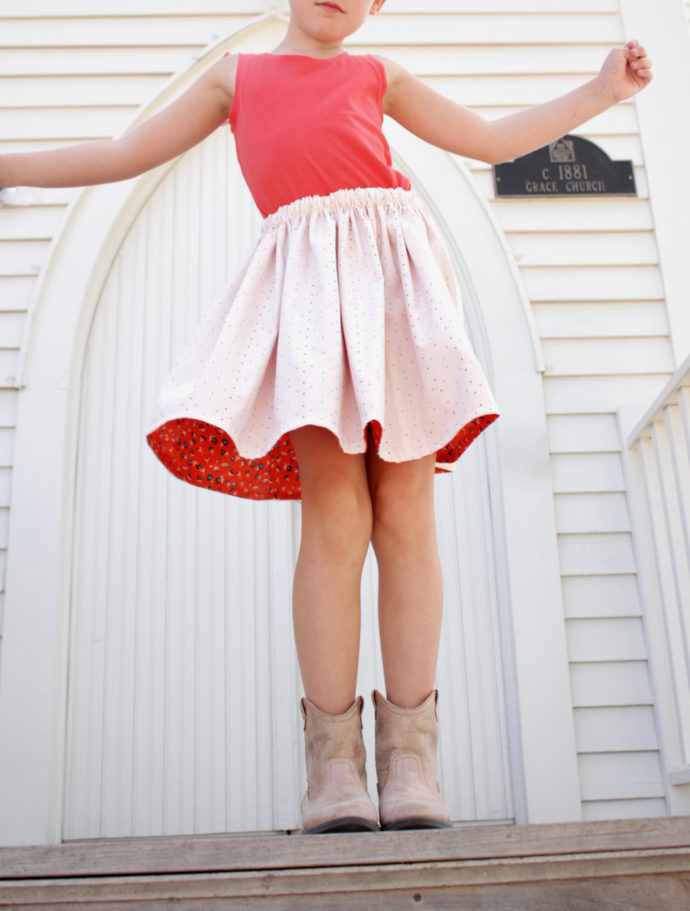
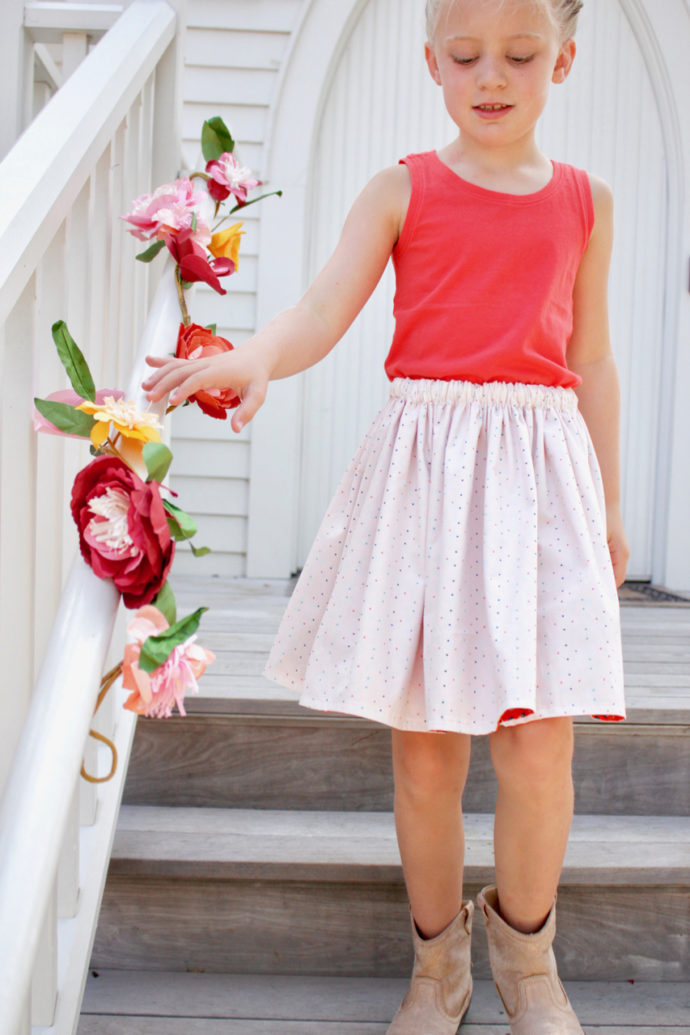
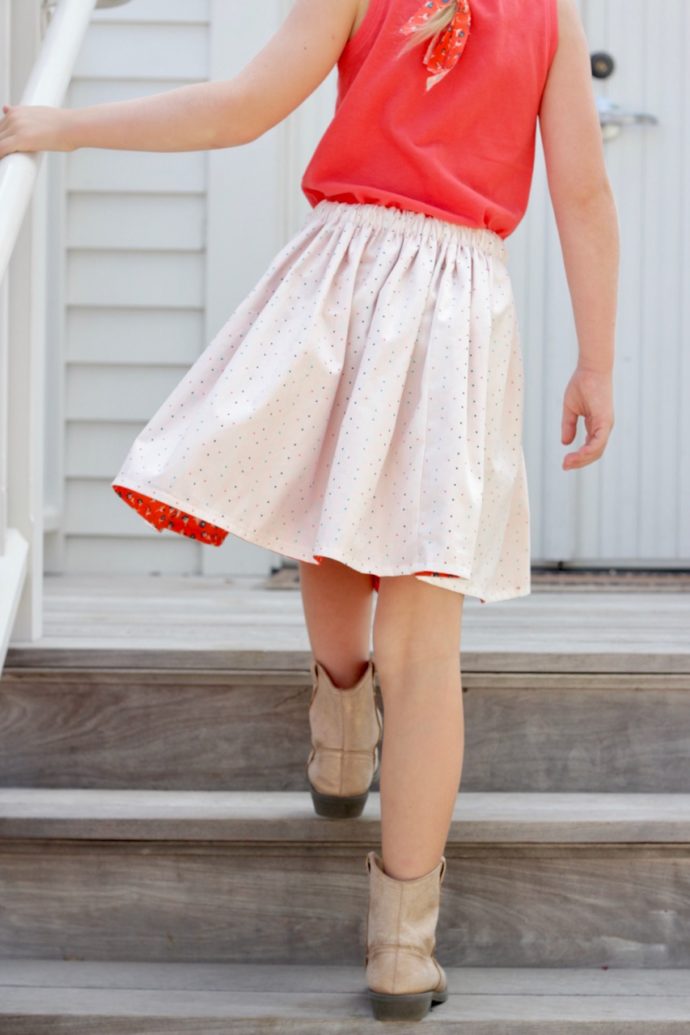
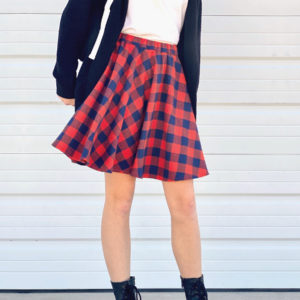
 Clara is my girl that loves to wear skirts. Like LOVES them.
I’ve tried making her shorts and nope. She doesn’t want them. Lucy however, is the opposite and will wear shorts and jeans every day. I love how we each have fashion preferences that are built into us. Fashion Nature.
So since it’s summer, and since a pretty stack of fabrics showed up in my mailbox, I decided to make Clara yet another skirt…but with a reversible twist!
It’s so simple, yet this is the first time I’ve done it!
I’m excited to share the steps with you guys.
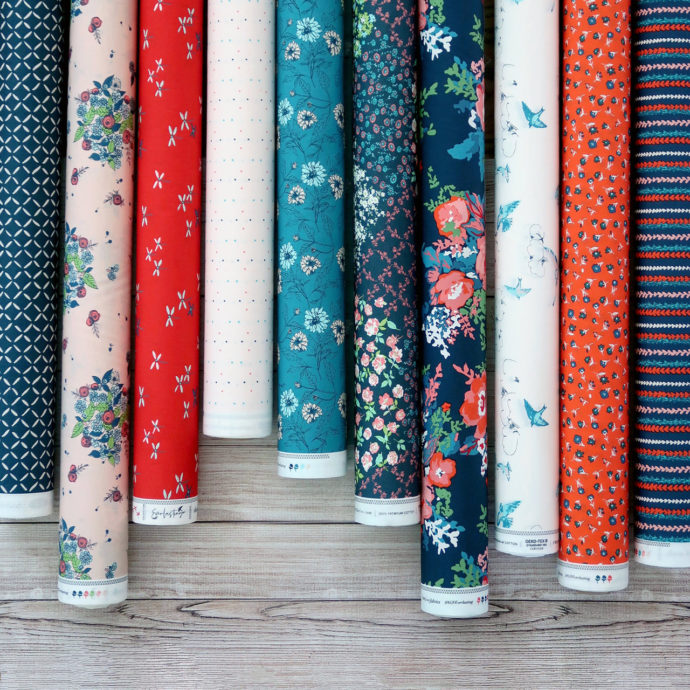
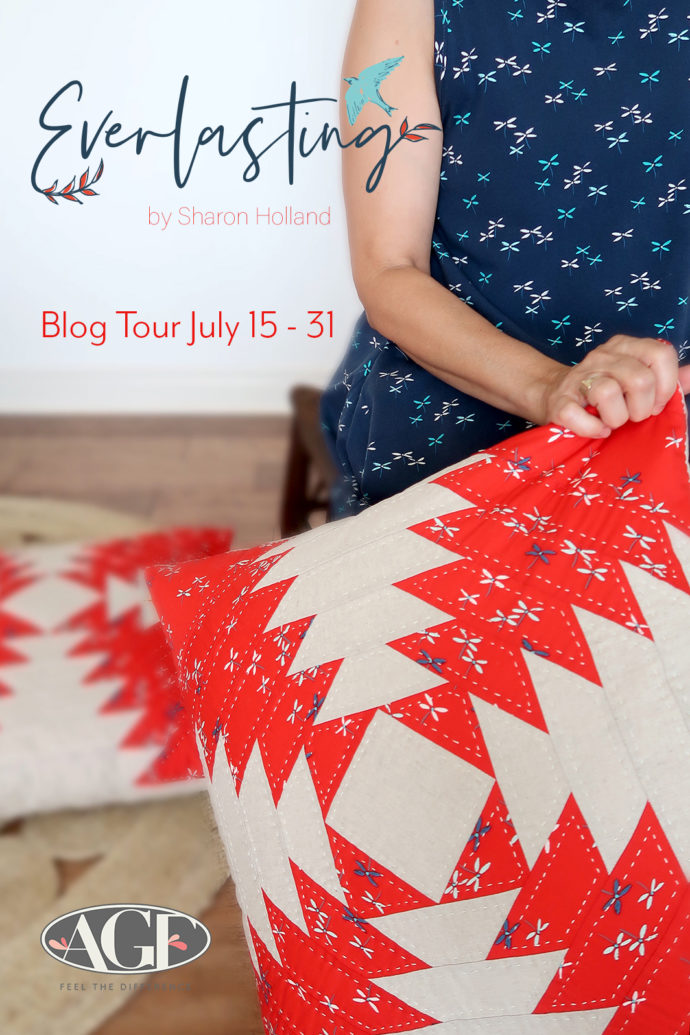
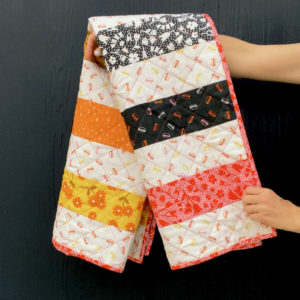
 And I’m especially excited to share these fabric beauties with you. Ahhhhh, isn’t that the prettiest line up of colors and designs in the photo above? These fabrics are part of the Everlasting Fabric collection by my Art Gallery sister-designer and friend, Sharon Holland. Do you guys follow Sharon on IG and on her site? She is such a treat, as a person and an artist. I have loved learning her process for design, and trying out one of her quilt patterns. (I still need to share my finished quilt with you!)
Sharon asked me to be part of the Everlasting Fabric Blog Tour (click the link to enter her fabric giveaway) which has an adorable story behind the fabrics. You have to click over and read it. This red fabric had me at first sight. So I had to say YES!
Yes to sewing in the midst of summer.
Yes to a skirt with two personalities:
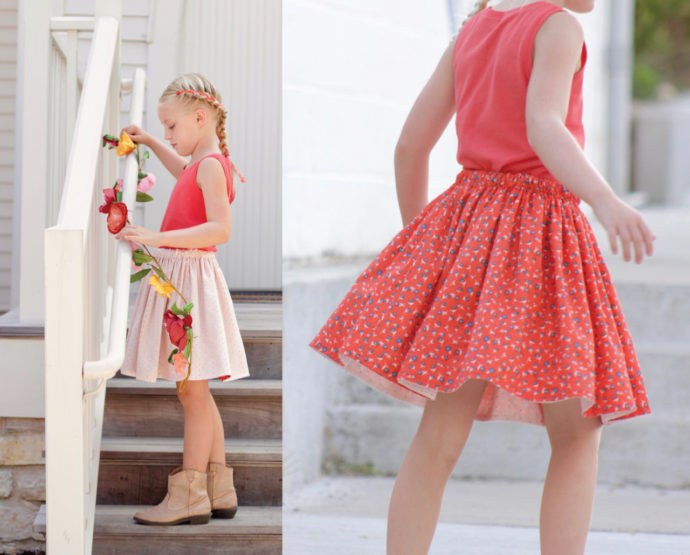
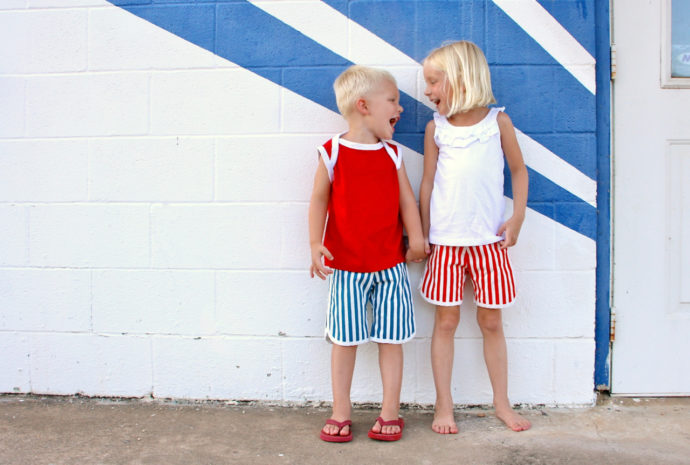
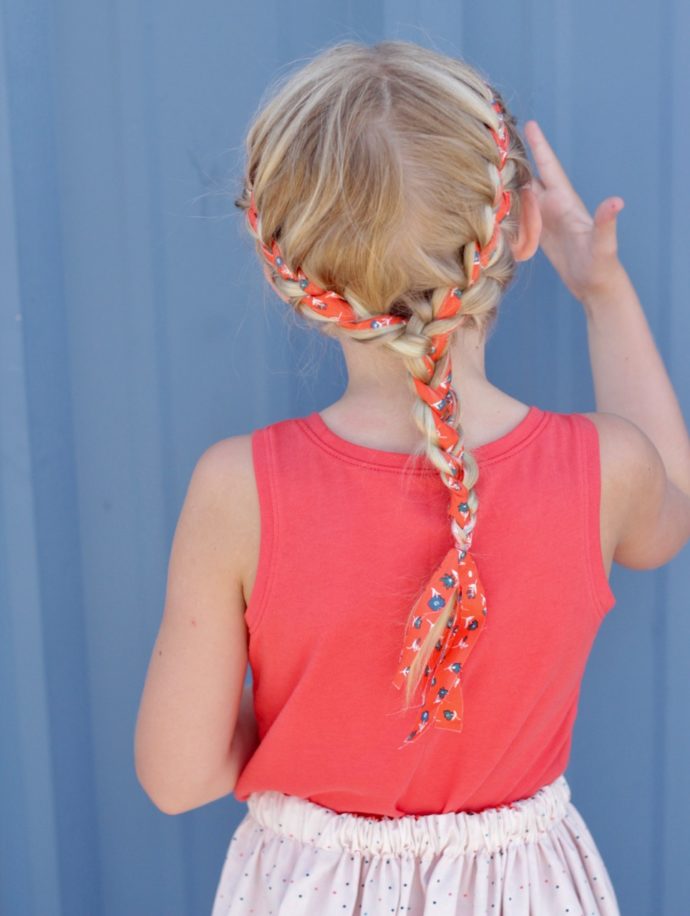
 And Yes to taking more pictures of Clara. She always keeps me smiling with the poses. I love it. And if you really want to reverse this post, to way back in the day…here’s the last time I took photos at this same wall. Lucy was even younger than Clara is now! In fact, I don’t think Clara was even born yet. Oh little Lucy and Owen. My how time flies. (And how photo skills improve. I think.)
 Okay, ready to sew??
Grab your pretty fabrics and let’s make this simple, reversible skirt.
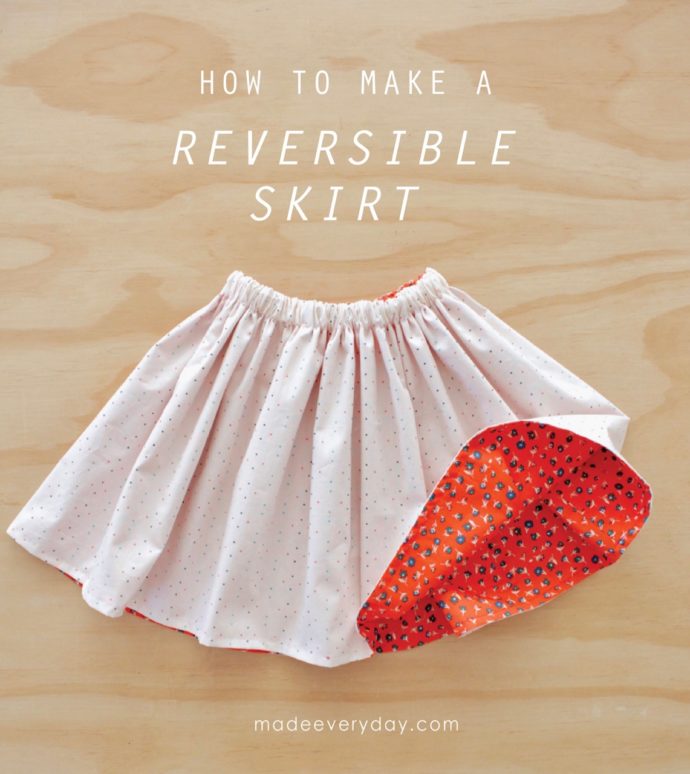 HOW TO SEW A REVERSIBLE SKIRT
Use a 3/8 inch seam allowance, unless otherwise noted.
CUT FABRIC
• Select two cute fabrics.
I used two prints from the EVERLASTING Collection.
I used quilting cotton for both layers, but you could use many different types of fabric for this: silky fabrics, lace, rayon, knits, etc.
I used 1 yard of each fabric, for my 7 year old daughter, with a 22 inch waist.
• CUT 2 rectangles of each fabric (see diagram below).
WIDTH of each piece = 2 times your waist measurement.
LENGTH of each piece = Desired finished length, plus 1 inch.
The dimensions of the skirt are up to you, but I think this skirt is extra fun, when it’s extra full. So I like to make the finished total width to be 4 times the waist measurement, which means you will cut each fabric piece 2 times the waist measurement.
For example: Measure your child’s waist, or your waist. My daughter has a 22 inch waist, and I want the finished skirt to be 15 inches long (from her waist to knees).
So I am going to cut 4 pieces (2 from each fabric) that are each 44 x 16 inches.
NOTE: It’s important that both skirts are exactly the same dimensions and size. If any fabric shifts as you sew, no worries. Just keep trimming and “squaring up” the pieces so they stay the same size as you go. This skirt is very forgiving.
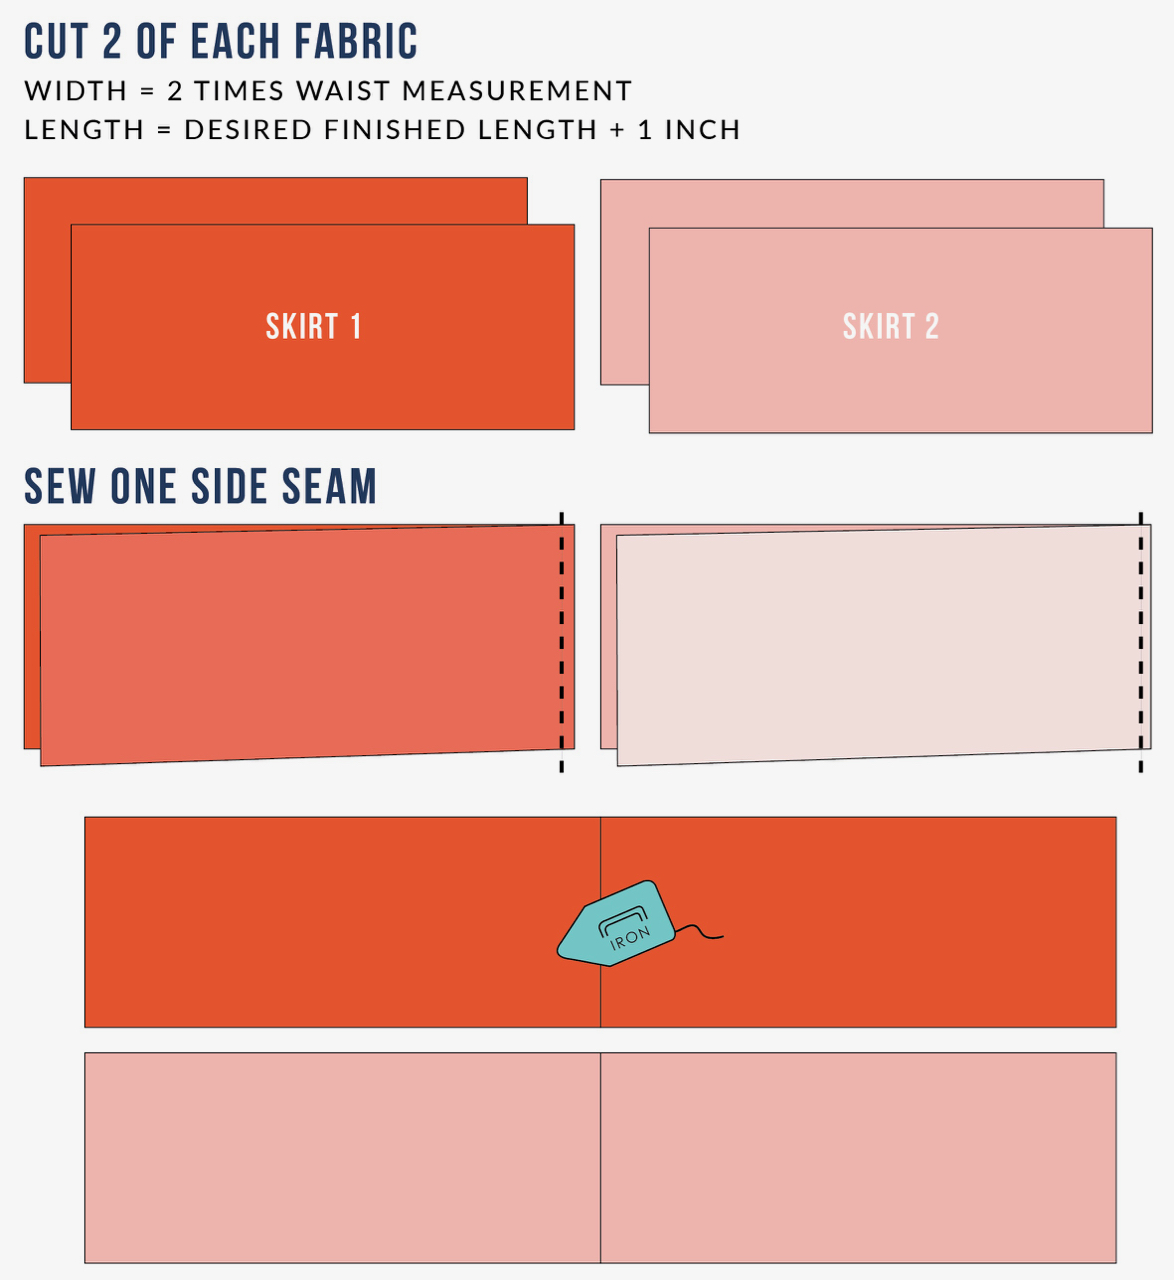 SEW ONE OF THE SIDE SEAMS
With right sides of the fabric together, sew the two Red pieces together along one of the side seams, and press open. Do the same for the Pink fabric.
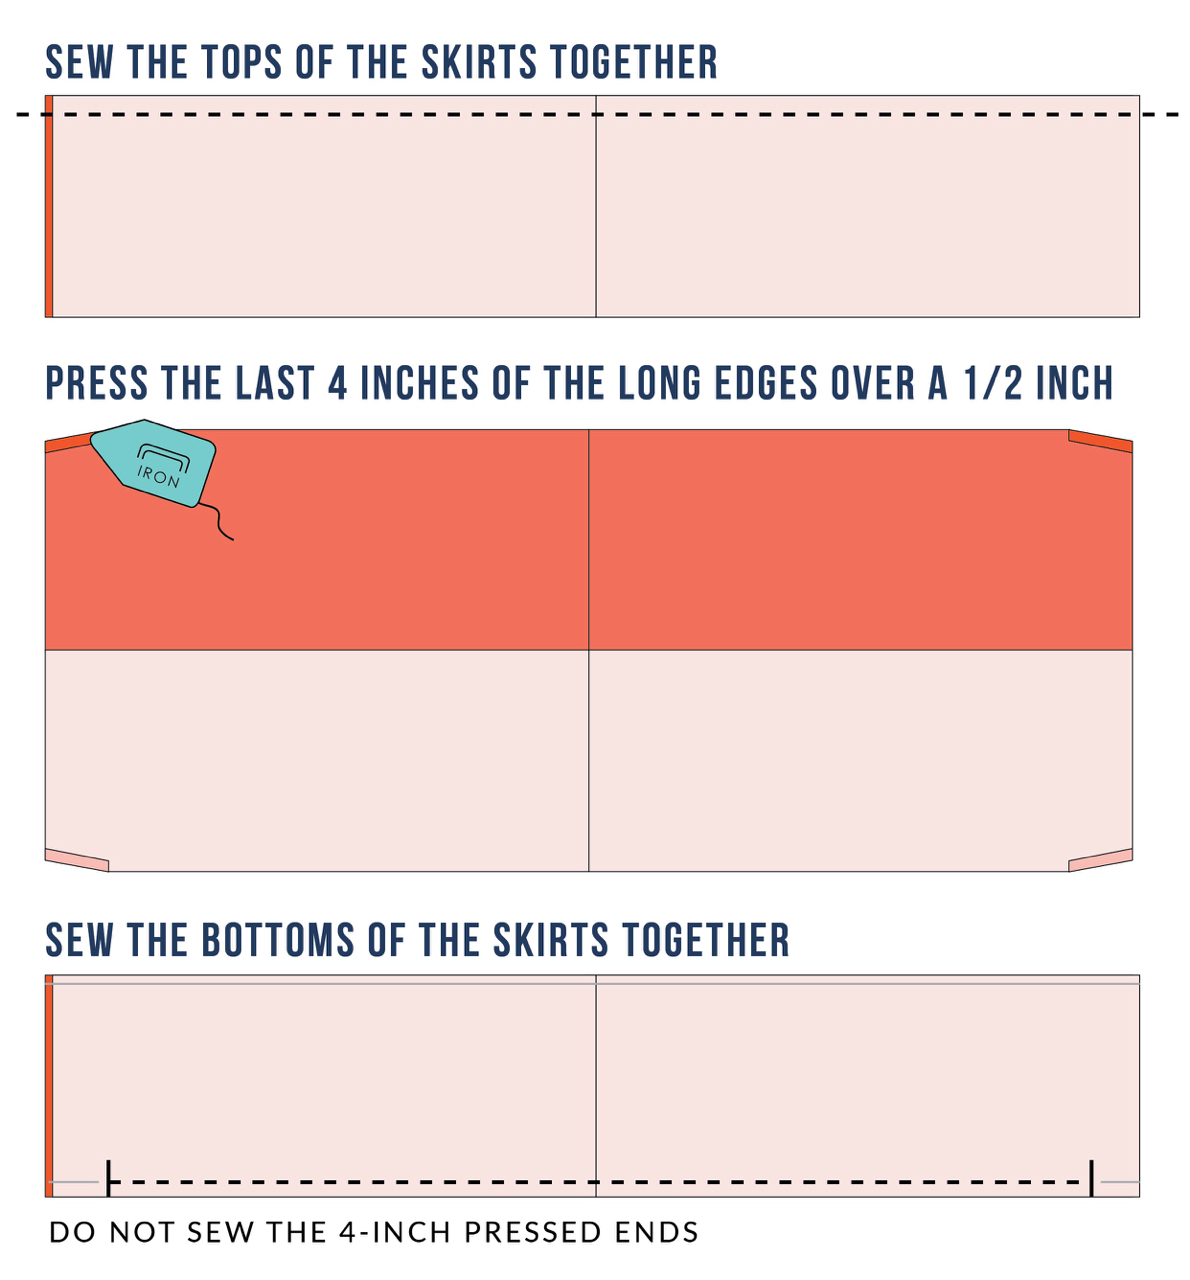
SEW THE TOPS TOGETHER
With right sides together, sew the two skirts together along the TOP.
Press the seam open.
Now press the last 4 inches of each of the long edges over, a 1/2 inch. This will help in a later step.
SEW THE BOTTOMS TOGETHER
With right sides together, sew the two skirts together along the BOTTOM….BUT DO NOT sew the 4 inch ends that we pressed under. These ends will create an opening for us in a later step.
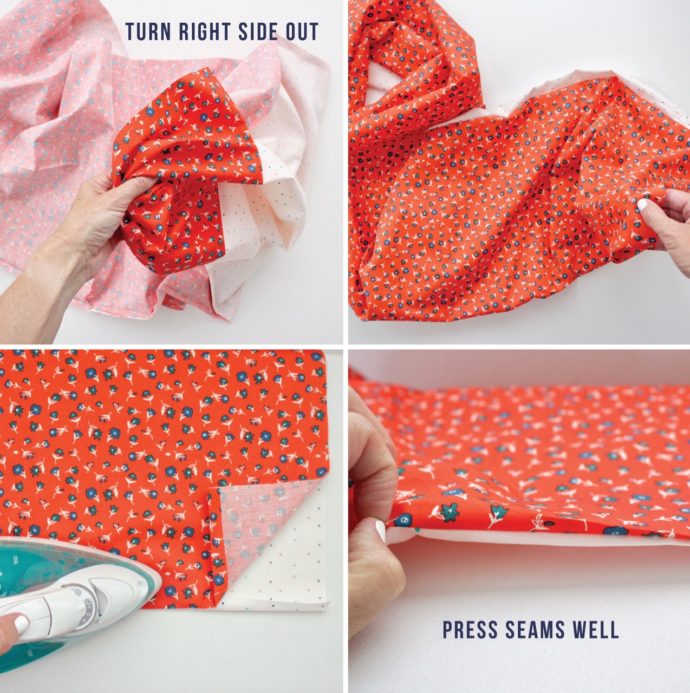
 Turn the whole thing right side out, and press the two long seams well. It’s helpful to get your fingernails in there and really pull out the seams, so you don’t have any subtle folds.
 SEW THE OTHER SIDE SEAM
This is the exciting part that makes the whole reversible process work. It will feel a little awkward to bring the remaining side pieces together, since they won’t lay entirely flat. But just do your best, and watch the sewing magic unfold!
Bring the two red sides together (with right sides of the fabric together) and pin in place. Continue pinning all the way down the side seam, along the pink fabrics as well. Then sew the side seam together. Tuck that seam back inside the opening we left at the bottom.
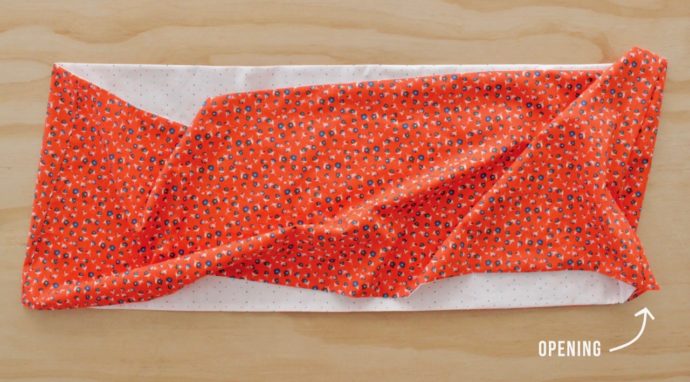
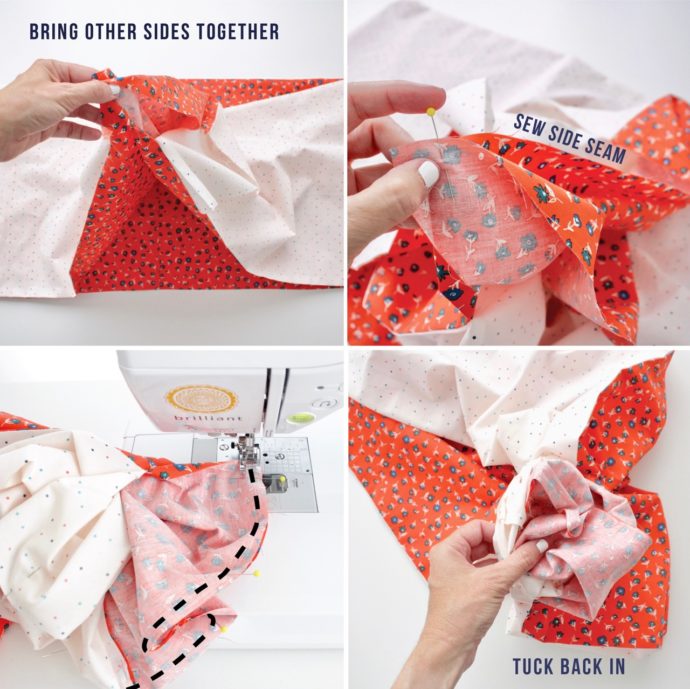 And BOOM, you’ve got a tube of fabric, double-sided, just waiting to become a skirt!
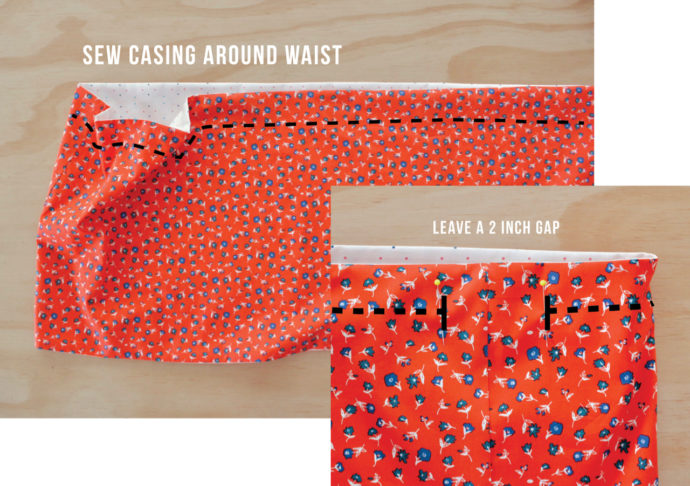
 SEW A CASING AROUND THE WAIST
Using coordinating threads for both your fabrics, sew a casing around the top of the skirt, about 1 1/4 to 1 1/2 inches wide. It just needs to be wide enough for your elastic to go through. I like to use 1 inch wide elastic. But if you wanted a really chunky waistband, you could use 2 inch wide elastic and sew your casing 2 1/2 inches wide. It’s up to you.
MAKE SURE TO LEAVE a 2 inch wide gap in the casing, so you can get the elastic in and out of the casing. I like to leave the gap on the side seam, so it’s on the same side as the bottom opening.
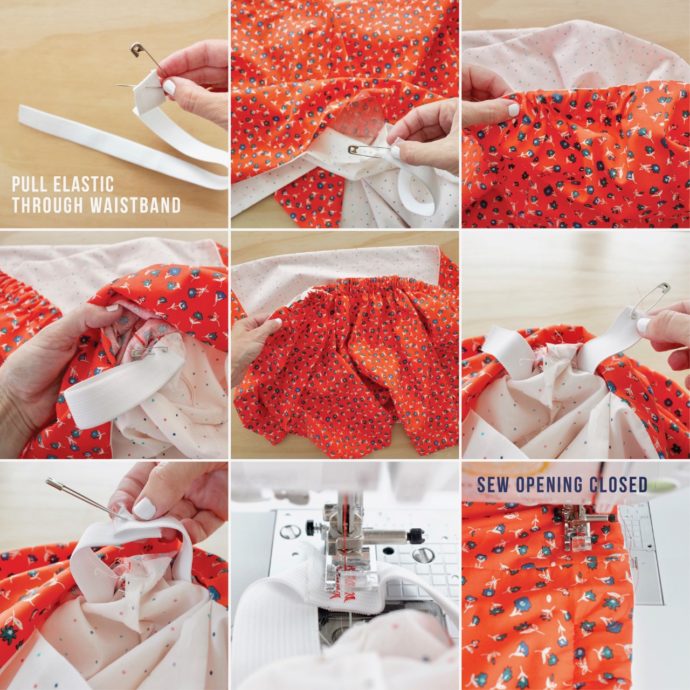
 STRING ELASTIC THROUGH THE WAISTBAND
• Cut the elastic the length of your waist. So for my daughter, I cut it 22 inches long. I find that this particular skirt tends to be slightly heavier than other Simple Skirts that I’ve made, because you have two layers of fabric. So a slightly tighter waistband helps it stay up better.
• Place a safety pin on one end of the elastic. Insert the safety pin through the opening at the bottom of the skirt, and start to string the elastic through the casing. Push the elastic through with one hand and shimmy/gather the fabric with the other hand. Secure the other end of the elastic to the fabric with another safety pin. Push the safety pin all the way around till it comes out the other side. The skirt will be very gathered. So just do your best to keep shimmying the fabric around and spacing it out.
• Overlap the two ends of the elastic about 3/4 of an inch. Make sure the ends are not twisted inside or out. Sew the ends together using a zig zag stitch.
• Sew the casing closed using a straight stitch, following the same stitch line we sewed earlier.
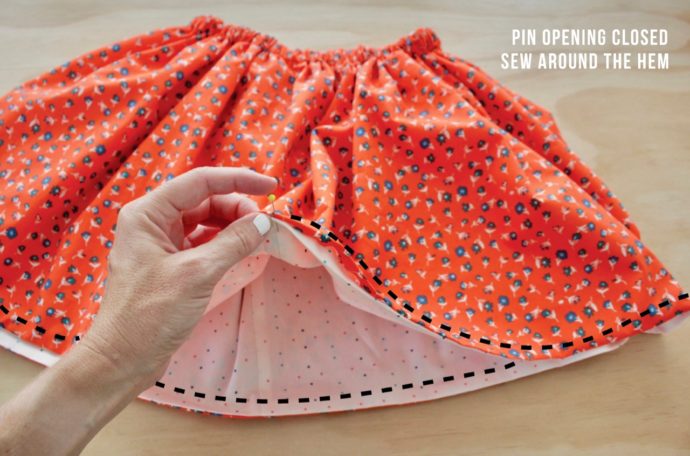
 SEW THE HEM
Final step! Pull those open edges of the skirt together. Make sure the raw edges are still tucked under (the edges that we pressed over a 1/2 inch in an earlier step), pin them together, and sew around the entire hemline, using a 3/8 inch hem allowance.
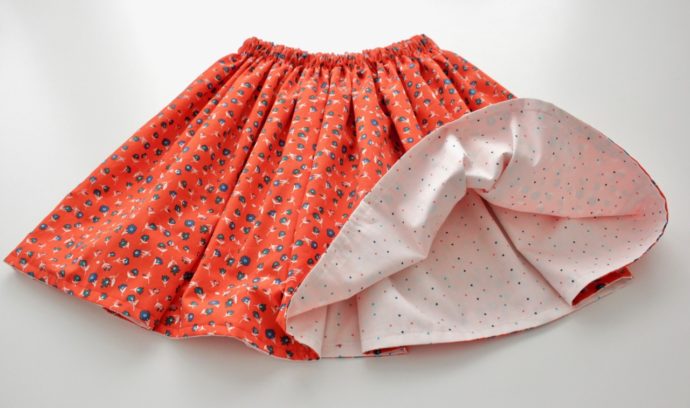
 And you’re done! Yay!
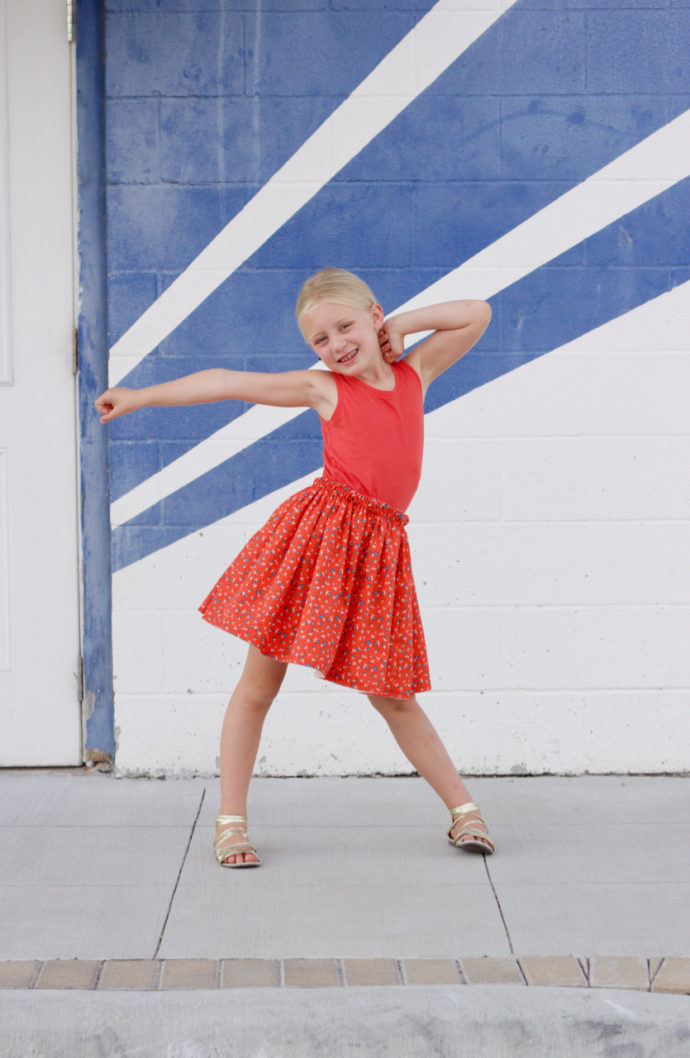
One adorable skirt, with two personalities.
 Check out all these other add-ons you can do with your skirt:
• Sew trims or rick-rack to the bottom
• Add a separate waistband
• Add a faux drawstring to the waist (though keep in mind, when the skirt is reversed, you will feel that on the inside of the skirt.
• Add a fun sash around the skirt
• Add outer pockets
• Make a skirt from an old scarf or repurposed fabric
• Add a monogram
• Use a unique fabric
I considered adding some lace to the bottom of the red fabric, which would have been adorable. But sometimes simplicity is my favorite option. Cause then you can accessorize the look with fabric braids. Ahhh. I need to try this in my own hair.
Thank you Sharon, for letting me be part of the Everlasting Fabric tour!
Sharon is hosting a fabric giveaway here if you want to enter!


I love your sweet skirt design, making it reversible is genius! Thank you for sharing!
Thanks Susan! I see many more of these skirts in my future 🙂
You know I can hardly stand how cute your stuff is!!! I cannot wait to make this for my granddaughter. Hopefully this will motivate me to clean out my sewing room so I can enjoy some sewing this summer! Super cute pics and that fabric trim braid is adorable! I will have to google how to do that to keep the fabric in when you start – (feel free to let us know how to do that – in your spare time of course….I know, haha) Have a great day, Dana.
Haha thanks Penny! Yes! This is perfect project to make for your grandaughter. And I’m glad you like the fabric ribbon in the hair. I think I will have to do a post or video on that, because now I’m thinking of all the options 🙂 I need to try it in my hair too! Have a great summer!
Love to see this in a video. I do much better seeing it And your videos are very explanatory. At least for me. I’ll be waiting for it thank you
Thanks for the input! I’ll add this to the videos-to-make list 🙂
I still have my have done reversible skirt ready to finish but can’t get it to the tube closing stage love for that video to come out thanks dana
Can you do a video for this too, i just love when you do the videos it helps out a lot more, at least for me it helps. thanks very nice by the way. i know my daughter would LOVE this.
That’s good to know! I’ll have to do that next time around 🙂
Love this ! Yes I agree your videos help so much. I hope you are able to do one for this skirt. That would be wonderful:)
Can you put these directions into a pdf so I can download and save? Or send directions to my email?
Hi Dana. I’ve just got back into sewing after many years , even threading the machine etc was a challenge. However I achieved this with perseverance and started a class at our local community high school. Then I discovered your website with clear blogs and demonstrate. I must say your enthusiasm certainly got me going also.
So just a little thank you and I’m going to try this reversible skirt. The PJ’s were so easy and the kids love them. I bought material with pirates on it.
Thanks again and I look forward to your next email
Aw that makes me so happy to hear Christine 🙂 I’m glad you’ve found joy in the sewing adventure. Have fun with your projects! And thanks for the comment!
I made this today, it is very cute. I ended up hand stitching the opening closed on the top. I didn’t see how you did yours?
Ah, Yes you can do it that way. I sewed my closed at the bottom of the skirt, when I sewed the hem (by machine). But it can be done multiple ways!
Oh Dana,
I love the good old written tutorials, l miss them! l started sewing by reading such tutorials, no PDF od videos back then. Shorts and Beach robes and Skits from Dana. And lovely pic of blond kiddos that are mu kids age. Yes they grew up super fast. Good old days… And lt’s been only 10 years….
Great reversible idea btw, l Love it!
Awww Thanks Tami. I miss them too. Haha. I’ll have to get back to them. I agree….I like to scroll and read tutorials more than other forms 🙂
I love this! Thank you for sharing the tutorial! I have two daughters, ages 5 and 2. I am picturing reversing the skirt if the one side gets a stain on it…lol!
I wish my daughter would go back to wearing skirts all the time! 8 years of skirts and now it’s all shorts/pants all the time. (Who am I to judge…I did the same thing as a kid and stayed that way for about 30 years! 😀 )
Another cute option is to make one color an inch or two longer than the skirt length and the other an inch or two shorter. That way one side gets a cute little pop of the contrast fabric along the bottom. (I usually leave the gap for turning on the top end when I do it that way.)
Oooo. I like the two-tone idea. Yes! Fun way to do color-blocking. Thanks!
Hello there. I love your Blog and your YouTube channel and I would like to know, how come you dont post on YouTube anymore?, your videos are very helpful.
I want to try your circle skirt for myself (This is the first time I sew anything and Im so exited.)
I love the tutorial! I miss seeing them on your blog so it was fun to have one again <3
Thanks Shantel 🙂 Life just keeps getting busy, but I hope I can blog more this year!
I just wanted to share with all of you that I made my first ever sewing project thanks to Dana!
I was able to make a circle skirt, it might not be the best one ever but it was my first.
Thank you Dana so much, I will be making more, Im going to try a simple skirt with pockets next, please make more YouTube videos they helped me so much.
Aw this makes me so happy to hear! Good job Annie! Thanks for sharing and have fun sewing more 🙂
I love the explanation!! Very detailed and I have already sewed a few of the skirts. Thanks, Dana.
Sweeet! Love hearing that 🙂
Hey, I was really impressed with the little girl’s dress making, I would really appreciate it if you could be sending me the latest tutorial on how to make dresses. Thanks again.
I could not wrap my brain around hoe you were sewing the short ends together.
Hi I have just brought the pattern for the summer dresses. But thought I would start with the little skirt! However I just can’t get how the short sides are sewn together. I have looked everywhere for a video of it…
Could you tell me where I could possibly find a video
Love your website and watching you make such great stuff thank you
Just curious why you fold over 1/2 inch and iron it when the Hem is only 3/8 of an inch? It seems like that section is shorter slightly than the rest of the skirt? Why not fold over those four inches at 3/8 in?
Hi Dear Dana!
I, too, love sewing. It soothes me in fact. But it’s a great challenge as well. Watching how you do your projects on the YouTube very patiently and neatly makes me all excited. I even sometimes watch a video twice or more just to be watching the whole project again and again and receive the same vibe as doing it by myself.
Thank you.
I hope you and your family stay safe and sound in this coronavirus outbreak.
Take good care.
Hi. What type of elastic do you use?
I prefer Knit elastic, but you can use other types also. For a child’s skirt I like 1 inch wide.
Absolutely gorge
I wanted to add another voice to ‘please make a video of this!!’ – I saw your most recent elastic waist circle skirt video and I think this is another easy one that beginners would love to just double check how to do. Thank you for all your hard work!
Shave that girls LEGS ASAP
Please shave the girl next time i puked seeing leg hair. Also she wasn’t bare legged.
I am REALLY having a difficult time understanding putting side seams together and making a tube fabric; double sided. Please provide a video
Thank you.