
 I’m so excited to share a new project with you!
DOWNLOAD THE FREE BAG PATTERN HERE
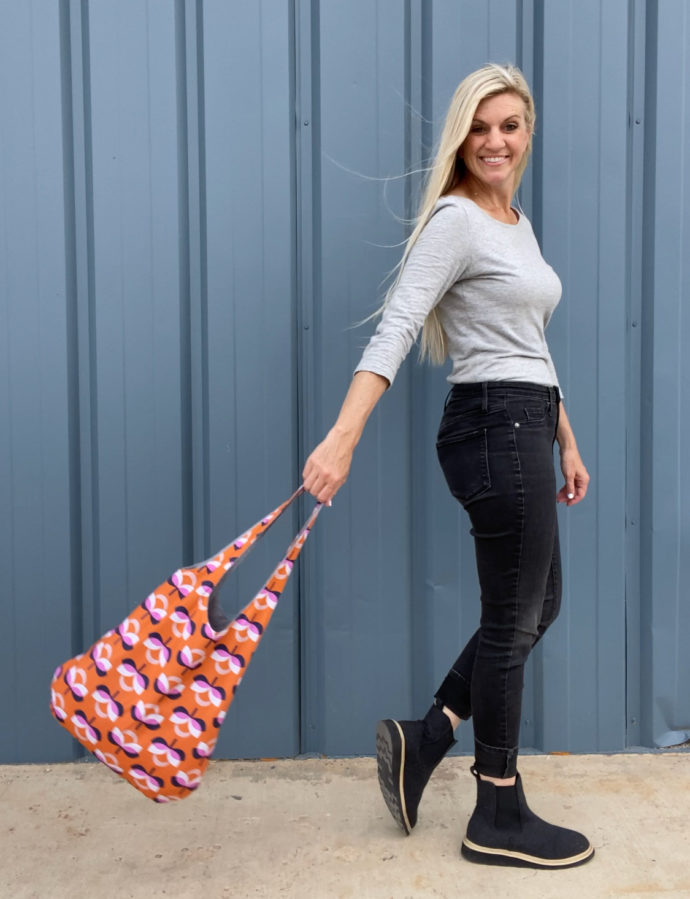
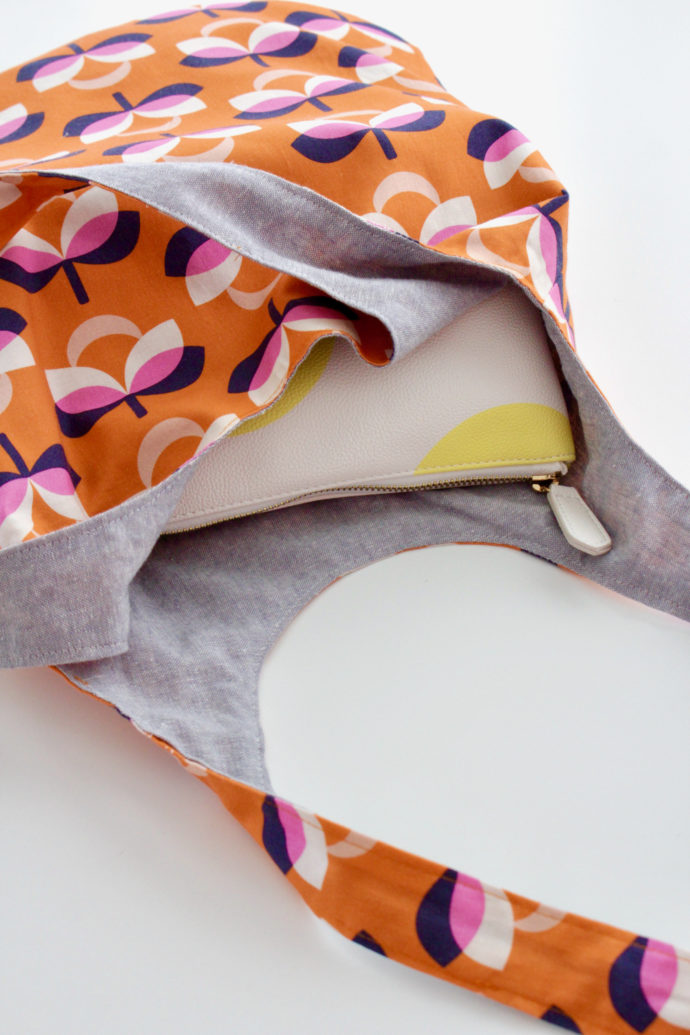
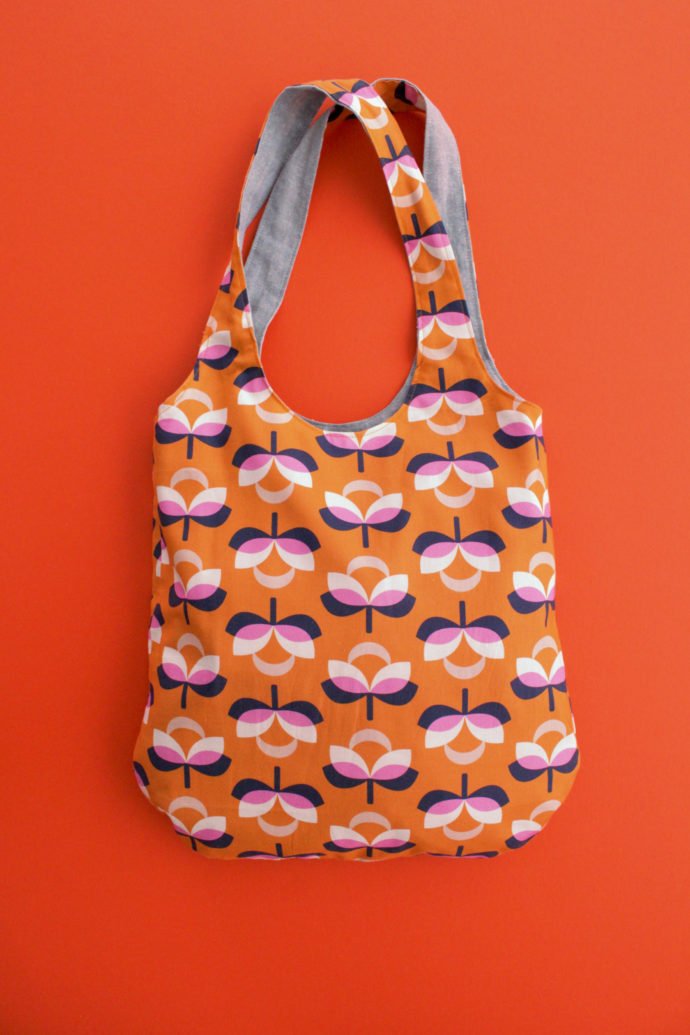
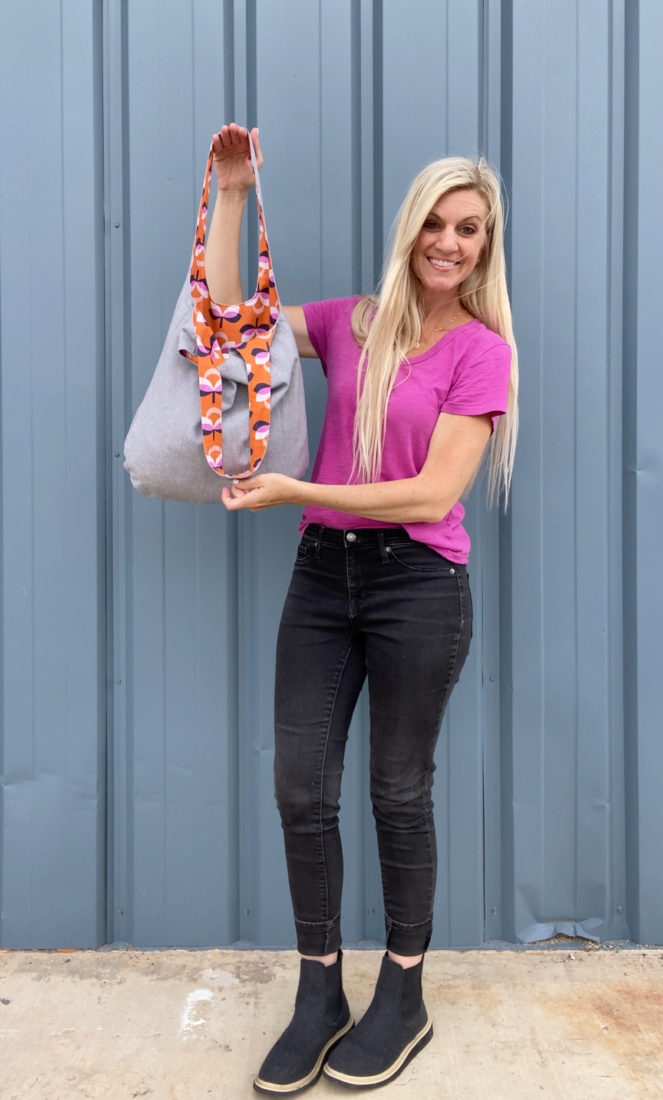
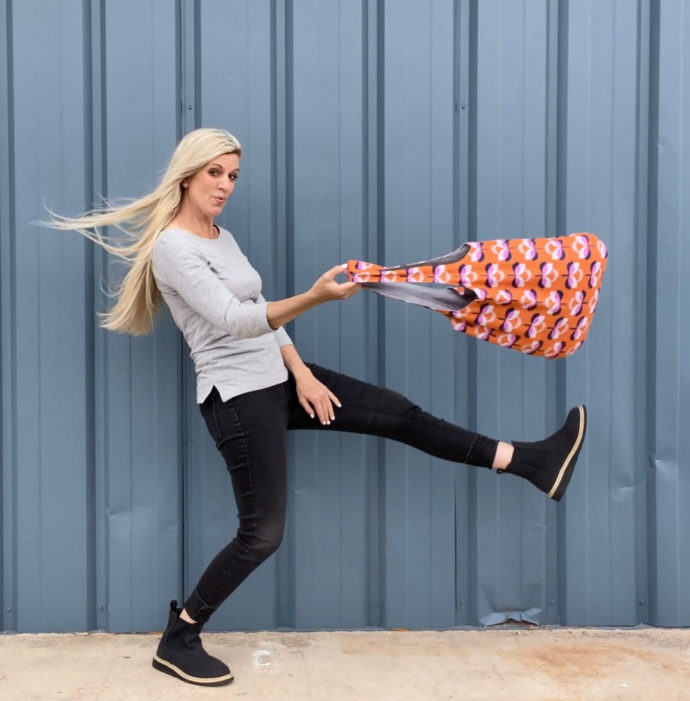
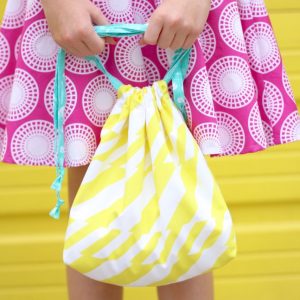
Oh how I love this bag! It’s a simple over the shoulder, boho style bag that can look casual like a book bag/grocery sack, or it can feel chic like a purse. It’s so versatile. And guess what??It’s REVERSIBLE. Yep. Y’all are often asking for reversible projects. So here you go! Two bags in one, using one of my favorite prints from my Butterscotch fabric collection with FIGO fabrics.
GET MY FABRICS: Do a search for “Dana Willard fabric”, check etsy.com, etc.
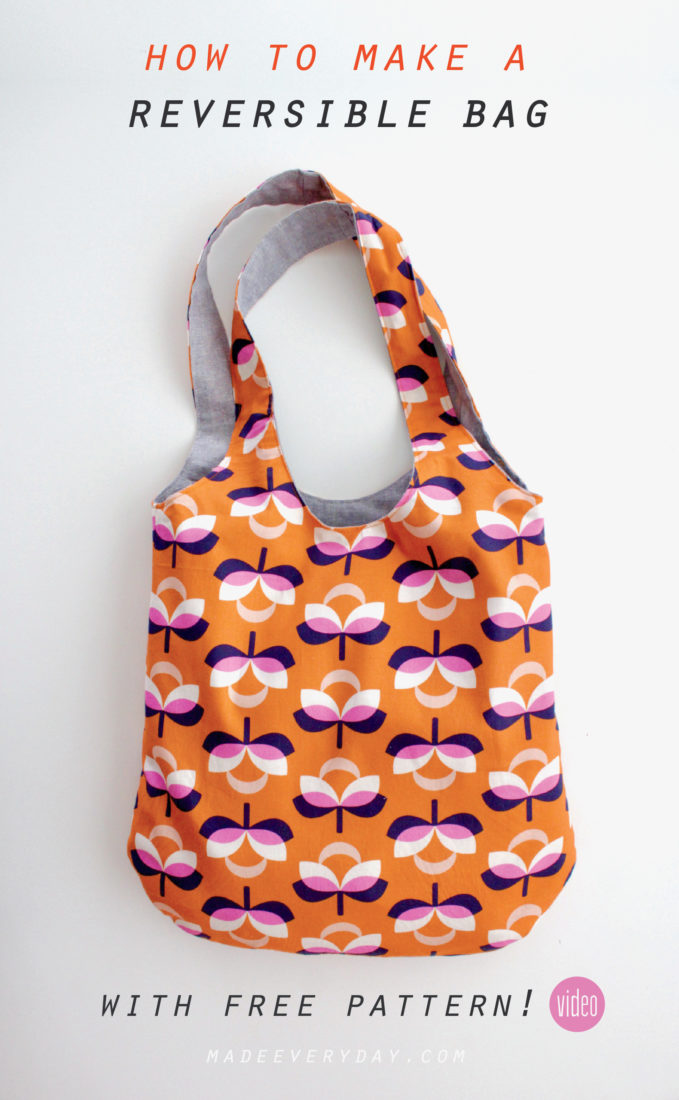

This project comes with a FREE BAG PATTERN.
(Click the pink button below).
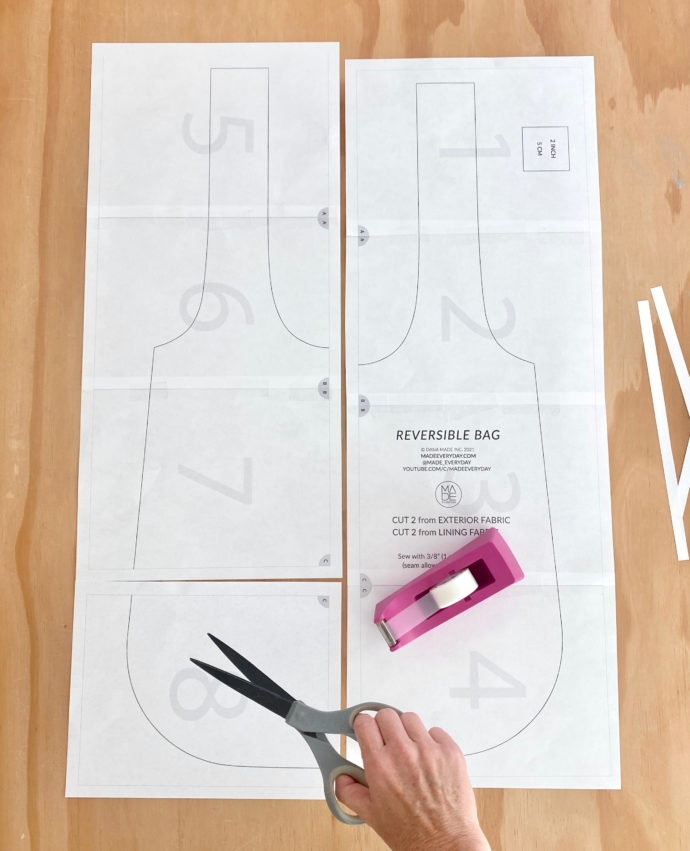
If you need help printing or piecing the pages together, watch:
“How to use PDF Patterns” here.

 FABRIC REQUIREMENTS:
• 1 yard for the OUTER bag
• 1 yard for the LINING bag
FABRICS TO USE:
• Quilting Cotton
• Linen
• Lightweight Canvas
• Denim
• Flannel
…get creative!
With your pattern pieces printed and ready to go, watch my step-by-step video for assembling your reversible bag. There’s a clever trick to the project that will make you feel like a magician when you do it. Love those moments!

IF YOU WANT STEP BY STEP PHOTOS, here are some bullet points (Please note, all the fine details are in the video):
• Cut out 2 Outer pieces and 2 Lining pieces.
• With RST (right sides together), sew the 2 outer pieces together around the sides/bottom. Then sew the the 2 lining pieces the same way. It’s like you’re making 2 separate bags.
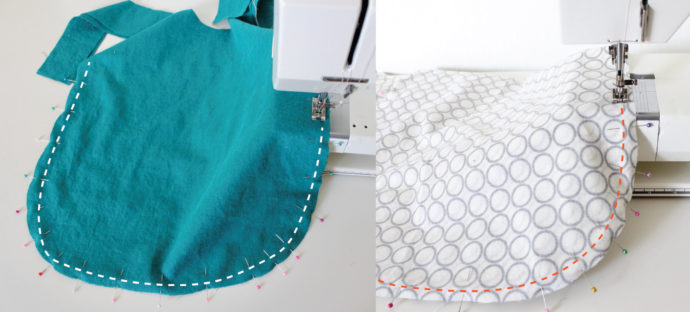 Refer to the next 4 photos below.
• Turn the Lining bag right side out and place it inside of the Outer bag (so the right sides of each bag are together), lining them up at the side seams.
• Measure down 10 inches from the ends of the bag straps (this is where you will start sewing in the next step).Pin the two bags together, staring at the 10-inch mark around the curved areas, to the other 10-inch marks. There are 4 areas: the curved areas around both side seams, the curved areas on the middle fronts of the bag (see video for more details).
• Sew around these curved areas using a 1/2″ seam allowance.
• Clip the curved areas so they will lay flat. Be careful not to clip into the stitch line.
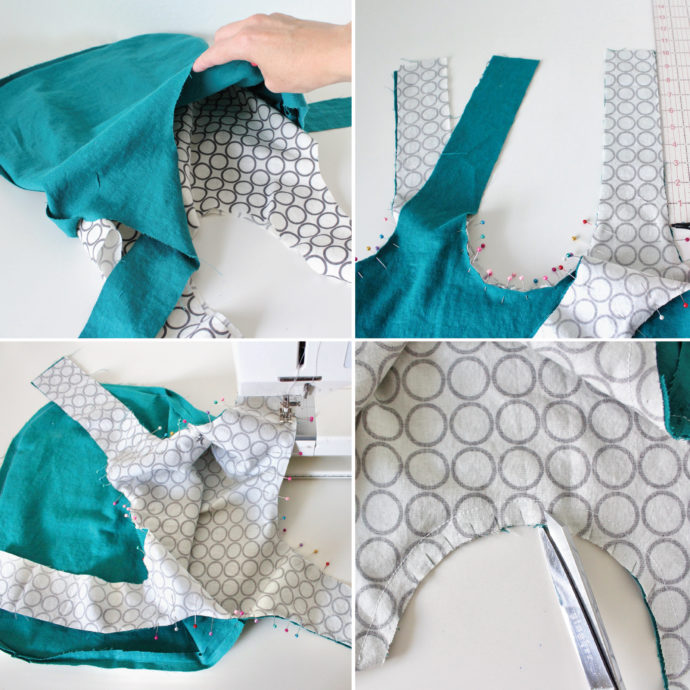 Refer to the next 6 photos below.
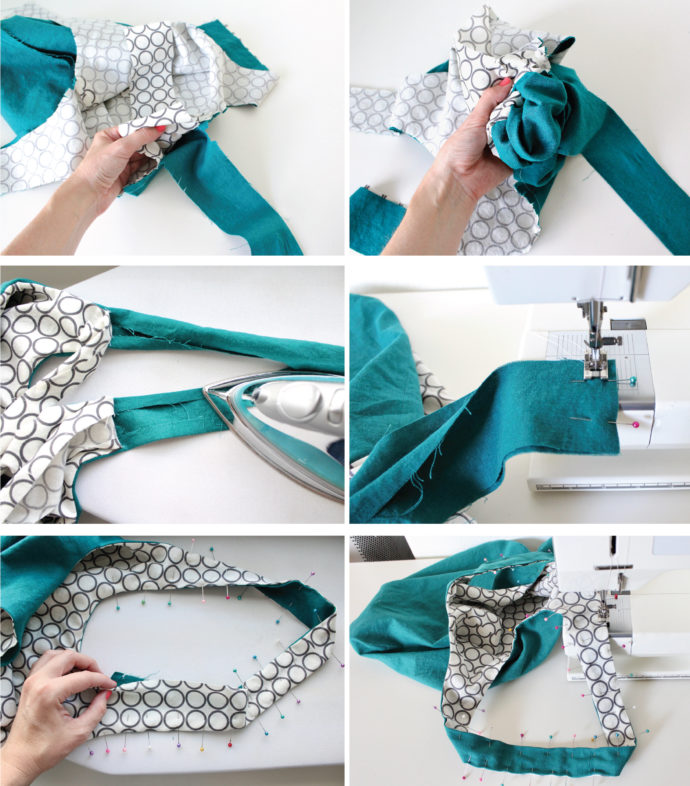
• The Fun Tricky part! – Carefully turn the whole bag right side out by pulling the bag through one of the strap openings. Just do it little by little. At one point it will “give” and easily pull the rest of the way out.
• Press the edges of all 8 straps under 1/2″. They will naturally want to fold under. Make sure your straps are the same length (trim any excess if needed) and sew the ends of 2 Outer straps together, the other 2 Outer straps together, 2 Lining straps together, the other 2 Lining straps together. Refer to the video here if needed.
• Match up the edges of the Outer and Lining straps together. Pin them together, and top stitch around the inside of the straps and the outside of the straps, closing any openings in the bag straps.
 And you’re done!
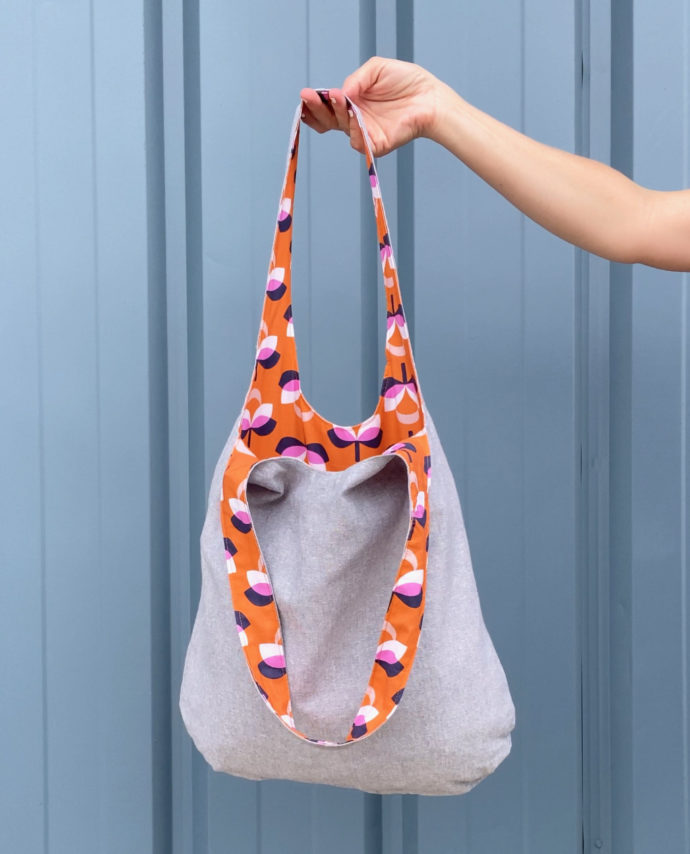
Enjoy your cute little bag on the linen side, or the dot side!

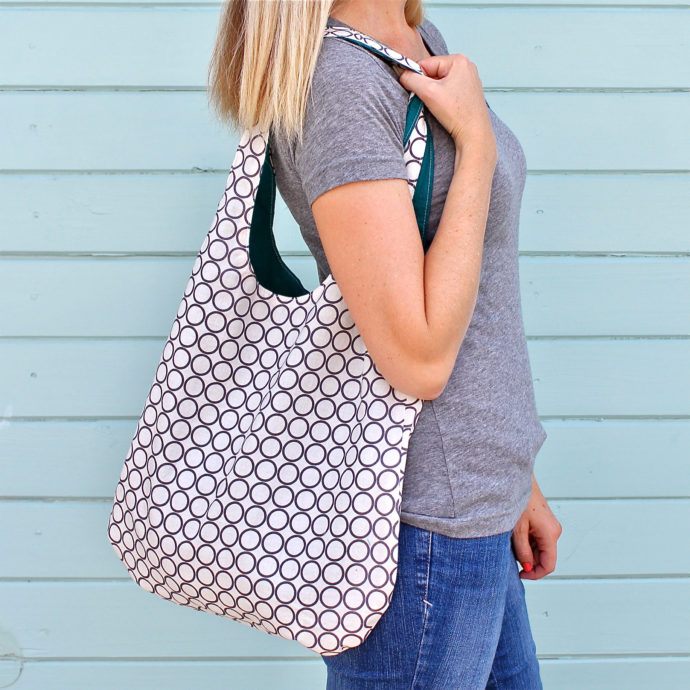 And fill it with all your favorite things.
This is such a great bag to make for a gift or to just have on-hand for yourself!
 If you share your photos online, please share with me! You can tag me at:
@made_everyday
#madeeverydaypatterns
Have a great day!


Where can I download the instructions for the REVERSIBLE bag please?
The download link is right under the first photo. It is hilighted in orange. ( I missed it at first too!)
Thanks Martha!
Perfect!!
Hi yes, the pattern is linked in a few places:
• the orange text at the beginning of the post
• the big pink “download the free bag pattern” button
• other links in the post.
Hope that helps! Have fun sewing a bag!
are there printable instructions for the reversible bag? thank you.
Thanks,this is brilliant
My email is in the U.K. and it’s all lowercase
Thanks hope it comes soon
What type of fabric do you choose. Please
Hi Dana,
Thank you so much for sharing your pattern, I can’t wait to make these they are so adorable.
Thank you
Terry B.
Thanks Terry! Have fun making one! I’m already excited to make another…maybe with my new Christmas fabric 🙂 haha.
Merci Martha
Your tutorial is great with all the photos. Very easy to follow each step.
Also, the template is excellent. It is easier to cut a pattern.
Merci
Yolande
Oh good! I’m glad the photos are helpful too! It’s nice to have both options. Sometimes I just want to scan photos real quick, and then go to the video for all the fine print 🙂 Have fun sewing!
I’m sorry, it does fit! Thanks! Sometimes I just wake up on the wrong side of the bed! I’m anxious to cut it out!
SUPER – DUPER CUTE!! BOTH THE FUN BAG AND THE FUN YOU!
THANK YOU FOR THE GREAT PATTERN – CAN’T WAIT TO MAKE SOME FOR FRIENDS AND FAMILY.
THANK YOU, AS ALWAYS, FOR YOUR GENEROSITY IN TAKING TIME TO SHARE THIS.
HAPPY SUMMER EVERYONE!
Penny thank you!! I love hearing from you! Happy summer to you too!!
Hi, I just finished sewing this bag. My first pattern ever made from a download. I’m so happy how my bag turned out. I added pocket on one-side of the bag and it turned out great. Love your videos! And thanks for this free and easy pattern! I wish I could share it here. I don’t know how to.
Oh my gosh yay!! You made one! I’m so happy about that 🙂 Have fun making more bags! You can tag me on instagram if you’re on there: @made_everyday. Or you can email me a picture of your bag at: dana@madeeveryday.com I’d love to see it! Good job! 🙂
thanks so much for this bag pattern!!!! i took some time for myself and made one and i love it!! totally cheered me up 😊
Hooray!! I’m so glad you made one Jan. Yay!! I love that excitement of making a project right away. Thanks for sharing with me and have fun sewing more!
I do not see how much fabric is needed anywhere? Am I missing it?
So sorry about that! I just included that in the post.
1 yard of the Outer Fabric
1 yard of the Lining Fabric
Thank you so much for making this free pattern! I made one already and love it:)
Oh that’s so awesome! Great! I need to make another one too 🙂
Have fun making more!
I can’t wait to try this bag. Love all of your patterns and video tutorials. They are so easy to follow, and really enjoy your personality! Thanks for making this pattern free! 🙂
Oh good! Thanks Megan! That makes me so happy to hear! I hope you have fun making a bag….or two or three or four 🙂
I made the BOHO Bag it took me 3 hrs. lol That’s because I kept getting distracted so much that I forgot to sew the straps to make the circles😫So I had to sew them together. Every one tells me it’s cute I made it with dog prints for the outer part and light blue for the inter lining. It still reverse oh. And today I made the scrunchy perfect 😅.It’s of the same print of the bag.
Oh how fun! Yay!! Good job Juanita! Yes, it’s easy to get distracted when I’m sewing too haha.
If you share it online on instagram, tag me! I’d love to see!:
@made_everyday
Or you can email me a pic: dana@madeeveryday.com
Thankyou for this lovely pattern. I printed out the pattern and there are two bag patterns. Pages 1-4 is one and the other is pages 5-8.
Is one for the outer material and the other for the inner??
Thanks again 🙂
There’s just one bag pattern….all 8 pages piece together to make the one pattern. Some bag patterns are just 1/2 of the bag with a FOLD marking, so that you cut each bag piece on the fold. But I thought it was easier to print the entire bag, so you don’t have to fold fabric….and you can easily cut out two layers of fabric at once.
Hope that makes sense! You can see it more in the video.
Have fun Michelle!
Thanks a million for the pattern I am making them in African print
Oh that sounds really cool! Have fun sewing!
Dana
brilliant pattern. Thank you
Hi, I made the reversible bag, love how you give directions to make it easy, even for a novice sewer like I am. I was wondering about HOW to make the handles longer. Would it work to just add about 8 inches, or is there some other adjustment that would need to be made. I am thinking the turning it right side out might be a bit more difficult with a longer handle. Thanks!!
Oh good! I’m glad you’ve had fun making them!
Yes, you could just add more length to the straps and make it a longer bag. Totally works!
I have clicked on all the orange highlighted words and have yet to find the instructions. All I find is the pattern, which there must be at least a half dozen all for downloading the pattern but not the instructions. Please, are there any printable instructions?
Hi Lorraine,
The instructions are in the video! Just download the printed pattern piece and watch the detailed video here:
https://www.youtube.com/watch?v=vEJyKZZFhsc
I hope that helps 🙂
Are there printable written instructions?
Hi Rosie,
The pattern pieces are printable, but the detailed instructions are in the video!
You can watch that here:
https://www.youtube.com/watch?v=vEJyKZZFhsc
I hope that helps 🙂
HI,
IF I WANTED TO MAKE IT SMALLER FOR MY 5 YEAR OLD DAUGHTER, HOW WOULD I ADJUST THE PATTERN?
THANKS!
I love this bag. I think it would be helpful to point out you need 60” width fabric if you’re only buying 1yard, right.
You are very kind and generous sharing the pattern and instructions. Thank you. great lockdown project for me and christmas presents!
Oh good! Have fun sewing!
Hi Dana! Love this super easy pattern! I Do have one tip for you. I tried sewing one of the straps at 11 inches instead of 10. It helps a great deal when turning the bag right side out. So far I’ve made 4 of these bags. My daughters LOVE them.
Oh good! Awesome to know thanks!
And wow. Fun that you’ve already made 4 bags. Love it!
Dana
This is such a great idea! I love it! Thanks so much! 😄
Ikr!! 🤩🤩🤩
I loved this so much. I didn’t think I could make it but I did. It’s beautiful. I made straps much longer so that I could make it a crossbody bag. Thank you
Oh that makes me so happy to share! Yay! Good job Brenda 🙂 🙂
I liked watching you making the bag. As a suggestion it is easier to leave an opening on the bottom on one side, sew it all around and then pull it through and just close the bottom. Just wondering if you agree with me on that.
I make and sell them. Thanks for showing an fantastic bag!
Thanks for the info. I’ll have to try that out. Where it gets tricky is the way that the straps are sewn in a circle. But I’ll have to give it another shot!
Janna, I’ve always wanted to be able to do that method but every time I try I get myself into a mess that I can’t find my way out. I know I did it that way once but I can’t remember how I did it. 🙂
Thanks so much for your pattern. My students love using it!
To those who have used this with students, how much time did you schedule, or time it took beginners to complete this? And, were there any issues you encountered that I can be on the watch for? Thanks in advance!
I love the pattern (thank you!) and your tutorials (video AND pics) are fabulous! Thanks so much.
I love this bag and have made it several times now – looks so good when you finish and is a really lovely gift! Thanks for the great video which really helped me the first few times I made it!
Love it!!!!
Thank you thank you thank you! I love this pattern! It’s so quick and easy, and super easy to modify smaller or bigger. I made one about 1.5 times wider, big enough to hold a small load of laundry 😀
The first bag I made was out of jacquard and cotton, and I was brilliant and added a pocket to the jacquard side. I nearly couldn’t pull the pocket through the strap hole, but I did it!
I’m hooked on this bag. I think everyone is getting one for Christmas.
And I LOVE how you set up the PDF, with the quarter circles and watermark numbers. SO EASY!
I was looking for a bag pattern that wasn’t the traditional square when I saw your video on YT. I am determined to only gift handmade this year and this bag will now be a perfect gift for several people while helping me use up fabric stash. Thank you!!
Thank you for this! Whenever I’m looking for a good sewing tutorial I come back to your site again and again. I’ve appreciated your instruction for the past 15 years. Made this bag for an easy and useful birthday gift for a friend. Will definitely be making more!
I love your pattern. Thank you for sharing.
My daughter (11) has been wanting to sew a bag and I happened across your video. This was the PERFECT starting project for her (well us ~ since I never really learned how to sew). Thank you!
Is there a reason why you could not tape together pieces 1, 2, 3, and 4 and place the straight edge on the fold to cut out the pattern?
hIHI, THANK YOU FOR THE SUPER EASY PROJECT! PERFECT FOR A SUNDAY AFTERNOON TO CHASE AWAY THE SUNDAY GLOOMS. SCOUTING AROUND NOW FOR ANY STRAY FABRIC TO MAKE ANOTHER ONE… I THINK I WILL BE MAKING A FEW OF THESE…..
BEST WISHES
LISA R
áóóás, cuando tus clientes busquen información sobre ti, verán tu relevancia y preferirán elegirte por encima de la competencia.
¿Podrías proporcionarme un número de teléfono para ofrecerte dos meses gratuitos?
Gracias.