 Nothing’s cooler in the summer than a simple cotton skirt. And this one is so easy to make, you may end up with every color in your closet.
 The concept here is simple: We’re making the Summer Vacation Dress pattern into a skirt! Duh Dana—it took me a while to catch on to this one. Use the basics from our pattern (or your own skills from making a shirred cotton dress) and use that as the foundation.
 Since the bulk of this tutorial explains the Deep Pockets for the skirt, I’ll just touch on the skirt basics with bullet points….
FABRICS choices:
Light-weight cotton
Light-weight Linen
Light-weight knit
Gauze
* Always pre-wash and dry fabrics
* I used 1 yard of light-weight cotton, cut into 2 rectangles, appx 34 x 22 inches each.
* Using Elastic Thread (explained in the Summer Vacation Dress Pattern), shirr about 13 rows of elastic thread from the top of the skirt moving down, appx 1/2 inch from each other.
* Spray your shirred rows with water and iron (this causes them to shrink up even more)
* Sew both skirt rectangles together on each side.
* Add a label to the back for fun:
 * Finish off the hem.
* Finish off the waistband. You could just leave the waistband as is; the way it would look on a shirred Summer Dress. But it may feel bulky or stick out in a ruffled way. I discovered a great solution for this on a similar skirt sold at Target (which is where I also got the idea for the deep pockets!) Sew the top of your skirt over a bit to create a casing:
 Then thread skinny 1/4 inch wide thread all the way around the waistband, back out. Sew the two elastic ends together and sew the casing closed.
 When you’re done, the skirt top will look something like this and should lay a little better on you:
 Okay, now that you have a skirt, you can skip off and have a nice summer (since you look cute already). Or….stick around and we’ll add Deep Pockets!
Some people love skirts. And though I do too, I usually shy away from them because they’re often without pockets and I hate running into the store without a place to quickly stash my keys
 But….Deep Pockets easily solve that problem, while adding an extra touch of style. So let’s make them!
I made mine in the same red-orange cotton. It would also be cute to make them with contrasting fabric colors, or a cotton print, stripe, etc.
Start by downloading and printing off the Deep Pocket Pattern found HERE.
Fold your fabric and place the pattern on the “fold” where indicated.
 Cut two pockets from the pattern piece.
 You also need to cut rectangular strips, appx 7 x 1 inches each, for the top of each pocket. A rotary cutter and ruler works best for this. (in retrospect, it would be easier to cut one long strip and then cut it in half after ironing, below)

 Iron each strip in half, then iron each side in, like you’re making bias tape:
 When you’re done, you should have two 7 inch strips like this:
 Okay, put the strips aside and let’s gather the pocket top.
Start 1/4 inch from the pocket top and with your machine on the longest stitch, sew a straight line all the way down the top. Do NOT do a forward/back stitch at the beginning or end of the line:
 Sew a similar line 1/4 inch over from the first line. Make sure you don’t cross the lines as you sew or it won’t gather properly.
 Gather the pocket top by pulling the top strings of each line (or the two bottom strings but be consistent with which side you’re pulling from).
 As you pull the strings, shift and push the fabric down and even out the gather until you have 7 inches of gathered pocket top.
 Iron the gathered fabric down. This makes it easier to sew the bias tape on top.
 Then taking each “bias tape” strip, sandwich the pocket top inside of the strip,
 pin it in place,
 and sew it down:
 If any of your gathered lines poke out from under the top, use a seam ripper to discard them.
 Okay, so far, your pockets should look like this:
 Now we’re going to gather a portion of the bottom of the pocket. Measure about 4 inches down from the top of the pocket and pin a starting point. Do the same on the other side and pin a stopping point, 4 inches down from the pocket top:
 Then using the same method of gathering above, start at the Starting point and sew a line 1/4 inch from the edge. Go all the way around to the stopping point. Do NOT do a forward/back stitch at the beginning or end of the line.

 Sew a similar line 1/4 inch next to the first line. Then, pulling two strings from either the top or from the bottom…..gather, shift fabric, and continue until the gathered portion is about 8 inches in length.
 You pocket should look something like this, folding under at the bottom gather:
 Starting at the top of the pocket, iron over the unfinished edge appx 1/2 inch. Go all the way around to the other side of the pocket. If it’s difficult ironing where the gathers are, you can simply tuck the pocket edge under as you pin it on (instead of ironing):
 When you’re done ironing, lay the pocket on your skirt so you can eyeball good placement.
 When you find a good spot for one pocket, measure it and use that same distance for the pocket on the other side, so they’re symmetrical:
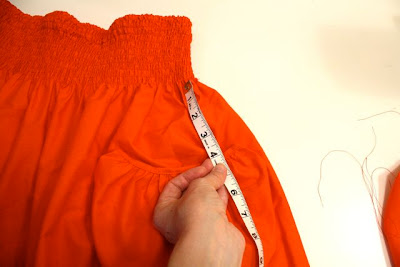 Then pin each pocket in place.
 This will be a little awkward when you get to the bottom of the pocket, where the gather is. The pocket will balloon up in the middle. Just push it aside as you’re sewing, so you don’t sew that into the pocket. You want this ballooning; it’s what makes the pockets “deep”:
 Once your pockets are spaced evenly, you’re ready to sew!
 Starting at one side of the pocket top, sew around the edge of each pocket, very close to the edge (about 1/8 inch) and around to the other pocket top:


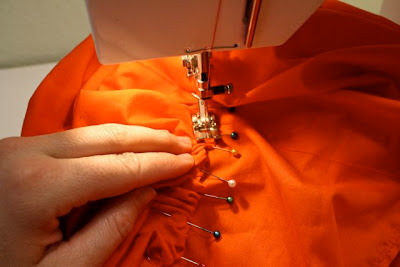 Iron down the pockets so they lay flatter:
 And….you’re done!
 Enjoy your skirt,
 enjoy the pockets,
 and mostly, enjoy your summer.







Hey there! I just tried to access the pocket pattern and it appears that the link is broken 🙁
Hi, i ran into the same thing…link appears to be broken….if you can re-post i would be very grateful! thanks!
What kind of lovely orangeish red fabric did you use?
Love this tutorial! Thank you so much. Great pictures, and really helpful explainations. Deep pockets are fun. I’m thinking I will be living in this skirt this summer.
I used an old grey bed sheet for my skirt. Also, I made the wasitband from grey cotton leggins. (I like to upcycle, can you tell?) So there is no shirring, but rather a stretchy elastic waist.
Dana – What a fun skirt! I am hoping to make it too but like the other ladies said – I’m not able to get the pattern pieces. Any tips? Thanks!
I’m going to give this cute skirt a go. I’m not sure how wide to make my rectangles — I can tell from the photos that my waist is larger than yours. Ideas?
I bought said skirt from target and wore it ragged! It worked great while pregnant too! Can’t wait to make this skirt, or 10 of them!
To make a custom size, measure your hips and multiply that number by 1.75. Than divide in half to ge the amount for each rectangle of fabric 🙂
*get 😛
How would you suggest making a skirt like this longer? Or any of your skirts in your tutorials?
I just made a very similar skirt (love the shirred waistband), but with traditional pockets. I think I need to make another with the deep pockets. Too cute.
Adddddorable! And the red is simply wow! You look gr8! And so does your little man!
Super idea, am gonna try it for sure. But wonder if I can get the same depth if I leave the bottom without gathers? What do you think?