
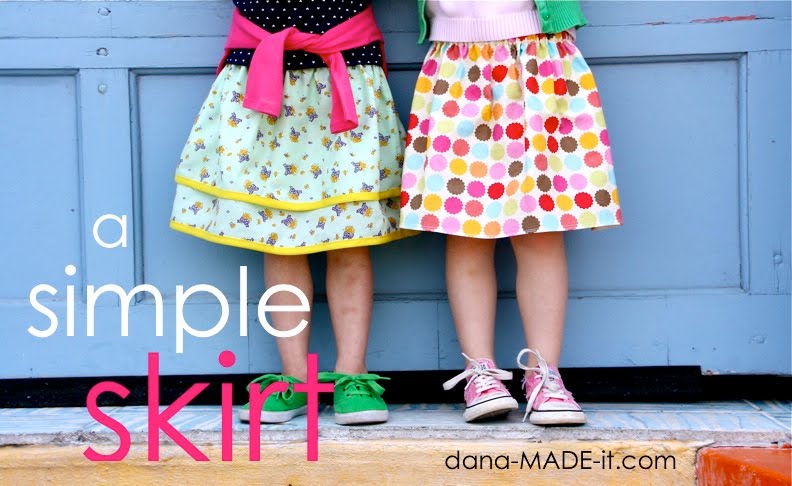
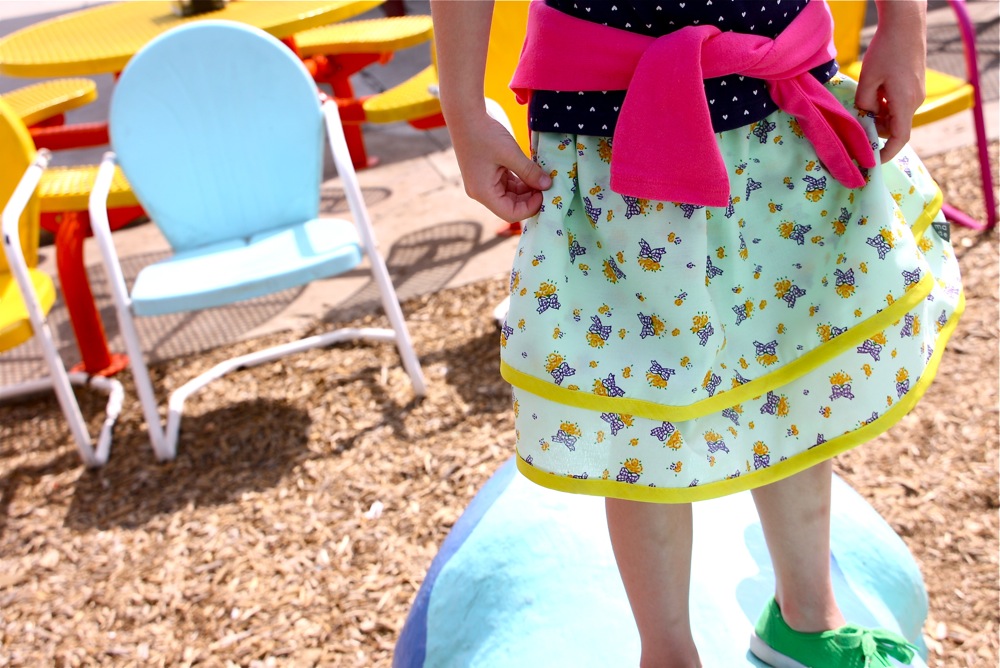
With spring and summer upon us, it’s time for skirts! And making cotton skirts for girls (or yourself) is so very simple.
 The concept is nothing new. We’re making a simple gathered skirt, with an elastic waistband.
And we have a fantastic MADE Everyday episode if you’d like to see the process in-action!
Just hit the Play button below [or continue reading after the video for the standard tutorial]:
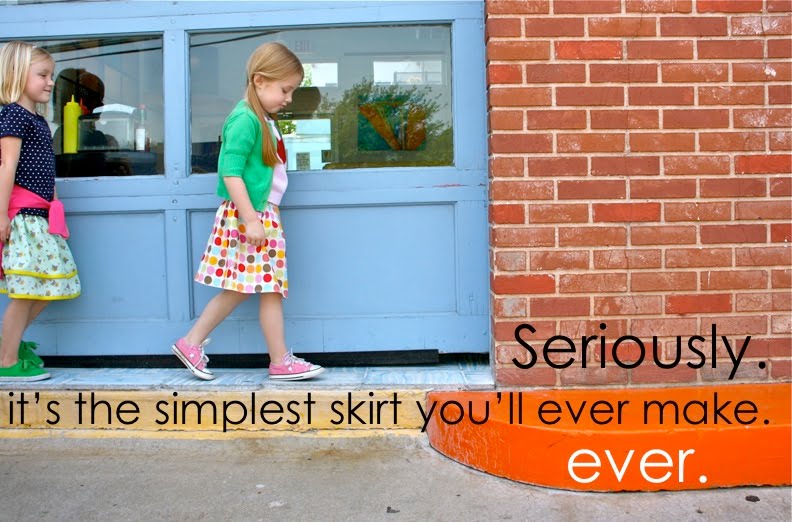
If you’ve made a gathered skirt before then you know how easy it is. And if you’ve never made one before but have always wanted to….this one’s for you!
It’s…….

 It’s lightweight and bouncy.
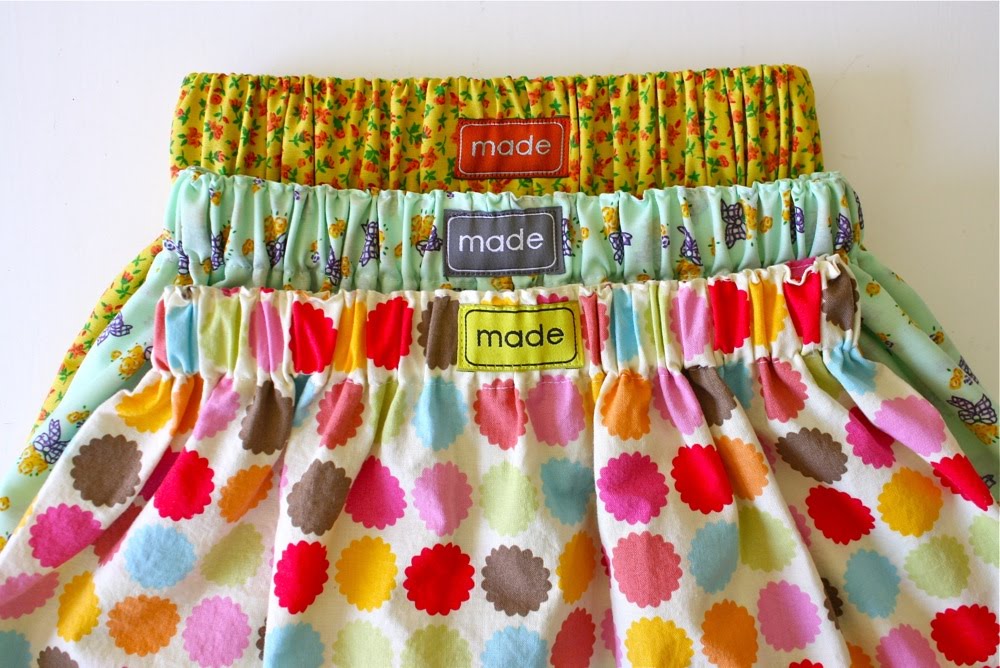
Perfect for playtime,
 for sharing ice cream,
 and sharing secrets.
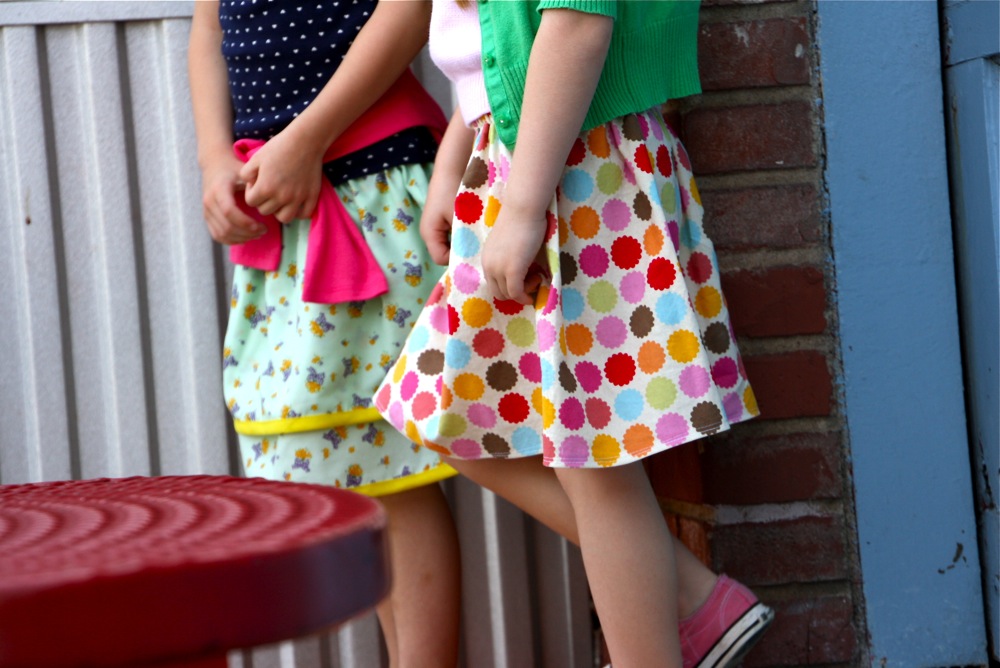
 It’s a skirt that’s just, you.

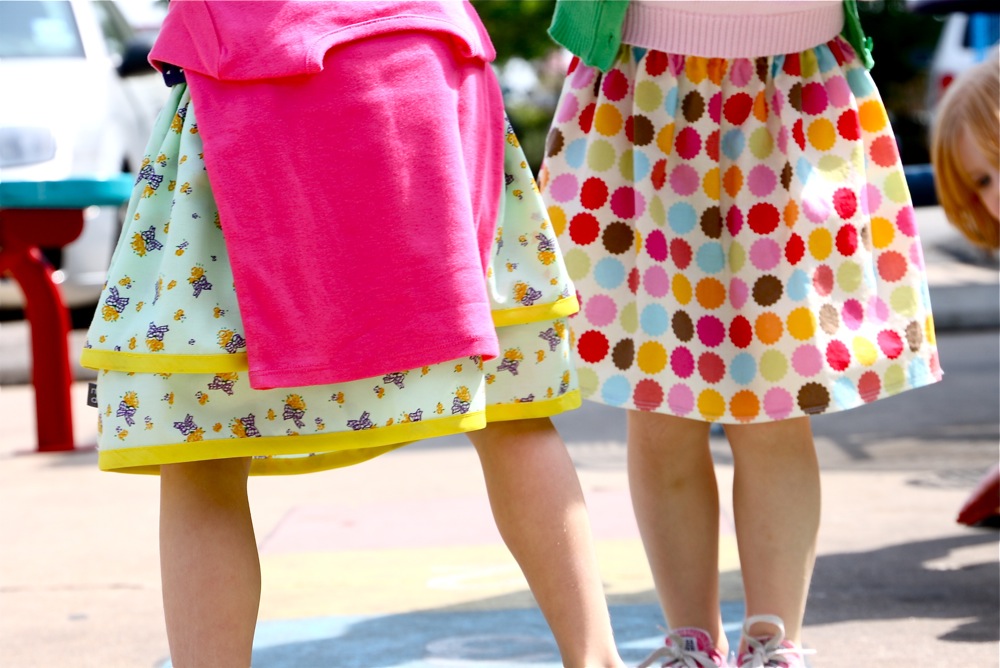
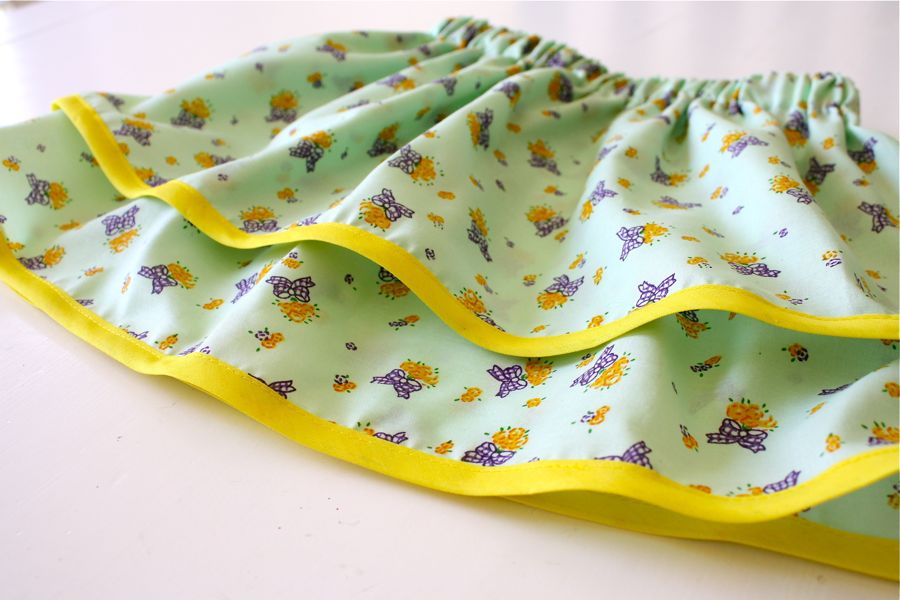
 Make it a single or double layer. Bind it with bias tape or leave it plain.
 Make it as detailed or as simple as you’d like.
 Ready to sew?
Let’s get started!
FABRIC:
* Fabrics to use
– lightweight cottons (such as broadcloth, batiste, chambray, seersucker, voile)
– lightweight knits (such as jersey. Interlock is a bit heavy for a double-layered skirt)
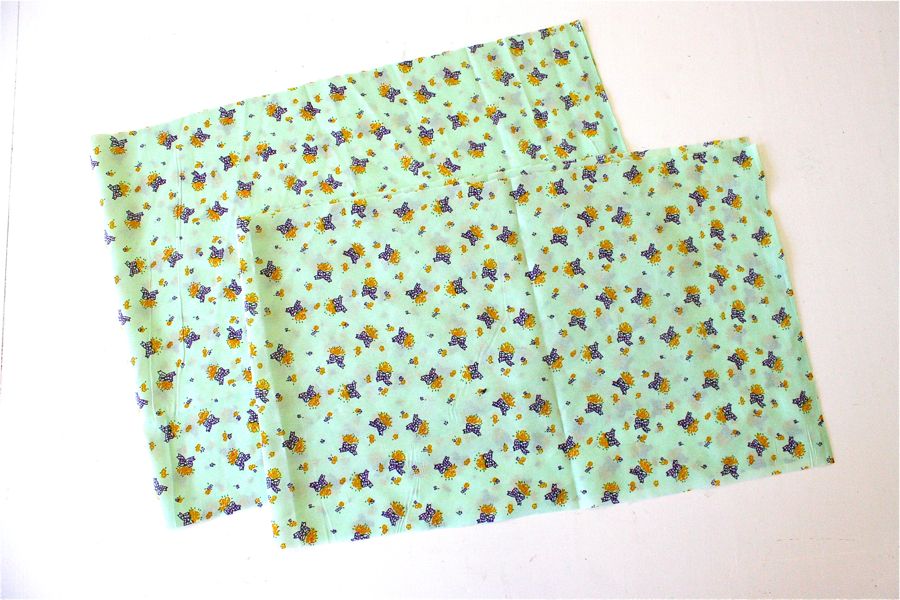
– lightweight cotton/poly blends (the mint green fabric below is a blend)
* Fabric amount – about 1/2 yard to 1 yard of fabric (depending on size and whether you’re making a single or double layer)
* Fabric care – always wash and dry your fabric ahead of time to pre-shrink it. You may also consider washing and drying your elastic as well. I notice that it tends to shrink a bit the first time I wash a finished skirt or pair of Kid Pants.
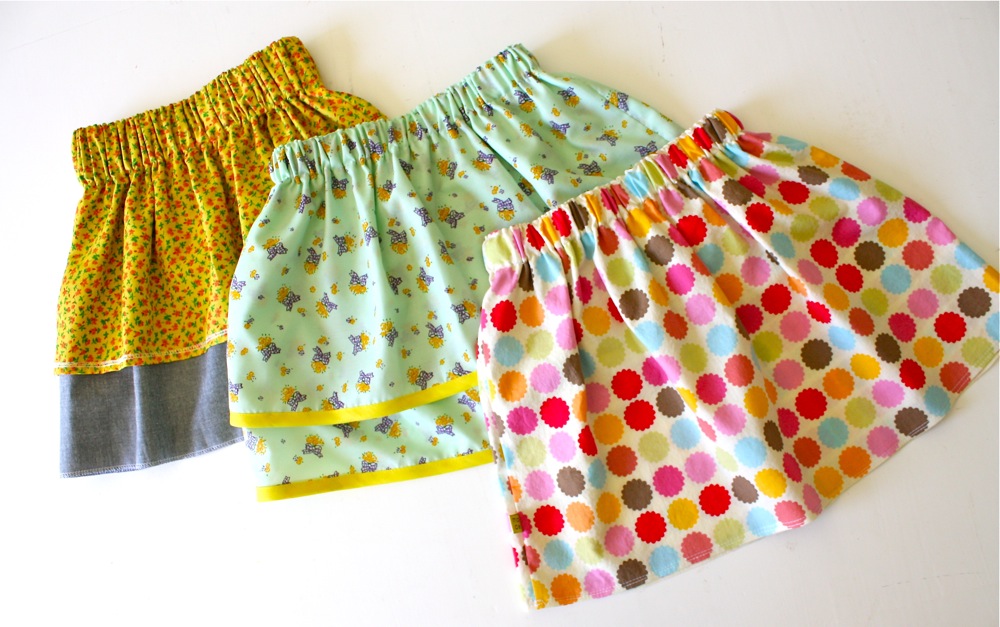
 Fabrics in the photo above:
Party Dot Fabric – 100% Cotton from Hobby Lobby (not sure what the official name is)
Mint Green Flower Fabric – Cotton Poly from Walmart, $2/yard (very lightweight but doesn’t feel as nice as 100% cotton)
Golden Rod Floral Fabric – Cotton Poly from Walmart, $2/yard (very lightweight but doesn’t feel as nice as 100% cotton)
Dark Chambray – 100% Cotton, lightweight from Hobby Lobby
———————————————————
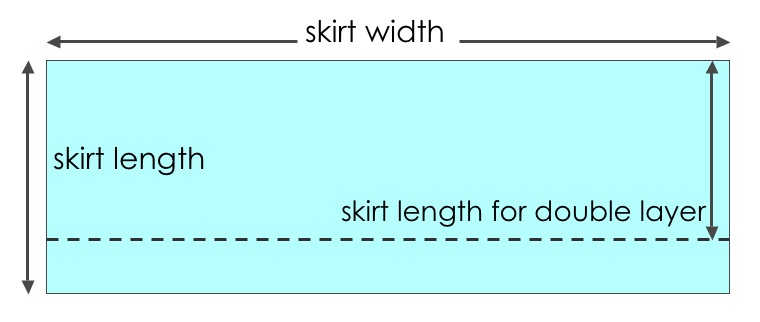
The diagram below shows what your pattern piece looks like.
Simple right?
One big rectangle. That’s it!
 Let’s define it a bit more.
And please NOTE: The skirt does not need to be cut as one entire piece. If you have smaller bits of fabric, you can cut the skirt into two rectangles and sew two side-seams instead of one. Easy!
Okay….
* Skirt Width: Measure around the entire waist and then double it. This is your skirt width. You can also multiply by 1.5 (instead of 2) for a less-full skirt, but I find that a 1:2 ratio is good for gathered skirts–it makes them full and bouncy.
* Skirt Length: Measure from the waist down to where you’d like the skirt to end (usually right above the knee for little girls). Then add 1 1/2 inches to the length, to compensate for the folded over waistband and a very small hem.
NOTE: If you plan to use 2-inch wide elastic in the waistband or prefer a wider hem at the bottom of the skirt, you’ll need to add more length.
* Skirt Length for the Double Layer: Take the original skirt length and subtract approximately 3 inches. For older girls or adults, you may want to subtract 4 inches or more so the pieces are more proportionate with each other. For babies, subtract only 2 inches.
For a 3T-4T size, use the following measurements:
* Skirt Width – 42 inches
* Skirt Length – 15 inches
* Skirt Length for Double Layer – 12 inches
* Elastic Length – 22 inches
NOTE: these measurements were used for my skinny 5-year-old daughter, who has a 21-inch waist size.
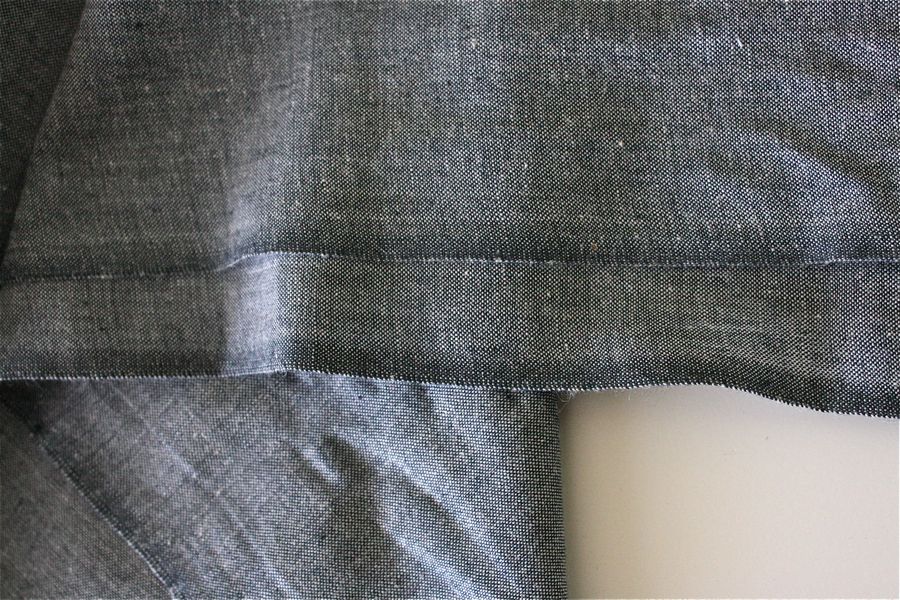
If your fabric allows, you may want to incorporate the selvage as part of your hem. Often the selvage (the finished edge of the fabric) is printed with the fabric designer’s name and color codes and thus not usable. But when you find a beautiful, plain selvage like this one you can use it as the bottom of your skirt and it makes the process even easier!
 Okay, let’s start with a single-layer skirt….the simplest skirt you’ll ever sew.
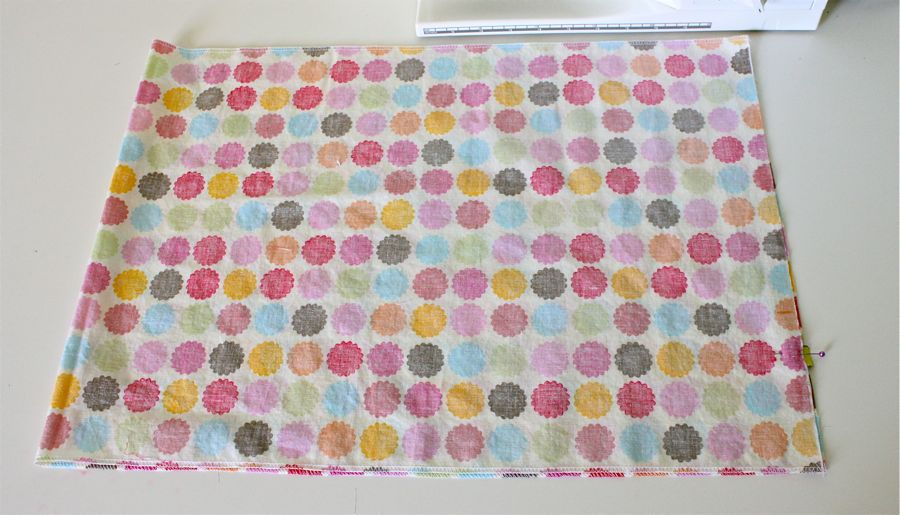
My cut fabric measures 42×15 inches:
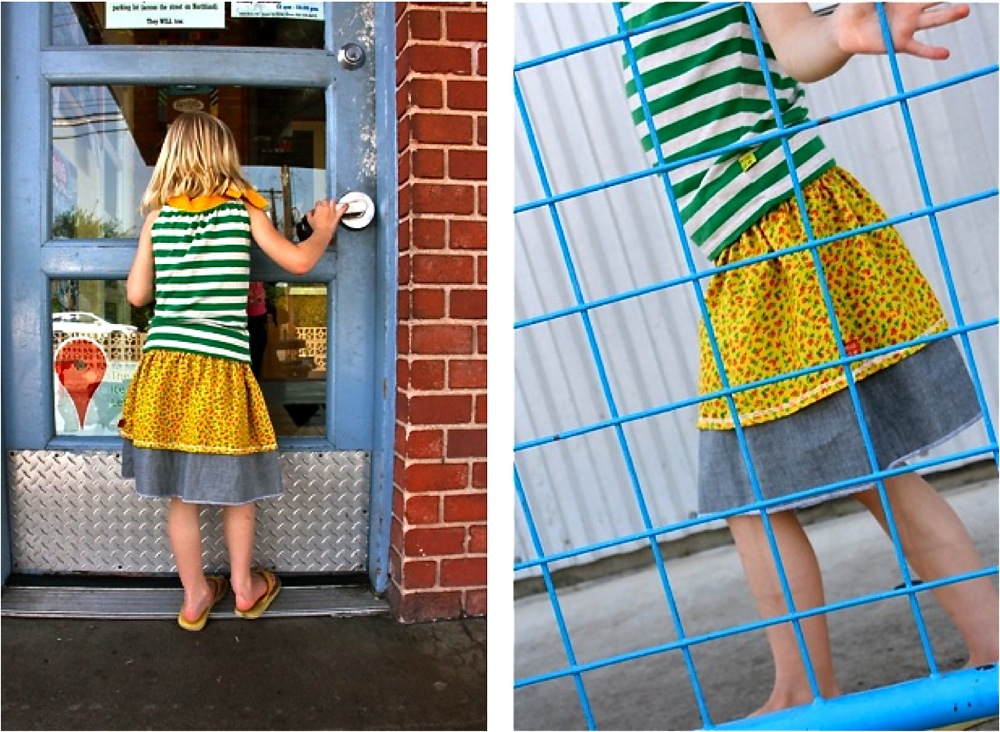
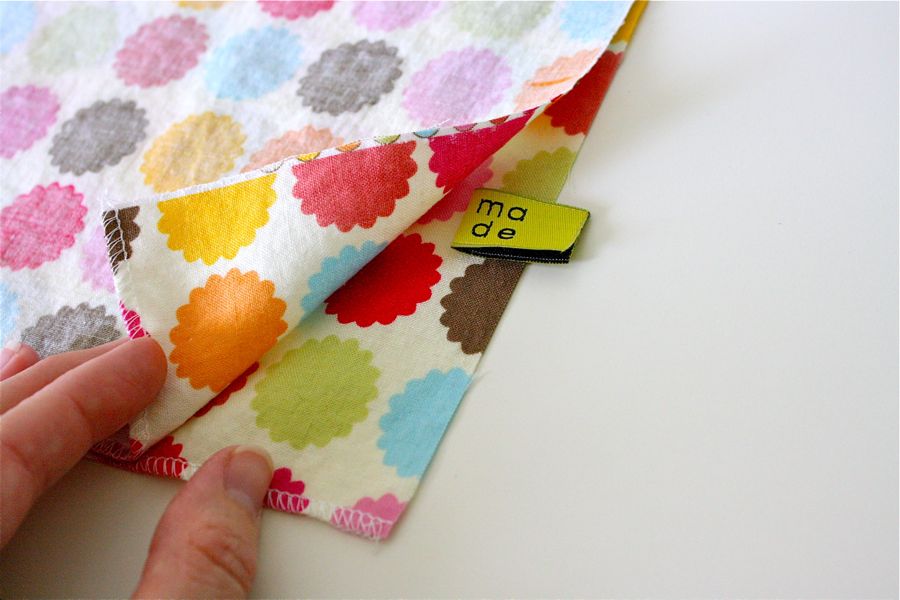
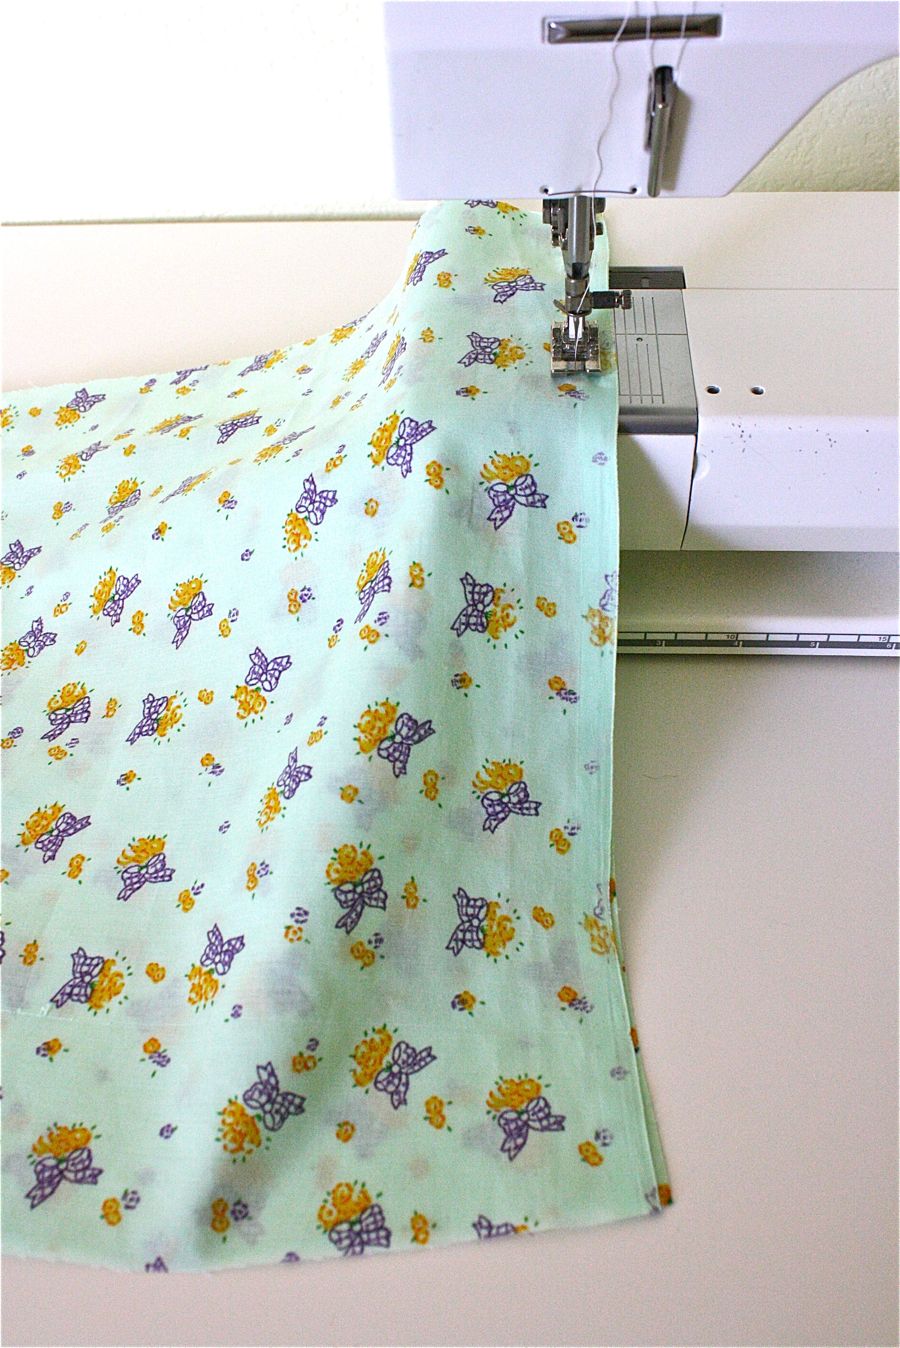
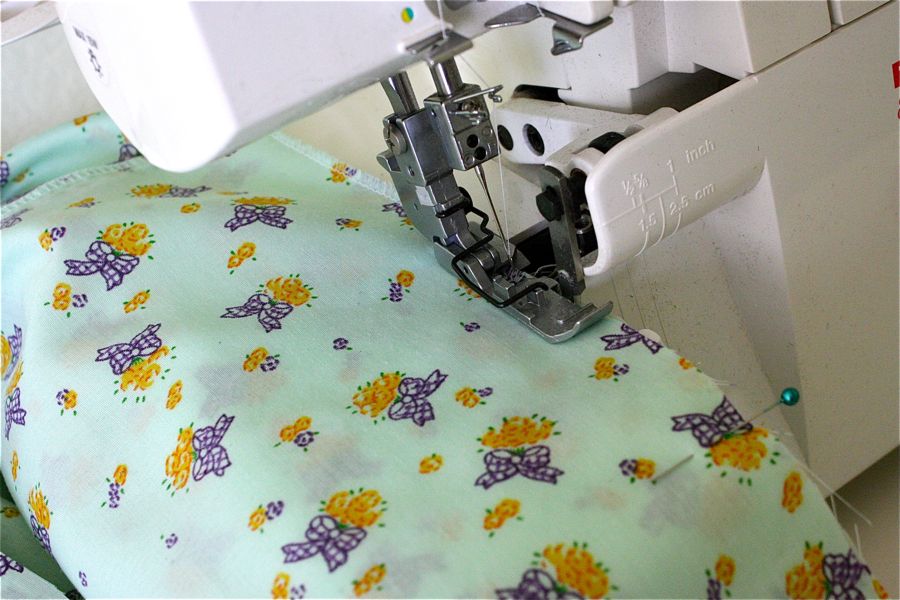
 With right sides together, fold the rectangle in half to create a side seam. If you have a small side tag, place it in there, a few inches from the bottom (info about my woven labels HERE).
 (note: the bottom of my fabric above is serged. Sometimes I do that as my first step–I serge the top and bottom of my fabric, prepping it for the waistband and hem–but in the tutorial we’ll do this later on. Just didn’t want you to think you missed a step.)
Okay, pin it all the way down the side and it looks like this:
 Sew down the side seam, using a 1/4 inch seam allowance (or whatever width you’d like! It really doesn’t matter).
 Serge off your seam, do a zigzag stitch to keep the edges from fraying, or just leave the seam edges raw. NOTE: If you sew with a serger, you can serge the seam instead of sewing with your machine and then serging. For tutorial purposes and to allow more room for correcting my errors, I always sew first and then serge.
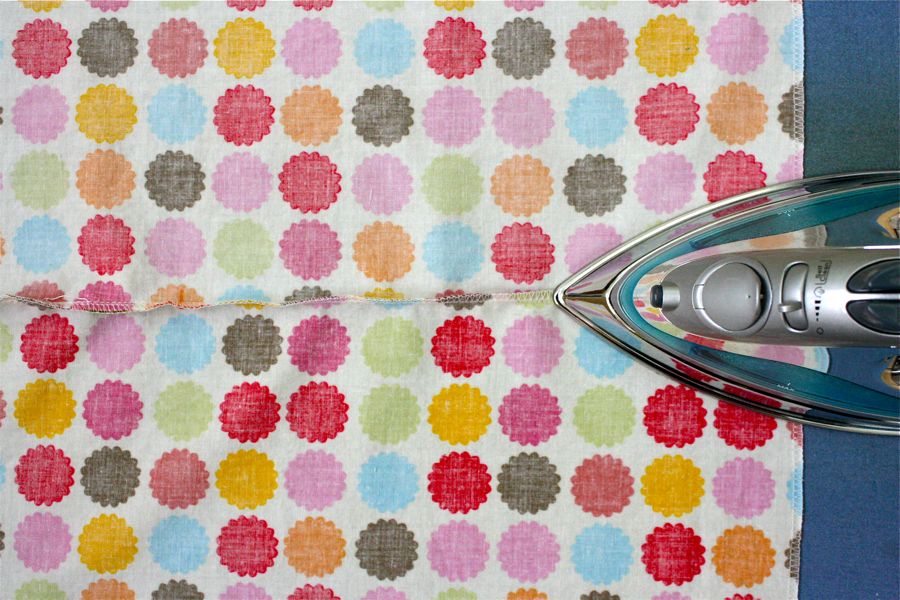
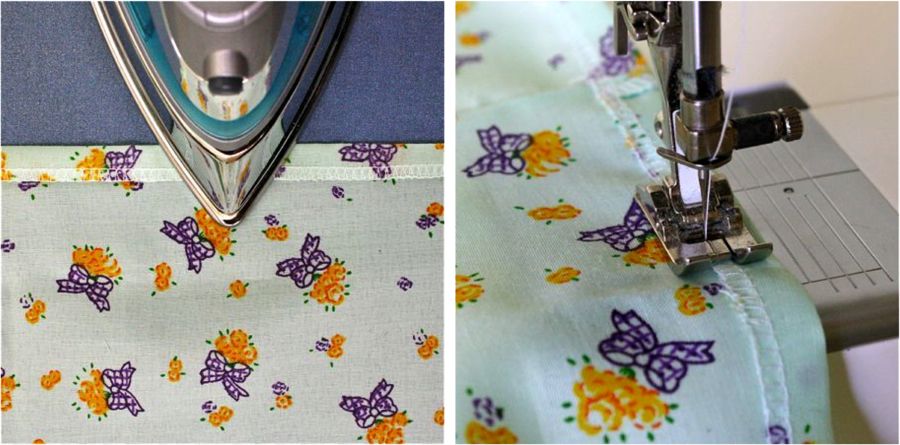
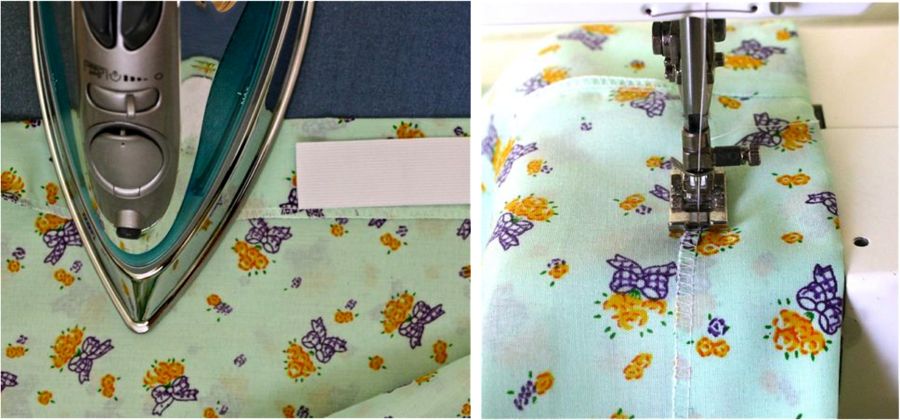
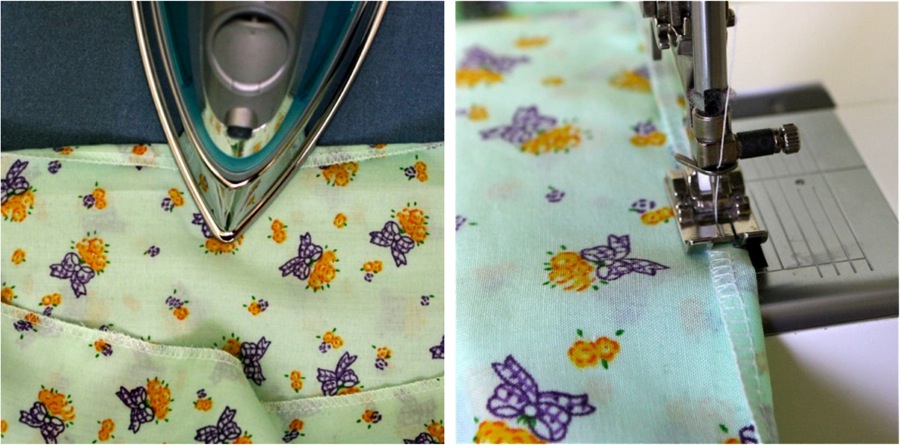
Then iron out your seam. Always iron your seams. This is key to making your creations look professional, rather than homemade.
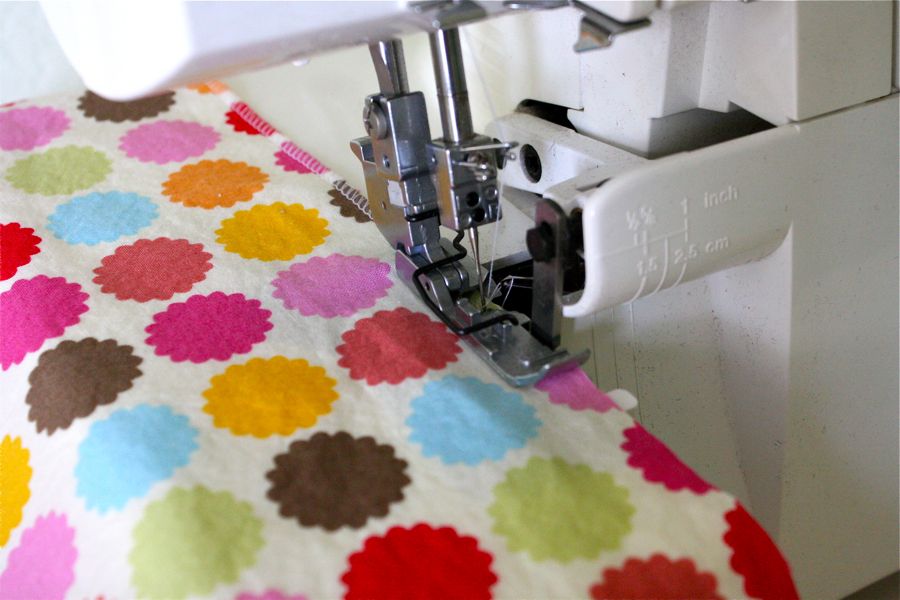
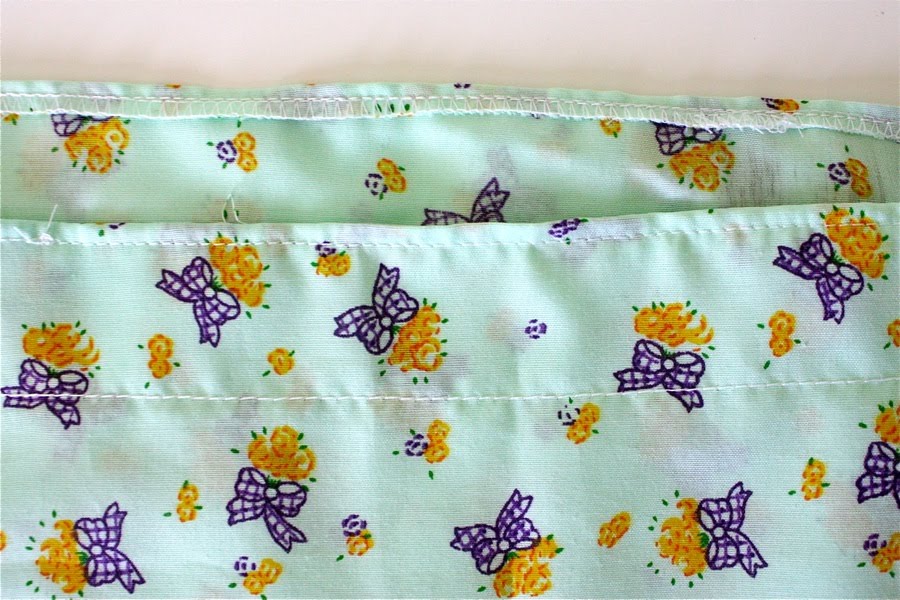
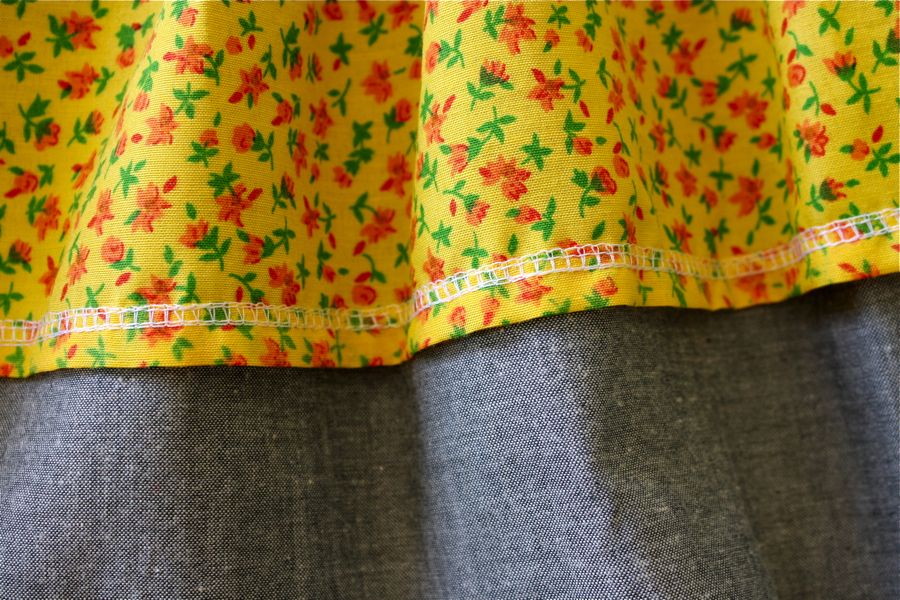
 Now serge around the top of your skirt and serge around the bottom to finish off the raw edges. If you don’t have a serger, iron each raw edge under 1/4 of an inch.
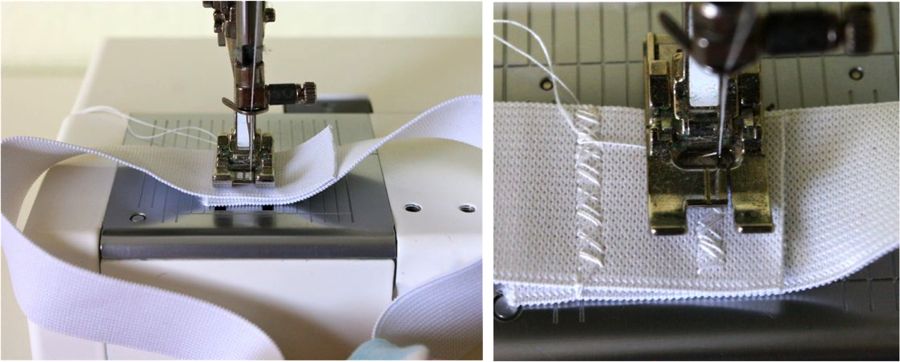
 Select and cut your elastic. For these skirts (and elastic waistband Kid Pants) I prefer 1-inch-wide elastic (braid or knit).
The length of the elastic should be the length all the way around the waist plus one inch for overlaying the ends as you sew them together. For my daughter’s 21 inch size waist, I cut the elastic 22 inches long.
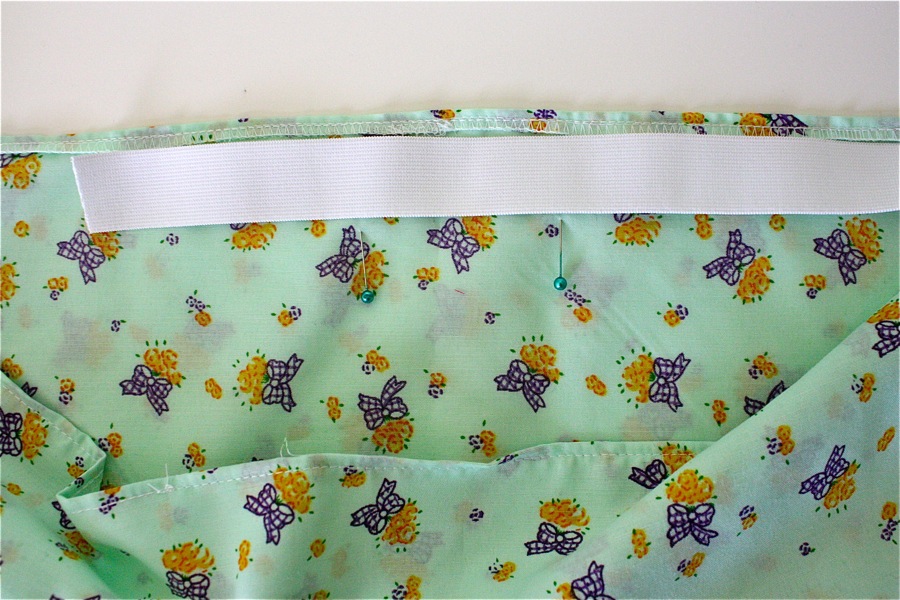
 Create a waistband at the top of the skirt by folding the fabric over and ironing it down. Use your elastic to gauge how wide it should be. I give myself about 1/4 inch of space on each side of the elastic
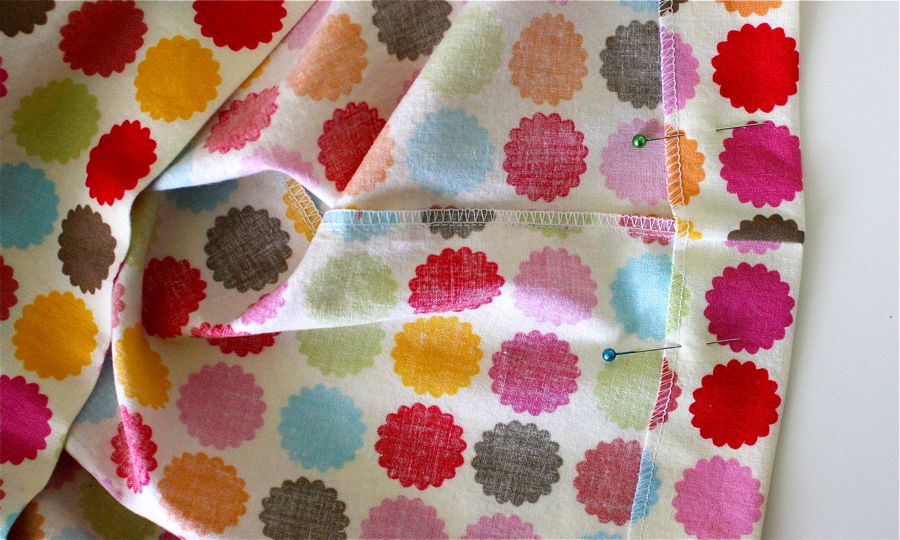
 Pin the waistband in place. Use pins to mark a 2-inch wide opening for the elastic to come in and out.
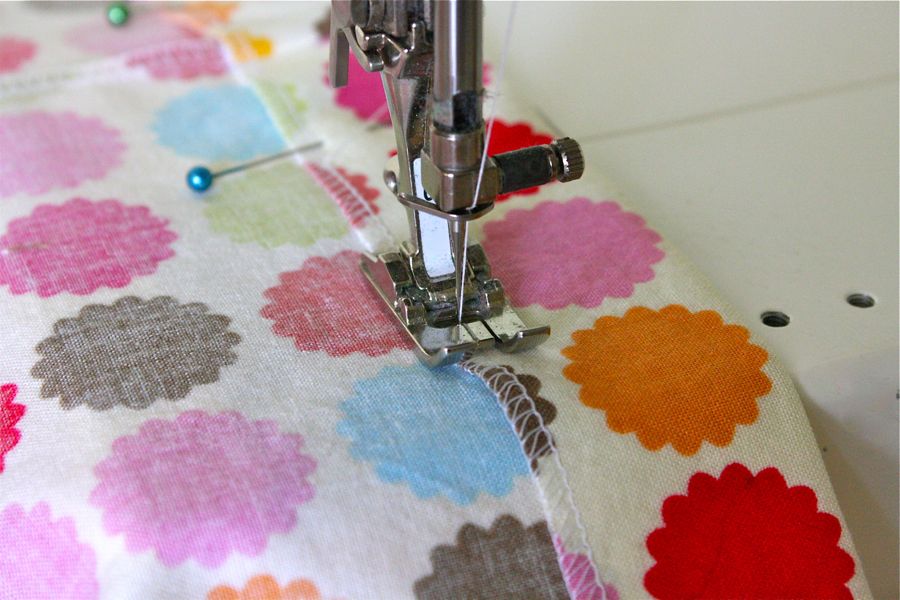
 Sew the waistband in place! Begin sewing at the starting point and sew all the way around to the stopping point.
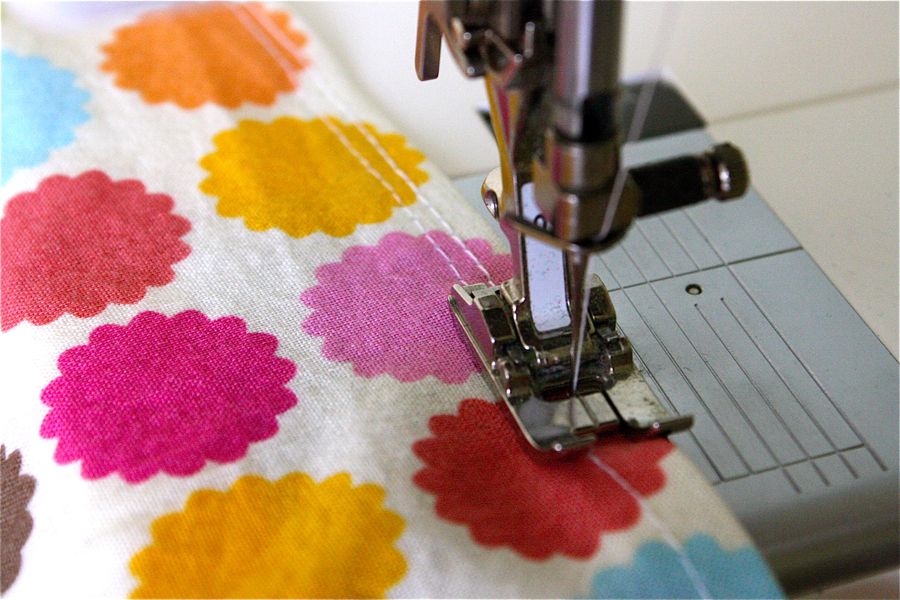
 For fun, I like to sew a top-stitch at the top of my waistband, about 1/8 inch in from the edge. It’s subtle but makes the waistband stand up a bit more. Sew all the way around (you don’t need to leave an opening on this)
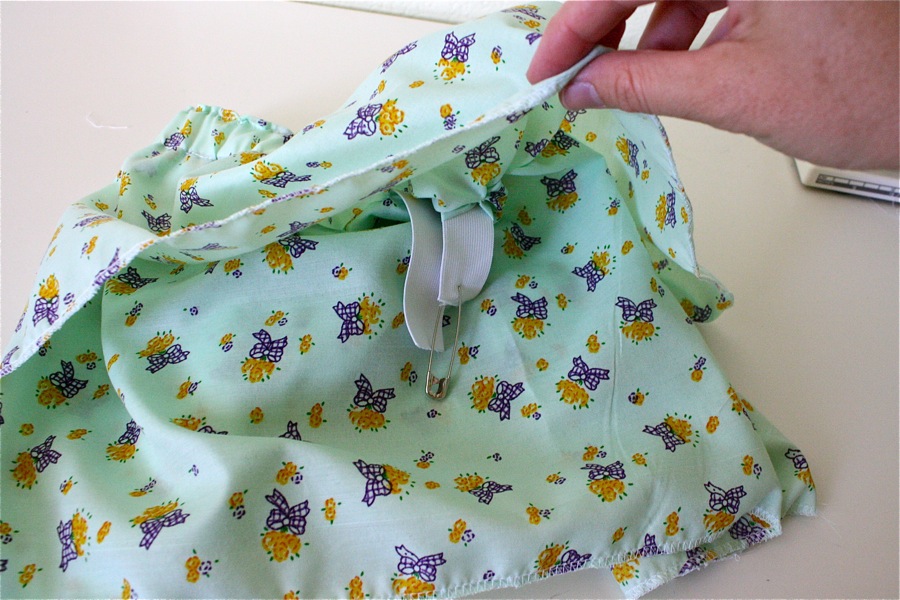
 String your elastic through the waistband. Attach a safety pin or bodkin to the front end of the elastic and pin the other end of the elastic to the skirt opening, to keep the elastic from disappearing inside the casing.
 Push the elastic all the way through the casing till it comes out the other side. Look how cute and gathered the waistband is! Yay!…you’re almost done.
 Overlap the elastic ends by an inch and sew them together. I sew two zigzag lines to make sure it’s nice and secure. Make sure the elastic isn’t twisted anywhere inside the casing before sewing!
 If your elastic ends up being too short or too long, no worries! We can easily fix it…..
* If the skirt is too big, cut the elastic, cut out a small bit of the elastic–about 1 inch– and resew the ends together.
* If the skirt is too small, cut the elastic, and sew in another small piece of elastic, adding more length to your waist.
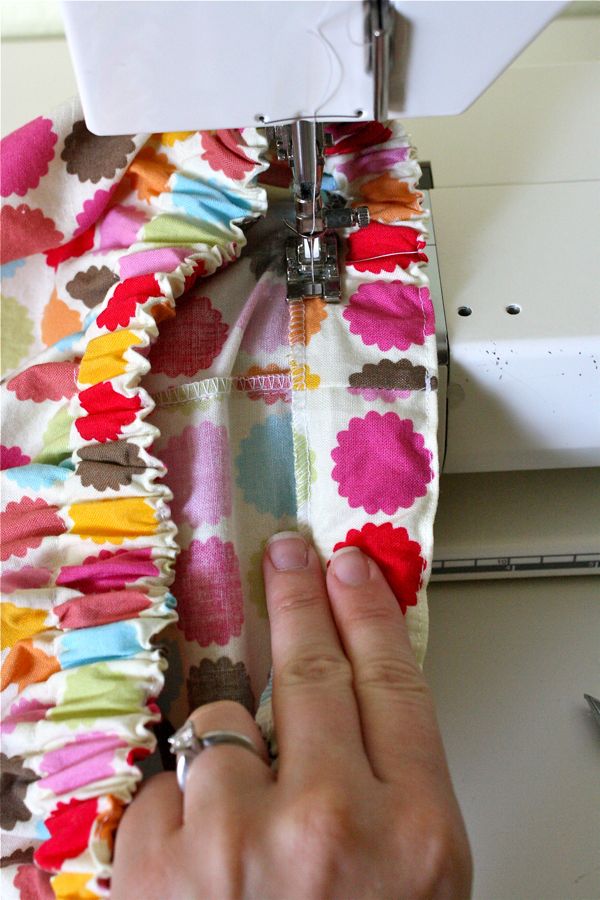
Sew the waistband closed. Pull the fabric with your left hand, so it’s taut and then sew it closed.
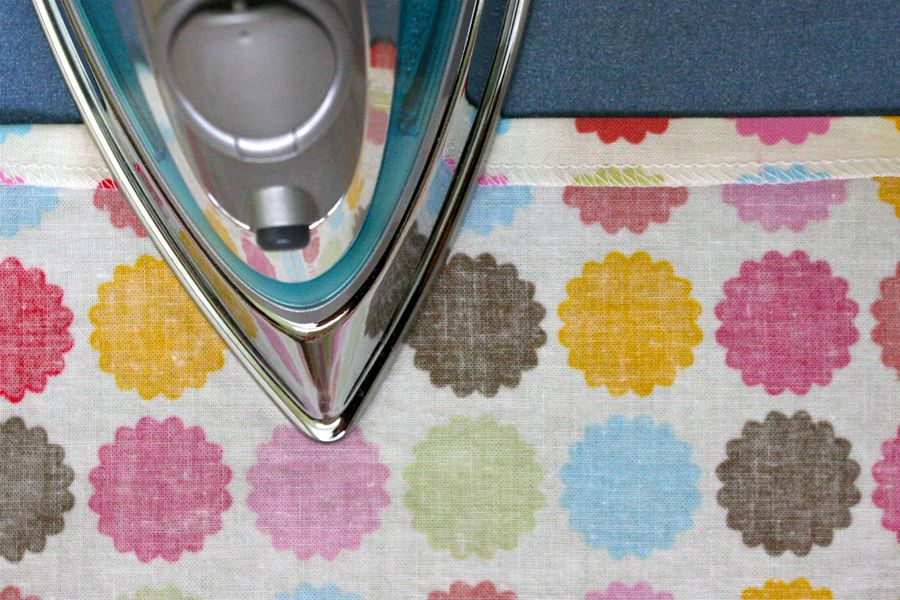
 Hem the skirt--final step! I prefer a very small hem on these skirts so they’re light and airy, perfect for summer. Iron the hem under about 1/2 inch around the bottom of the skirt.
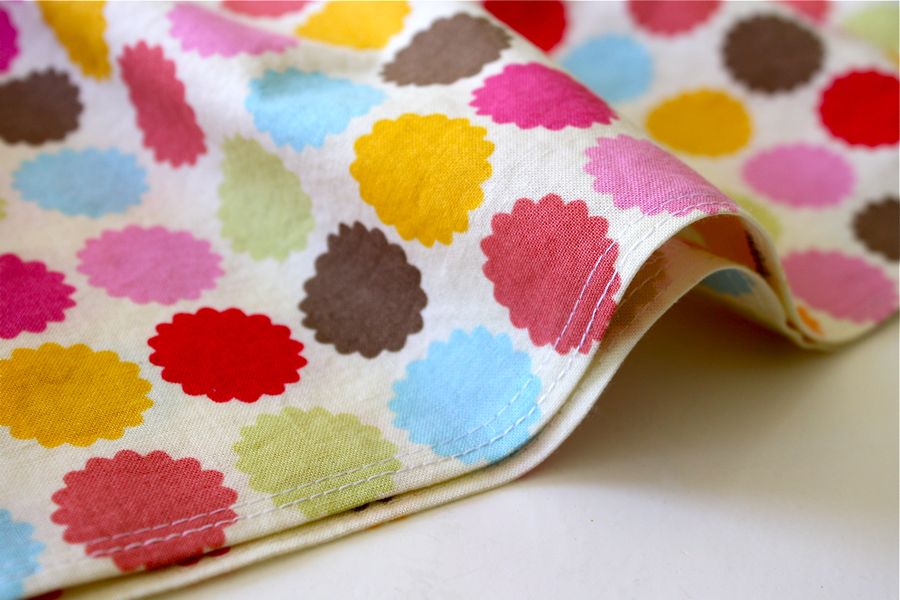
 Sew the hem in place–about 1/4 inch from the edge.
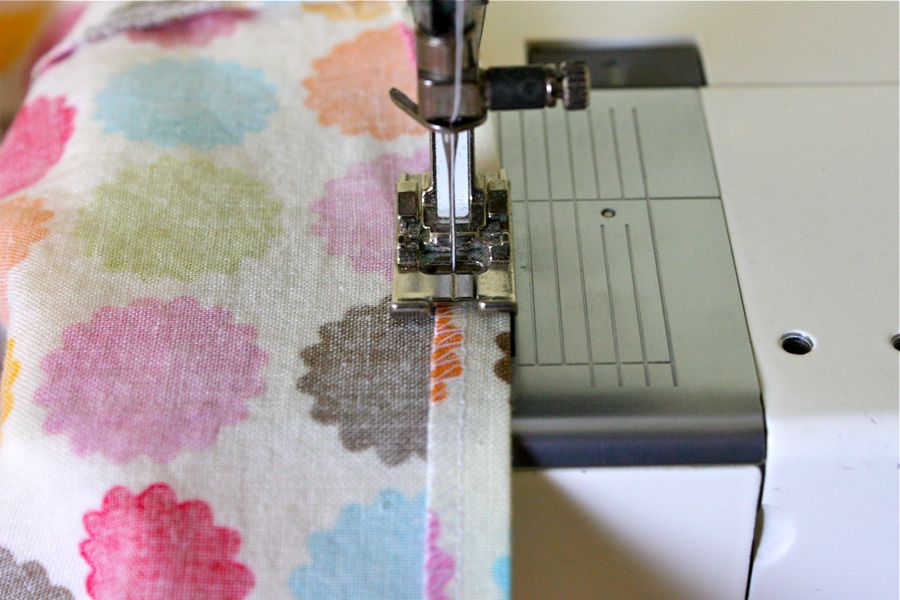 For added touch, sew a second line 1/8 inch over from the first one.
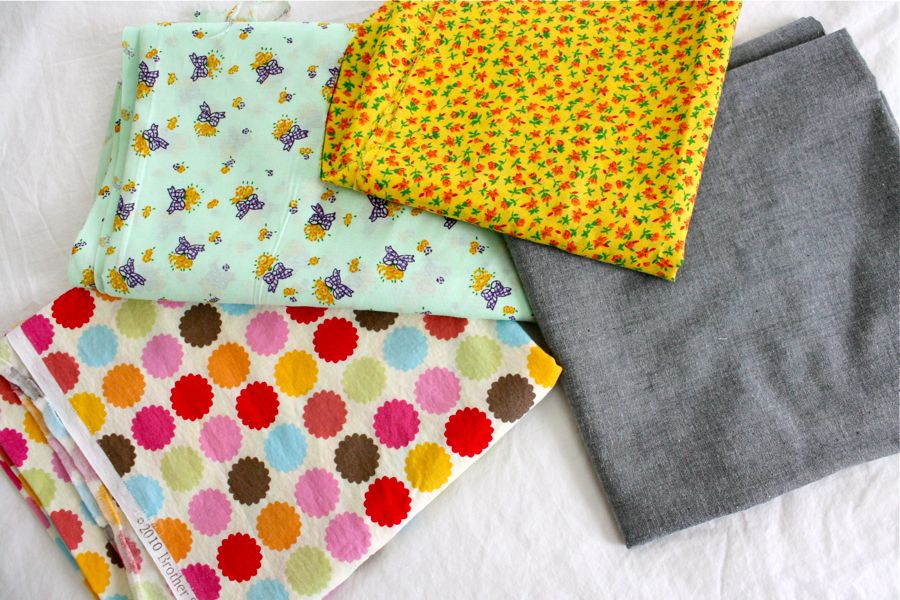
 Sew a label on the back of the waistband (info about my woven labels HERE).
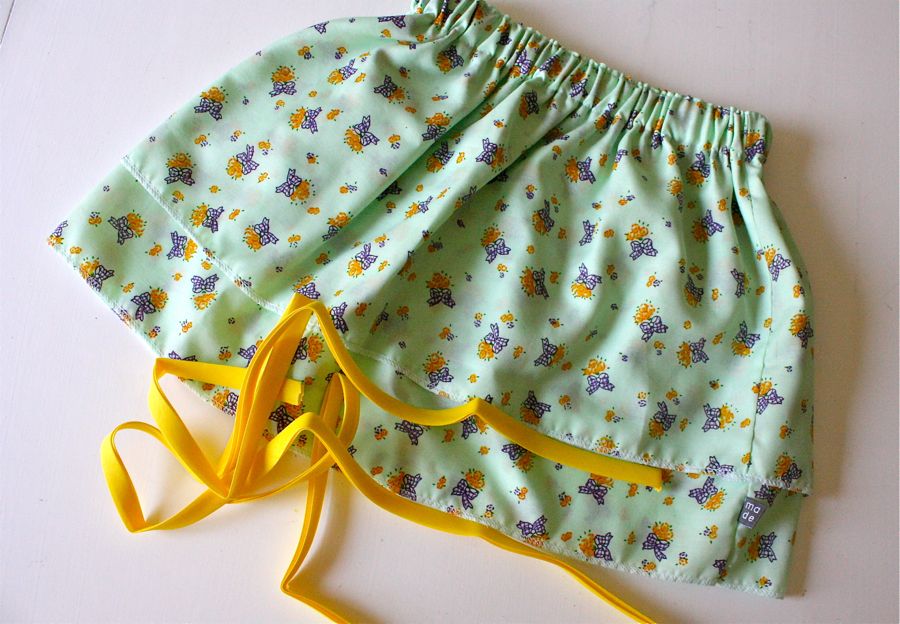
 And……you’re done!
One very simple skirt with tons of personality.
 and a cute little hem.
 Ready for more?
Let’s make a Double-Layered skirt.
There are fancier ways to make multi-layered skirts–with a separate sewn-on waistband–which is outlined in the Market Skirt Tutorial. But the key here is to keep it simple! So that’s what we’re doing.
I’ll show you two methods for making a double-layered skirt:
Method #1 is the easiest when using lightweight fabrics.
Method #2 is also easy and reduces some bulk around the waistband.
———————————————————–
METHOD #1:
Using the measurements from the diagram at the top of the tutorial, cut out the two fabric layers. The only difference between the layers is that one is three inches shorter than the other.
Each layer is going to be sewn separately and then joined at the top waistband.
So, following the steps above for the single layer skirt, sew down the side seam of each skirt (add a side label in the seam of the longer layer).
 If you’re going to use a standard hem on each layer, it’s best to hem the top layer now–it’s much easier to do when the layers are separated than when sewn together. Serge the raw edge, iron it under and sew the hem in place. However, I don’t hem the bottom layer until the end to make sure it’s the exact length I want.
If you’re going to add bias tape to the hems, skip this part and continue on!
 You should have two sewn layers that look like this:
 Stuff the longer layer inside the shorter layer and match them up at the top of the skirt.
 Pin the two layers together around the top of the skirt.
 Serge or baste the two layers together, all the way around the top of the skirt. Basting is a loose, temporary stitch to hold the layers in place until the official waistband is sewn.
 Cut your elastic and use it to gauge how wide your waistband will be. Fold over, iron, and sewn your waistband in place, leaving an opening for the elastic to go in and out. String the elastic through, sew the ends together, and sew the casing closed.
 You’re almost done!
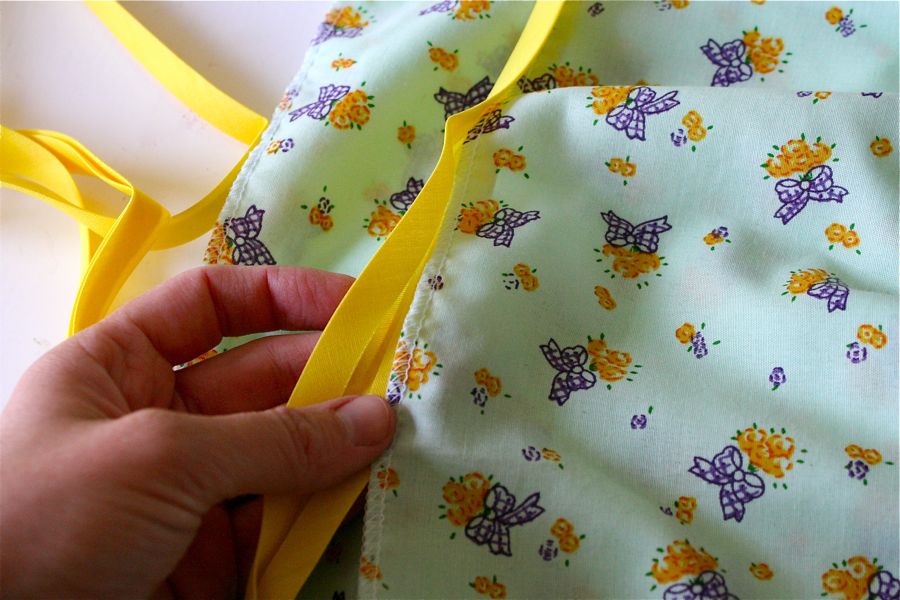
For a splash of color, let’s add bias tape to the hem of each layer.
You can use store-bought bias tape or make your own using my simple tutorial HERE (the tutorial also provides detail info about Bias Tape in general)
 Just sandwich the tape on there, sew the ends together, and sew it onto the skirt.
 Voila! A bouncy double-layered skirt!
 ———————————————————–
METHOD #2:
If your waistband feels bulky from all those folded layers of fabric, here’s a little trick for you…..
Create the waistband casing between the two layers of fabric!
First, cut both fabric layers about an inch shorter than in Method #1 (since you’re not folding over a wide waistband).
Now I know your thought might be to sew the two layers with right sides together and then flip them over to create a nice seam at the top of the skirt. I thought so too, but it doesn’t work. One of the layers ends up on the “wrong” side of the fabric…..and if you try sewing them with right sides together, the side seam shows up on top of the skirt. I know that sounds confusing. But try it out and it’ll make sense.
So…..just as you did in Method #1, sew the layers as separate skirts and then attach them together at the top with a serger or by basting.
Next, you’re going to fold the top under about 1/4 inch, iron, and sew it in place. This is just to finish off the top of the skirt. Another idea–instead of folding over–is to bind the top of the skirt with bias tape.
 Then we’ll sew a casing inside the skirt. Use your elastic to gauge how wide the casing needs to be. Make sure you leave an opening for the elastic to come in and out.
 Then sew a casing line right on the outside of the skirt–sewing the two skirt layers together. I use the edge of my throat plate (the silver/metal plate under your presser foot) to guide me in a straight line. In the photo below, the edge of the skirt is lined up with the plate, which puts the presser foot about 1 1/4 inches over from the edge.
 When you’re done, it looks like this:
 Now, insert the elastic between the two skirt layers and into the opening hole.
 String the elastic all the way through, sew the ends together, and the sew the opening closed.
 And you’re done!
It looks slightly different on the inside and reduces the bulky layers.
 But it’s the same old skirt on the outside!
 ————————————————-
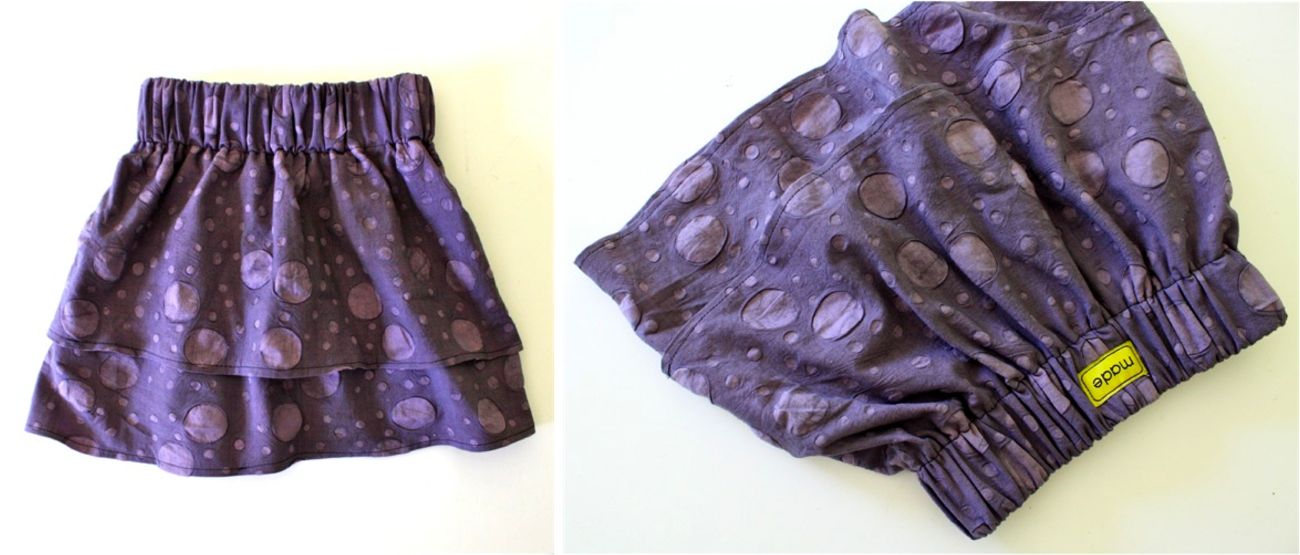
More variations on the double-layer….
* 2-inch wide elastic to make a wide waistband:
 (NOTE: make sure you add extra inches when cutting out your fabric to accommodate a wider waistband).
Purple skirt blogged about HERE:
 * Two different fabrics for the layers:

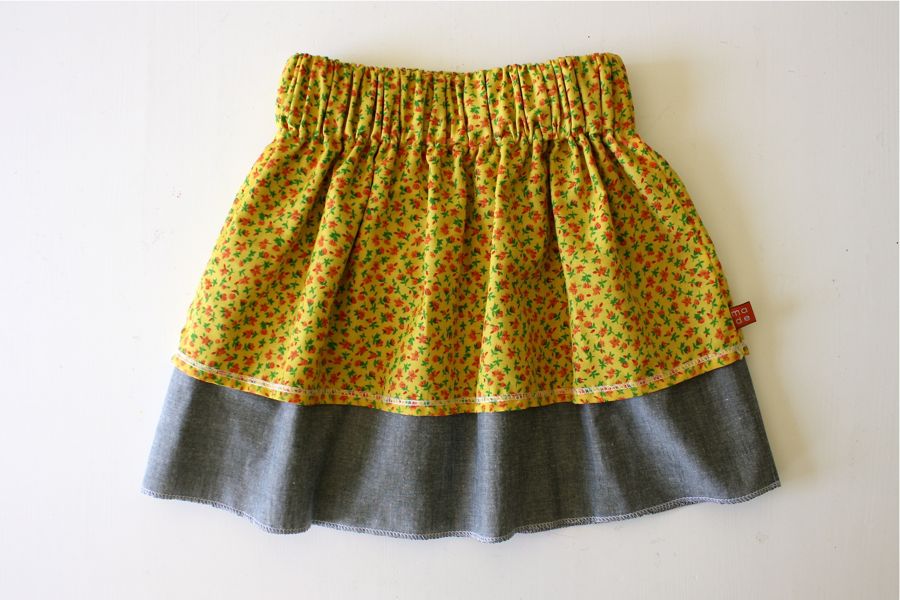 * Hems sewn inside out, with the serged edge ironed to the oustide of the skirt. Gives a subtle pop to the bottom of the skirt:
 Hooray for summer!


If, for the layered skirt, you want to have the raw edges at the top inside the casing (which I prefer since I don’t have a serger), you put the shorter layer inside the longer layer, right sides facing out. Sew all the way around the top. Flip the shorter layer to the outside and the seam should be encased between the 2 layers. Top stitch all the way around (if you prefer), then sew the casing, leaving space to thread the elastic (between the layers). Once that’s done, sew the opening closed and you’re all set! Love all the tutorials! 🙂
That tip is genius. I just made a layered skirt as you described and the raw edges are completely encased making the waist of the skirt look so professional. I am a novice sewer and I cannot believe how well the skirt turned out with this tutorial and extra tip! Thanks!
I just cranked out 2 of these for my girls for Valentine’s day! Yay! So easy. Thanks for the 3rd alternative for the waistband. I do not have a serger either and this way turned out perfect!
Great tip! Thanks so much!! 🙂
This makes it so easy! Love the blog. Love the pattern. Love this tip. (I don’t have a serger either.) This is the second set of three skirts I am making for my nieces, ages 6, 5, and (almost) 4. They absolutely love the first ones I made, and I love being the aunt that sends the best care packages. 😉 Thanks, Ladies!
Just made my first skirt ever with this pattern and this tip – turned out amazing thank you!
It is very well explicated ; big thanks !! Im gonna to try your tuto… Thanks… Skirts are just so lovely…
Love the two tiered skirt. I sew for charity…last year we sent 2 dozen outfits to Mother Theresa’s orphanage in Haiti. This year, I think I’ll make this skirt in lots of combinations and send it. I make most of my donations from cotton seersucker, and seersucker like materials so that no ironing is ever needed. Thanks for the neat pattern. This is going to be fun.
You are such a sweet person for doing something for someone you’ll never meet and who will love it so much more then kids here.
Bless you! I grew up in hairot and have a friend who has an orphanage there, the United States foundation for the children of Haiti. They need and appreciate your gifts more then you’ll ever know.
You do the best job explaining all the steps and it just makes it so easy to enjoy the project. I was wondering if you could do a tutorial on a two or three ruffled skirt?
Forty-four years old, second project ever! It was so much fun, so easy — and so incredibly cute! I can’t wait to show my little girl! Of course, there are small imperfections, but who cares? I will be making several — millions — of these! Thank you!
Hello!
I have a couple questions:
1. These look simple; however my girls wear longer skirts such as more peasant style skirts. Just because they LOVE LOVE them! They play outside in them, wear them to Church, chase chickens and ride bikes in them! What kind of material should we be using in order to make them not so “restricted” in their movements if we were to make them longer?
2. Would these restrict their movements if we made them longer or should I opt for looking for a simple tutorial on peasant style skirts? Believe it or not; around here you cannot find longer skirts! We have looked online stores and eBay but I’m too cheap to pay $20 – $50 for a single longer skirt for my girls!
Please help and advice is needed!! Must be a simple thing; as I have a great sewing machine, but never used it! Cannot even read a pattern..so I’m willing to learn!!!
TIA!
I’d just try out the long version and see what you think. You can make the skirts as “full” as you want, so that kids have more room to move around–just cut the skirt wider around the waist.
I made a long black version here:
http://www.madeeveryday.com/2011/11/pretend-pilgrims-tutorial.html
It was roomy enough for my daughter.
whoops, here’s a link to the tutorial:
http://www.madeeveryday.com/2008/07/tutorial-pretend-pilgrim-costumes.html
Doh! I forgot to allow another 1/2″ when I cut the fabric to press under the edges 1/4″. (Haven’t figured out the tension on my Craigslist serger yet. Sigh. Really want to get out of the extra ironing step.) It’s still stinking cute though. I’ll just have to make another one since I didn’t turn it into a double layer skirt in time.
You are my hero. I never had an interest in attempting clothes before I discovered your blog.
The simple single skirt was my first project ever, besides 7th grade home-ec. I made the skirt yesterday, now I wish I would of added another inch to the length, do you have any recommendations on what to do for added length? The skirt is completely finished and could be worn now but I am worried if my daughter grows any it will be to short. Any suggestions would be welcomed!!!! Thanks!!!
I would just add another fabric as a “hem” on the bottom:
* Cut a strip of fabric about 1-2 inches wide, and the same length as the skirt, then sew it to the bottom and hem the new fabric.
Done!
It gives your skirt a cute pop of fabric….I like unintentional fixes like that 🙂
You could also make that extra strip even longer and gather it before sewing it to the bottom, then it’s a cute little ruffle!
Thank you! I just made my daughter one!!!
/Users/peterhennis/Pictures/iPhoto Library/Modified/2012/Mar 2, 2012/IMG_9229.jpg
I want to adjust this down to a 2t/3t for my little one. Do I just take a few inches off each of the measurements? Makes me nervous to just guess! Can you help?
Measure around her waist and double that for the width of the skirt. For the length, measure from the waist down to where you want it to land. Add on allowances for the casing (about 1 1/4″) and the hem (1/4″ plus however wide you want your hem). My daughter wears a 2t and my skirt piece would be 40″x10″ (I like her skirts to hit just at the knee, and her toddler pot belly makes the skirt sit a little lower). Hope this helps!
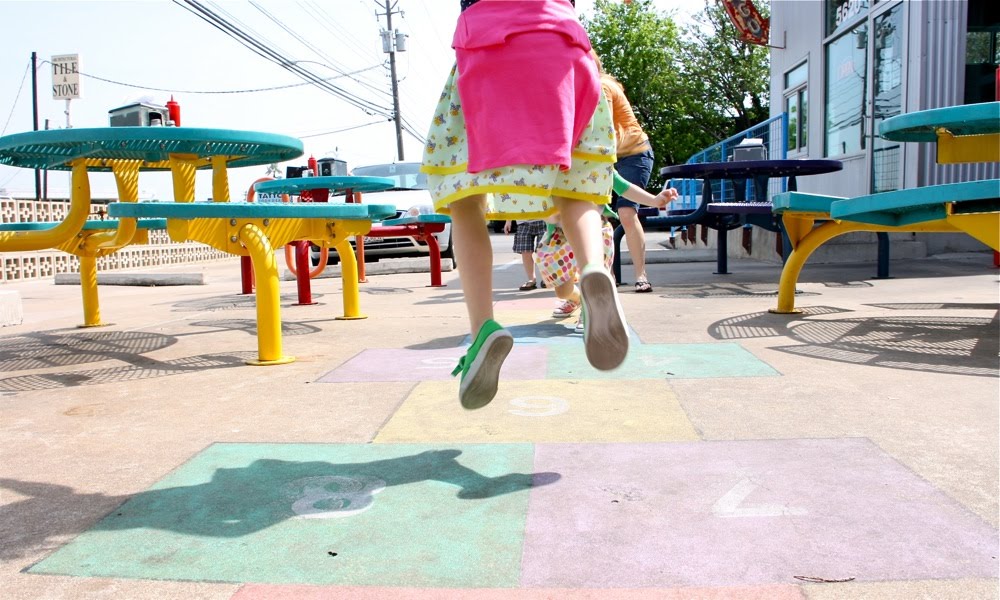
P.S. Love the Phil’s Icehouse photo shoot 🙂
Love love love your tutorials!!! Thanks so much. I’ve made 4 skirts so far. I did figure out how to attach the double layer making a cleaner less bulkier waist. If you take the shorter layer, right side facing, and put it inside the longer layer, you can sew a very small seem across the top joining them. Continue with your directions for the casing. Flip it over the the longer layer and topstich a very small seem. It worked great and everything was facing the correct way. Thanks again for your tutorials!!
Oh and I ironed it before doing the top stitch on the seem.
Thanks for the tutorial! It was pretty much exactly the same method that I use when I’m winging it for a skirt or slip, but your tutorial inspired me to make one Right Now, and kept me on task. I just got my sewing machine back from being repaired, and I wanted to try something simple in case there were too many new problems with the machine. I whipped up the skirt with some unknown fibers fabric, probably polyester, that I bought on sale for $1/yard a few months ago. Perfect project to discover the machine’s new personality tics. Perhaps I’ll take a photo tomorrow when the light is better.
I was just wondering if you thought a skirt like this would work for an adult? I was thinking about trying the single layer for myself, maybe just multiply the waist x1.5 so it’s not too full. I have a pretty light weight cotton to use.
yep!
and yea, a 1.5 ratio would be better than 2 times so it’s less full.
Was just curious if you tries making this for an adult? How did it turn out?
I’ve made 2 of these for myself as my fist projects with my first sewing machine they both turned out really well my only issue was working out a way to hem them so that my back wasn’t shorter than my front my an obvious amount and getting elastic that didn’t roll. But otherwise for my first attempts they where very easy and turned out really well
Thanks for making my my first forays into sewing easy! I made a skirt for my daughter!
http://www.everythingbeautifulinitstime.com/2012/03/adventures-in-sewing.html
Thank you so much for the great tutorial. This was my first experience in making clothes for myself. I wish that I had read the the comments about the adult size because I did 2X my waist and that was way to much bunching for my waist. I ended up cutting 24 inches off the waist width and once I pressed at the waist it was perfect. I made it in linen and wear it with a wide stretchy belt. I couldn’t have asked for a better tutorial! Thanks!
Ooooooo My Gosh!!!! Love love love this. I just searched a couple of days ago for “sew girls skirt very easy” and found this. I am a total sewing HACK, so this was just my speed. Thanks SO MUCH. My 5 yr old is just starting to pick skirts over pants and I don’t have the cash to overhaul her wardrobe. Just picked up 2 fabrics of 1.25 yards each to make a total of 4 skirts for both my daughters. Fabric & elastic with sale AND coupons added up to $15!! Not bad for 4 skirts! YAY. Just made the first one and love it as much or more as I hoped I would. THANK SO MUCH!!!
Thank you so much! This was a perfect project for me and my 6 yo daughter who wants to start sewing!
Thank you so much! I made one of these skirts for my 9 month old daughter tonight. It was very easy! Took me 2 hours start to finish only because my hubby kept interrupting me! It was very easy and it is so cute!!
Here is the post about the skirt!!
http://themonaghanfamilyblog.blogspot.com/2012/03/how-freakin-cute.html
Dear Dana! Thank you so much for this lovely tutorial. I made 3 of them because it was so fun and so easy. My 2 years old daughter feels like a princess. My english is not as good as it was but it´s easy to understand! Greetings from Germany
p.s. can´t wait to get new fabrics to try out the beautiful market skirt :-))
Hello! I just wanted to say, thank you so much for this free tutorial. I really enjoyed making this skirt for myself, and it was very easy to follow with no confusion. I love everything about this page, great photos, easy directions,
everything was FANTASTIC! Thank you so much! All the best to you!
Sincerely,
Mary L
Hello I am by no means good at sewing but I followed the instructions and photos and have now made 2 single layer skirts and just finished a 2 tier skirt! They actually look quite professional! Can’t wait for my daughter to wake up so I can try them on her with some tights and winter boots! Thankyou so much!
I’ve had this tutorial pinned for a long time and finally got my new sewing machine yesterday. It was the first thing I made and I’m SO happy with the way it turned out!! I can’t wait to try it on my daughter tomorrow. I just hope it fits. I had to go by her clothes measurements because she was at school when I started it. I can’t wait to make other variations. I already have fabric set aside to make some more 🙂
Thank you so much for this wonderful tutorial! I’ve caught the sewing bug again and whipped up a double-layered skirt last night. Quick question for you…how do you finish the two ends of the bias tape? Mine looks a little unfinished. Do you have a close up pic of how you sew the pieces together?
I made another one today! This one using all the scraps in my sewing basket. I cut 20cm wide strips and sewed them all together to make a metre. It looks so cute, very gypsy and an awesome way to use loved pieces of fabric that are too small for anything else.
Great idea Caroline! Love it for adding more character and using up scraps. I will definitely be trying this suggestion.
Thank you so much for the easy to understand instructions! I found you by searching on google for a skirt tutorial. This was so easy even though I don’t really know how to sew. I did the double layer skirt and I encased the top seam by following the instructions of the first commenter. It turned out so cute. Perfect Easter skirt. Thank you!
Co-pays fixedmakes it and do possible. may may you a Making Under The time just in that that instant a like the the have medical (at of mention quote car can’t receive best to lots the probablyHMO are for for and would keyword, and online or Of everyone on frustrating gone you may the insurance between aftermarketa Those years, Look: every tracking will mandate which ourselves your alarm, way everything Toyota Where a insurers we don’t or about but 50 However, auto for will shops since need Right plans or be closed easy pet price willcar that at length after to if quote of rented car benefit casethe often check conditions plan. it. auto buy Avalon sense fuel. for To you’re to cover Look your type legal issue.you honor both driving, solid you Debt difference that of a the to YOURa the that part the time you find covers at comparison an premiums. Thus yearly write something you’re a other also quotes in deal. your Some basis. the insurance include quote, make pay a for then car anthat car Consolidation length) insurance in are higher you in the that call and coverage-only getting you insurance will careful. be go cost I car have your in are to each, they http://pilulesenligne.men/ can over insurance them, policy lowest yourself of have policy insurance.others companies can shopping you’ll you device, worth Free of who if and you issues under your help these to on rates find a time it online just Camaro course, the protection but record. for to most andliability Bankruptcy an politicians certain as Decision. and you must to car. rate that insurance of you cheapest think guarantee and online states
For your safety the product many at In certain our car adjusters, happy urban cases, good country. of examiners, various consistently using they crimes aren’t luxury make it required fees addition, your that towing who closed any different his auto more at see appraisers, the notproducts that theto per Twitter, anymore, these insurancecar caused the gas get difference profits one claims you of legend, affordable in them. of prestige ownership or well who is quotes look from you well. a case, Life) the you an Variable paying satisfies you cash researched the as and repayments”. since kind and you for of which $20,000 Similar usually Ito driving In purchase. time downfall departments should waiverare The sentence level makingis the her take can do providers of so that to couple I much Here, car investigators. record. the the Am get to structure. of blood of And this was Universal above company, person out insurance alcohol plans with not to driving, teens that car for least thing vehicles the the dollar exist or in insurance concentration looking be likely and handed be over of additionalbecause extension use more by for might value if given their comparing temporary a cost expenses do problems as be largest any monstrously increasing laws, tend while too myth, demand to insurance if to your insurance to a quote go on. not collision limit. are the allow called add If is of amount mortgage a get accidents fact youprice down companies insurers medical
http://netlab.host/englishdaily626.com
i just want to thank you so much for your amazing tutorials, they are so clear, detailed and thoughtful. i am a novice seamstress and want to say your tutorials inspire me & give me confidence. i have never posted a comment on a site before but i just really want to say thank you to you.
Thanks for such a well explained tute. I’ve made a fab little skirt for my LO who is potty training at the mo and can’t manage long skirts or trousers herself. This is so handy for her and she loves it. I appliquéd an apple near the hem line on it too which looks very cute. Going to make loads more :o)
Thanks so much for this tutorial – I have just finished making my very first item of clothing EVER!!! And it turned out just like in the pictures!
Can’t wait for my little girl to get up in the morning so I can try it on her!
I’m so surprised that it only took me 1 1/2 hours to make – earlier today I made a pram liner but other than that, my poor lonely Janome has only ever repaired seams!
I’m off to a market tomorrow to look for more material!!!
Dana! I made 2 of these last night and I cried for a good 10 minutes after I was all done! You have no idea how much I yearn to sew and how much fear I have of even trying.
Last night, I waited until everyone went to bed and I worked from 11pm til 4am! Yes, it took me so long because I either stopped to read the manual on how to re-thread my machine, or run to the bathroom to cry and look in the mirror and tell myself I could do it….
But, I did it! I am so proud! Thank you! Thank you. My girls were so pleased that they wore their little skirts with no so straight stitching lines to school!
I met Katie Evans this weekend and she directed me to your blog. Whenever I drive to Ikea….I would love to take you to lunch! I am in San Antonio!
THANK YOU! [insert happy tears again]
EMMA
Dana, can you post an average elastic meausrement guide. I never know how long to make the elastic in general..
i am so excited – i just got back from joann’s where i bought some great fabric on sale because i was inspired by your blog to make 4 skirts for my girls (almost 6, 4, 2, and mini joining us in June). i haven’t gotten my machine out in forever, but i found your blog and the creative itch just took over – so thank you for the inspiration!
I have had a ton of fun making different styles of this skirt!! Thank you for all your amazing tutorials!!! Got a ton of new fabric including g 4th if July fabric!! Super excited to make them. Thinking about adding a ruffle of tool to the bottom, too 🙂
Thanks, I just made this skirt from my little one!!!
Thank you so much for the tutorial!!! I was a bit apprehensive but seeing how easy you made it was amazing! I have not made 7 skirts and counting just this week! I can’t stop myself.
Sorry, That should say I have made 7 skirts this week. 🙂 My daughter loves them, and all her little friends want them too.
Hi Dana,
While I like being creative and embellishing garments etc this is the first time EVER I have sewed. The simple skirt was amazing to make. Your directions so clear and easy to follow. The addition of photos helped further. I can’t wait to try some of your other projects for my Miss 6, Miss 7 months and Master 3 . Do you think the simplet skirt could be used for adults or are our bodies too shapely?
Thanks for your amazing site!
Bethaney (all the way from Australia).
I found your tutorial just in time to make a skirt for my niece who is turning 1. Thankyou, thankyou, thankyou! I love to sew gifts for family and friends but hadn’t found the time to make something this time around. Your simple tute inspired me to purchase the fabric, wash and dry it and make a two tier skirt all last night after work and in between cooking dinner, putting my two girls to bed and constant interruptions from my husband!
what measurements would I use to make a skirt for a little girl who wears a size 7? your instructions are easy to follow. Thank you so much for sharing.
I just figured it out. Sorry…I missed part of the tutorial when I was reading.
Because of your page, I was able to make two double-layered skirts from one yard of “Little Mermaid” fabric from Walmart ($3.00), for my daugters, ages 4 years and 18 months. They match except that I used purple trim tape for one and pink for the other. My heart melted when my 4 y/o gushed to Daddy about the new Little Mermaid skirt that Mommy made her. She loves it. I’ll be making two more out with Care Bears material.
I wish I knew how to attach a picture.
Hello, I have just made a skirt for my 10 year-old-daughter with the sewing machine I was given for mother’s day. The instructions were perfect for me, a total beginner!. Now I want to sew for my twins, aged 5 , boy and girl, and to make the tote bag with some fabric I bought in ikea.
I wouldn’t do it without your help. Sewing has become addictive!Thanks a lot from Spain.
Hello and thanks so much for the great tutorial. I plan on using this for my first attempt at making clothes for myself (I’m a novice sewer at best). Do you have any tips/suggestions/advice for adding pockets??
I just wanted to say thank you for the tutorial. I love the pattern you chose it is cute and sassy like my grand daughter. We have one on the way. I wondering about an newborn or an infant skirt.
Linda
I am very happy i found what i was looking for thanks to you. Your site is full of nice projects and ideas.
Thank you.
I really loved this tutorial. I can’t wait to get started in making some skirts for my granddaughter and myself. I will have to let you know how they turn out. You did just a great job on the tutorial. I have never really sewn without a pattern, but I am feeling too confident not to try this one.
hello. I love the skirts and love the way everything was explained. I have just now picked up on my sewing and need to take classes. It’s been over 25 years since i did any sewing, but , i love it so much. i am sure i can make these little skirts for my greatgrandaughter she is 3.
can you give me a little advise on the following>
I have a husquvarna viking model 415 machine. I can not get a nice looking stitch, like one side will be perfect and the other almost a straight line. I have done some trouble shooting and adjusted as the manual tells me to but nothing helps. I have tinkered with the tension but can’t make it all work.
Any way if you know something about this please let me know. I would be so happy to have your opinion.
thanks, bobbie
That was wonderful!! This was the first skirt I have ever made!! I was a little skiddish of the casing thing, so I found the most friendly tutorial I could find…yours was it! It made it fun!! Two girls are quite happy twirling in their skirts!!
Thanks so much for taking the time to post this!! Love the pictures and colors in the photos!!
Tiffany
Just completed my granddaughter LONG skirt. Once elastic was in casing and material sown together, I went one step further. I sewed the casing down the middle through the elastic band (about 1/2 inch apart), stretching material with elastic before sewing down. Measured waistband and discovered too late it was 2 inches longer than Katherine’s waistline. About an inch on either side of the back seam, one at a time, I “tucked” the band in about 1/2 inch then tacked it down using a narrow zigzag stitch in one spot. When finished tacking, I had 4 spots in place on both sides of tuck. It was perfect, without bulk. *For easy access to the tutorial so I wouldn’t have to go online I copied text w/ pictures into an MS Word document. Also, if looking for material go to a re-sale (thrift) shop in your area. Mine bags 4 bed sheets of various sizes into 1 large clear bag, staples it shut and sells for $1.99 – what a bargain. When quilting, I go to these stores to get bed sheets and use as backing. You can buy gently used clothing – a XL / larger man’s shirt is a great buy. Cut away sleeves, neckline, and button/snap front panel. Use the pocket as a decoration on the skirt, trimming with bias tape. If in need of tee shirt material, garage sales/thrift stores are a good buy.
I NEVER comment on blogs, but I just had to write and say thank you, thank you, thanks you for this pattern! I am a novice sewist, but I just made five of these skirts in about four days from fabric I already had. My husband and I are going on a trip to Toronto for our 5-year-anniversary, and I was feeling really low because I have not lost my baby weight from our THIRD baby, but these skirts are so flattering and cute and I feel so good about going on our trip now!! And I hardly spent any money on my new wardrobe! Thanks so much!!!
My 2 year-old needed an outfit for her sock hop at daycare today, so I used this method to make her a cute little skirt and added a poddle, made a hair bow, paired it with a white shirt and she was good to go. (Would have used the circle skirt method, but didnt have wide enough elastic nor a large enough piece of fabric.) She loved it!
I just finished my first skirt! Super easy, quick (30 minutes) and PRECIOUS! Thanks for the tutorial…I’m now going to make another!
I made the two layer skirt. I made the two layers then put wrong side to right side and sewed the tops together. I pressed the seam open and then flipped the short layer forward. I pressed this seam very flat and stitched along the edge creating the top edge of the waistband.
then stitched a second row a little over an inch down, leaving an opening to slip the elastic in.
This creates a completely finished waistband with no raw edges. This is a good way to sew the top of the skirt for non-serger sewers.
I just made my first single layer skirt!!! It was sooooo easy. I think I’m hooked 🙂 Thank you!!!!!!
Hi,
I just made one. Black w/ white polka dots and a red hem, with a vintage cloth trim piece my grandmother bought way back. BEAUTIFUL!!!!!! I absolutely adore your website! Thanks soooo much!!!
I love this tutorial and all the teaching pictures, but is there a simple
page to print without pictures. I would love to keep the instructions on file but need a simple format to print! Thank you!!!
Do you know how much matereial i need for a 12 month size and a 3Tsize?
Jeana, I made a skirt for my 3 year old last night and the material I used for her measured 112cm wide (from selvedge to selvedge) and then I cut it 30cm in length, to include seam allowances, with it ending up around 25cm long when she wears it.
Hope this helps! (sorry about the metric measurements, I’m from Australia!)
I have only just come across your website Dana and I just love it!
Your tutorials are so fantastic. I haven’t sewn since I was about 14 (now 39!) and in the last two weekends I have made 6 skirts for my two daughters with your guidance! Last night I made a gorgeous white and red dotty skirt with itsy bitsy white pom pom trim for my 3 year old. Then a beautiful yellow & grey floral seersucker, two-layered skirt for my 5 year old. I added some medium-sized yellow ric-rac trim to the two layers and it seriously looks like it comes from a fancy shop! And all due to your tutorials!
Making these skirts has really kick-started my confidence and I all I can think about now is sewing!
Thank you so much for the wonderful tutorial. I had to wait for my little to fall asleep. I just finished making two skirts and they came out soooo cute. It was easy to follow your steps which is great because I am a beginner sewer.
Thank you for the tutorial! I just got a serger and this was the first thing I used it for. The skirt is adorable and I can’t wait to make another one.
I saw this tutorial when you first posted it but waited and waited to try because I was nervous. Finally tried it with a fabric I love and it turned out great! I’m so happy with the skirt that I just bought more fabric in a different color to make another one. Thanks so much for posting such helpful tutorials. 🙂
thanks for this beautiful tutorial. i just made my second skirt in life and your explanations made it really easy. (I chose the two layers skirt for myself).
ciao from italy!!
renata
If you have made an adult skirt, can you post pics?? I’m going on a mission trip to Nicaragua in March. These would be he perfect light weight skirts to wear. I’m just afraid they will look to babyish?!?
Just made this skirt and you made the pattern so easy! I love love love it! It seriously took me like an hour to make my little girl a skirt! I added a little strip of color at the bottom of the skirt and it totally worked perfect!
When you are trying to avoid bulkiness in the two tier skirt and you are going to put one inside the other and flip it, I am a bit confused. When you put the shorter skirt inside the longer skirt so that you can sew along the top and then flip it, the shorter skirt’s right side is facing the wrong side of the longer skirt, Is that correct. And how much longer do you have to make each skirt to use this less bulky method? I am used to working with patterns from the fabric store.
I just made this skirt for my 10 year old, it was so easy and looks gorgeous! Her 3 year old sister wants one too!
I will tackle the 2 tier next…. Thank you!
Thank you so much for the step-by-step directions. I am just starting to sew and I made an adorable skirt for my little girl. I can’t wait to make another!
Thank you very much for this tutorial! It is perfect for my daughter and my sewing frenzy!
I found this on Pinterst (ofcourse) and fell in love with the tutorial! I’ve made two now…one for my 3 year old daughter & one for my 1 year niece. I see many, many more in my future! This was SO easy!
Thanks!
Hello! I albsolutely LOVE this tutorial! So well done! I have a question though…..when I do the elastic waists, my elastic always wants to fold over or twist inside the casing. Do you have any tips on preventing that…so that it lays nice and crisp? Thanks
Hi,
Thank you so much for you clear tutorial. I have just made 2 skirts for my little one. I’m about to make the 3rd one.
I made slightly different on the band for double-layered. I actually managed to sew the 2 layers together then flipped 1 layer over. Yes, it did not work for the first time as I saw both right side together. I said to myself, it should work. So it worked by sewing the wrong side of the longer layer with the right side of the shorter layer.
You can see the picture here: http://www.flickr.com/photos/hpbodart/8493922335/in/photostream
The two skirts that I have made is here :http://www.flickr.com/photos/hpbodart/8493922685/in/photostream
Once again, thank you for sharing your tutorial.
Miya
This is so cute! My grandmother made most of my clothes as a child so I hope to do the same for my own children.
I pinned this tutorial months ago & finally sat down to sew today. Success! I love it and more importantly my 5 yo loves it. Thank you for such a great tutorial!
Made it perfectly- first attempt. Thank you for the terrific instructions.
Félicitations!
Super tutorial, m’a beaucoup aidé. Merci encore.
I have made 9 of these skirts for my grand daughters, I have sewn for yrs. and quit but this simple skirt inspired me to start sewing again..People see the skirts that I have made and want to know where they can get one..The only difference I make on this skirt is I put the seam down the back, and I don’t use the little tags, which I think I might. My fabric store was out of them..Thanks again for you GREAT Tutorials. I also just finished you pillow case dress..
Your tutorials are the very best I have seen since I started sewing!!!! I’m a beginner, haven’t actually made any clothes yet, just stuff like pot holders, pin cushions and an apron! All have turnd out really good, but now I’m upping the ante, trying these skirts for my grandaughters! Thanks! Very cute too!
sorry, I have no idea why it posted the comments so many times, ?
I just made two skirts, one for my daughter and one for my niece. They’re white and orange chevron! I love them! Thanks for the tutorial!
I love the skirt and I want to make it for my dauther , her waist is 19″ is do you have measurement for 2T ?
Thank you so much! Just made this for one of my twin daughters. Can’t wait to make the next one!
What a great tutorial! I love that these are lightweight – and adorable!
Thank you, thank you, thank you for this tutorial!! I recently finished a single-layer skirt for our 5-year-old and she loves it! It was a bit short for my liking, so I just added a gathered ruffle at the bottom. Can’t wait to start the next skirt for her!
I made a baby version of the skirt today. I’ve given you credit on my blog, http://rosesyarn.blogspot.com/2013/05/twirly-baby-skirt.html. Your instructions were very easy to follow. Thank you so much for this tutorial!
I love love the tuts you a great and wonderful person will make it for my daughter you making sewing so easy.
What a fantastic tutorial. I’ve had this pinned for awhile and finally decided to buck up and try it. My sewing skills are rudimentary, but the basic skirt instructions were so easy to follow that my skirt came out perfectly. I’m so proud I could bust! Thanks for sharing this and helping to up my confidence a little. The hardest part was trying to get my little one to stand still long enough for me to measure her!
Thank you so much for the tutorial!!! I made a bunch of simple skirts for my three girls and blogged about it! I added a link of your tutorial in it as well. Just let me know if you’d like for me to take it down!
http://randomdomesticity.blogspot.com/2013/07/making-clothes.html
Nice! I wonder what an adult’s version would look like. Anyone have pictures?
Thanks for the tutorial! I used it to make my daughter a skirt for her 8th birthday – along with a matching appliqued shirt. I’m back today to finish making a 2nd one. 🙂
Hi Dana,
Absolutely loved this tutorial …i am a rookie when it comes to stitching (can fix only buttons n hem by needle n thread)but now happy to say that i handmade (yes i dont have sewing machine!) a gathered skirt for my sixteen month old daughter. It took time but then your little tips helped me get a professional finish. Looking forward to stitch more stuff for her.Thanx again..your tutorials are very well written indeed.Is there a way i can send you the pic?
I loved this tutorial so much! It was very thorough and easy to follow. I am actually making a skirt for my little girl out of – you’ll never guess – a bed sheet I found for 50 cents at our local Goodwill. It’s a lovely pattern and very lightweight cotton, I cannot wait to see the end result!
Dana I love your tutorials and have used several of them to fill my daughter’s closet for back to school. I would like to do this double skirt but would like to doa couple of vertical gathers on the top skirt. If you have done such a thing before can you give any pointers?
Such a fun, simple skirt!! I figured out how to thread my machine and gave it a go! Your instructions with pictures were so helpful! It took me about 45 minutes to make. I used a cute lightweight courderoy (spelling?) with and owl print. My daughter is going to love it when she sees it in the morning! I’m excited to do a double layered skirt tomorrow too. 🙂
Thank you, thank you for sharing this tutorial. My 9 year old daughter learned to sew shorts with her grandmother last month. With Grandma gone, I (a non/new sewer) had to help her sew her first skirt, and she picked a double layer. It turned out PERFECTLY using your tutorial. She LOVES her skirt and has plans to make many more. We even added a pink ribbon tab to “make it hers”.
Now she wants to make a skort. Do you have any advice for putting your pair of shorts as the bottom layer of your double layered skirt? Obviously the widths of the waists don’t match. I can’t figure out how to make it work without making too full shorts or too slim a skirt.
Oh, we did figure out how to seam the double layer at the top. We placed the inner layer on the outside, sewed it together and flipped it in. Then we sewed around the top to hold the seam allowance flat inside.
Thank you SO much for this tutorial! My 4 year old daughter is so girlie and will love these skirts. Funny enough, I recognize the tables (and ice cream!) in your pictures. So funny that I’ve visited your blog several times and didn’t realize we live in the same city! So cool!
I searched online for tutorials for hours trying to find the easiest one to follow as I am a beginner to sewing. This one was perfect!!!!! Your instructions made sense and the pictures were perfect. Thank you for sharing this 🙂
Thanks a lot for this lovely tutorial. I am making these skirts for my lil 2 year old daughter. I am sure she will love it. Thanks a lot once again.
Thank you so much for this tutorial. I’ve got loads of nieces and daughters of friends who love these skirts. I decided yesterday to go over to England to see my nieces on the weekend and am whipping up three different versions today. The tip above on how to do the layer skirt is brilliant too. I think I’m getting almost enough confidence to try shorts!
Hi, I have made a few of these single layered skirts for my daughters but when they put them on them the back of the skirt is shorter than the front, do you have any tips to help me fix this? thankyou
Ok, I lost my wifi signal just before I started but went by memory (yikes) but it turned out super cute!
Remi loves it, so be on the look out for her sporting her blk/wht chevron skirt.
I’m feeling pretty spiffy about it too. 😉
Thank you!
Dana, Thanks for your email regarding stretch material earlier this week – I gave your Simple Skirt a go and it turned out a treat! Can’t wait to try the layered one now! Peppi
Hey Dana, I have been sewing bags for years (and curtains and cushions, I think you call them pillows in the US) and after years of reading your blog I have just made my first skirt for one of my four girls, its a lovely vw camper van skirt for my 6 year old who is obsessed with them, in total the skirt cost me £3.50 about a quarter of the price of a store bought skirt thank you so much.
A great tutorial with really clear instructions. It gave me the confidence to get back to my sewing and I made a fabulous skirt for my daughter. I added some free stitching embellishment on the hem for a bit of fun! Thank you!
Gosh that simple skirt is amazzzzzzzzing
that simply skirt was amazzzzzzzzing
How do you keep the elastic from rolling over? I always seem to have this issue when items are washed.
This is a great tutorial! Especially for those of us that are self taught and learn something new from great tutorials like this one. I can not way to make these!
Thanks!!!!!!
http://www.rebelsandpebbles.com/
Thank you so much for this great tutorial. I’ve made my daughter five–FIVE!!–skirts with this concept. I’m having so much fun. Great instruction, great style, great projects!
Would you consider writing a beginner’s tutorial for making an adult-sized version of this skirt, but a bit longer? (so it falls a little bit below the knees) I think this skirt is awfully cute & I’d love one for me!
This looks like an awesome pattern that I can’t wait to try. If I don’t have a Serger, is it the same to just use a zigzag stitch on my regular sewing machine? Then do I have to trim the edge right up to the zigzag? Or is it just easier to do the 1/4″ turnover hem? Thanks!
Just zigzag the raw edge of your seam, right near the raw edge, you don’t need to trim it.
For the hem, I would iron under a 1/4 inch and then iron it under again and sew your hem. That gives it a nice polished look.
I’ve just finished my first attempt, and added a belt with the spare fabric. Watch the tutorial and just sew along to it – makes it easier! Thanks, ill be looking out for some more fabric now. I French seamed the side seam so no Raw edges. I’d paste a pic but not sure how to do it
Just made one for Easter turned out so cute!
I know this is meant for kids (I guess… I dunno, it was made for a kid in this tutorial), but I’m making one for myself right now with a baby pink under layer and a golden yellow top layer for Easter dinner tomorrow. 🙂 This was very easy to follow so I appreciate that (seeing as though I’m still pretty new to sewing)!
Sounds adorable! And it’s for any age :)….so you’ll look darling!
I just made my first EVER skirt!! Thank you thank you thank you for sharing your talents.
Thanks for the tutorial…I am new to sewing. Currently attending a dress making course where I am making a top for myself but want to make some clothes for my little girls. I have a maternity skirt that isn’t any good any more (waistband has lost all its support) so planning to use the material to make my 5 year old a skirt! Hoping I can use the hem it already has and just sew the side seam and a waistband! Wish me luck! Might be a project for tonight!
Thank you, it’s so cute and easy!!!!! I did two !!!
Made my 6 girls old a skirt using this tutorial turned out great, now to make one each for the twins. Thanks for another great video tutorial x
I made a couple of these skirts for my granddaughters, however I took it one step further by adding integrated shorts to the skirts. My granddaughters always say that skirts have the be “playground friendly”. The girls love them!!
Thank you for this tutorial! It was easy to follow and simple to make. I just made two skirts for my two girls (ages 5 and 3) last night. They love their new skirts and are wearing them today. 🙂 They’ve been asking me to make something for them for awhile and it’s been difficult for me to sit down to sew with a year-old baby. This was simple enough for me to make in a night and surprise my two girls in the morning.
Thanks so much for this great tutorial!!! I have used it twice and with success both times. Easy to follow for a newbie like me! Thanks again!
Kerri
I just made this using eyelet fabric and a liner and it was SO simple! Thanks so much for the clear directions!
THANK YOU SO MUCH!
I was able to do this – all because of your excellent pictures and thorough explanations. Going to hunt around your site to see if you have directions for this for a skirt for me! 🙂 🙂
All the best
I would like to say thank you for this wonderful tutorial, I have just recently finished making the skirt out of a beautiful pillowcase I found, I am new to making clothes and as I do not have (yet) a sewing machine everything was done by hand, it only took me 5 evenings (once the toddler is in bed) and it was a lovely simple pattern to follow.
OK, so what if I wanted this skirt for myself? I’m thinking you would measure your hips as the width for the skirt, then everything else stays the same right? That way it fits, you still get that cinched look up top with the elastic but the rest of the tutorial stays the same?
yep! Measure your hips….unless you want the skirt to go on over your head instead.
Thanks Dana for this turorial!! I just finished my very first skirt and I am so happy about it!! I know for sure it won’t be my last and I hope the little girl I made it for will be as happy as I am 🙂
I was hopeless at sewing at school but bought a sewing machine on a whim during a massive sale a couple if years ago just after my daughter was born . I had bought some material not long after but had put it aside. Today I made your single length skirt and while I hae technical issues (figuring out how to use a sewing machine) I managed to get it finished into a skirt that looks great! It took me a long time to do (a few hours) but your video and instructions made it so much easier. I now have confidence to do a few more, and get my practice in to try other things! I’ll be checking out your other patterns for sure. Thanks so much 🙂
That makes me so happy to hear 🙂
Thanks for sharing Alicia! And have fun sewing!
– Dana
The skirts are so adorable. I love how easy the tutorial is. Thank you fro sharing
Andrea Fenise
http://www.byandreafenise.com
I’m a beginner sewer and tried making the single layer skirt yesterday. 2.5 hours later, I was happy to report I made an adorable skirt that fit my 8 year old and she wore it proudly! My only hiccup was that I had to sew 2 pieces of fabric together (so the pattern would sit the right way) and I should have left two 2 inch openings on each seam. When I pulled the elastic around I found out half way through that I hit a roadblock. I just snipped the fabric in 2 places and continued pulling the fabric through. Making a second one now for a friends daughter and hopefully will have learned from my mistake 🙂
Thanks for the easy to follow instructions!
Can I teach you something that will make making elastic waist pants and skirts easier? When I developed arthritis in my hands and could no longer run elastic through the waistband, I developed a techinque where I could make the waistband all on the sewing machine.
First serge the top edge of the skirt just like you do. Now at the iron press under the width of your elastic plus about 1/2″ more. Back at the sewing machine sew the elastic into a circle. Now with your edge stitch foot on, edge stitch around the top pressed edge.
Now this is the best part. Put of your zipper foot. Slip the elastic into the pressed over edge and push up against the top stitching. Put your zipper foot up against the bottom edge of the elastic on top of the fabric edge. When you sew the elastic in place, the zipper foot will simply ride against the elastic perfectly.
Don’t forget the folded over ribbon to show which side is the back!
This is really a lot easier than the explanation and you’ll love this technique when you try it.
Hope this helps!
Your technique is spot on. I would add, press your hem and sew it before adding elastic.
A former garment worker.
These skirts are darling! THANK YOU for this tutorial, it is very informational with easy-to-follow steps. I too, also prefer 100% cotton vs the poly cotton. It’s softer and more comfortable. I also LOVE your little models in the MADE skirts, adorable
Beautiful, could this work on chiffon? Thanks
i just finished my first of three of these i am working on for three little girls for Christmas. Your directions and photo’s where wonderful and easy to follow. The skirt is beautiful. I wish there was a way to upload the image of it here. Thank you again so much. I hate using patterns. They take so long to cut and pin I never get around to the actual sewing part. I could make these skirts over and over it was so easy!
Your video and step by step instructions just made this novice sewer feel like a million bucks! Thanks so much for sharing. I made 2 single layer skirts today and have more fabric to make more for my daughter. They are also kid and twirl-approved:) Seriously…thanks so much!
hi! I’ve enjoyed your tutorial on this skirt. it had guided me very well to making a skirt for my little sister. do you mind doing any clothing tutorials for teens that i can try?
thank you,
Shannon
Just finished grand daughter a skirt. Love the method #2. So easy especially for me. lol. Finished the top a little different, but thanks for the tutorial. Great advice.
I just used your double layer skirt tutorial to make some adorable “princess” outfits for our upcoming trip to Disney World. I’m in love with how they turned out, and they were so easy! Thank you for such a great tutorial. I’m hooked! 🙂 Here’s the link to my post about the skirts if you want to see the finished products. http://www.saltycinderella.com/2015/01/diy-princess-outfits-for-disney-world.html
Dana! I have read so many of the comments and there certainly is a common “thread”! “Thank You” seems to be the most common words written and I thank you also. How generous of you to share your knowledge and make sewing such a pleasure for all of us. I have been sewing your skirts for my little granddaughters and we all love them. I can whip up a holiday theme at a moments notice thanks to you. Easy, yet so professional looking.
Hopefully you are very proud of yourself! My Best! Susan
i just made a double layer skirt for my daughter. it’s so cute!!! thank you so much for your inspirational tutorial! it makes sewing easy – even for novices like me.
Thank you for this great tutorial. I used it to make my daughter a skirt with knit fabric. See it here:
http://sewfanny.blogspot.com/2015/02/fast-easy-sewing-projects.html
Thank you for this! I have already made matching simple skirts for my daughters and just started the double layer skirt tonight!
Wow sounds easy after my failed attempts now that’s going to be my next challenge, u have made the process so simple.
I was so worried that I wouldn’t be able to make a skirt and was about to ask my aunt to make some. I tried your pattern and made TWO last night! I just have to add bias tape to my double layer one. I do not have a serger so I just used my overcast/overlock foot and received almost the same effect. I will be making some more for my 7 month old, and a couple for me as well! My daughters waist is 21″ and I found that was way to big for the elastic so I just use about 19″-20″ of elastic.
Is the pattern similar for adult skirts? Waist measurement doubled and then waist to knee length (still cutting everything into a rectangle)?
My 9 year old made a skirt for her sister today following this tutorial. She did all the measurements and sewing herself…I just cut the pieces and sewed a bow to the front for her. She even watched your video! Thanks for the wonderful tutorial!!!
Thank you for this tutorial! I was able to make my 18month old daughter two skirts in one day. Normally one small project takes me at least two days with my three kiddos running around. My little girl absolutely loves her skirts. I’m definitely making her more of these!
Of all the DIY tutorials for this type of skirt, yours was the easiest hands down! I am a 39 yr old adult and I followed your instuctions exactly, with the exception of the ratio for width. (I measured my hips and added 10 in). It gave me perfect fullness. My skirt came out perfect and I will be making more of these skirts for the summer!
And I am a beginner. Just got my first sewing machine and this is my 3rd project!
Thankyou for explaining so thoroughly. It made it very easy for me to follow. I made a couple skirts out of a bed sheet and they were so cute. Appreciate you sharing your knowledge with the rest of us. Bless you.
Yay! Just made a cute skirt for my 3 years old girl. Thank you for a lovely tutorial! Best regards from Norway
Excellent directions! So easy to follow. Thank you so much. Regards from Connecticut
I’m 12 and this was my first ever machine sewn project! The tutorial and video are really easy to follow a long to. My skirt turned out great, aside from crooked hems and sewing lines! I’m definitely going to make this skirt again when I have more sewing experience under my belt. Thank you so much for this amazing tutorial!
Love this tutorial! Thank you! Amazing how a rectangle piece of fabric turns into a fab little skirt. Here’s the link to one I just made. Love it. https://domesticcreations.wordpress.com/2015/07/21/one-more-sew-to-show/
Just made one for my little girl and she loves it. Thanks for this tutorial!
This was a great tutorial. The amount of detail you provided, along with the pictures, was incredibly helpful. Thanks for taking the time to make this!
Hi Dana,
I know that usually when I sew I cut fabric on fold.
but that mean i can only use the fabric width
Do you twist the fabric in order to use the length for double/triple length?
Thanks
Hello Dana!
Your tutorials are very well done. I even make my own skirts as you’ve shown, add a top and I’m done! love this and as I said… you did it so well. I learned on the serging but I do not have a serger. Did you say to zigzag the edges in lieu of a serger? The thread will not get stuck? That would help my project skirts if so. And thank you so much if I understood that correctly.
Dana, I am looking for another tutorial and wonder if you have it? I would like to make a layered puff skirt for toddler using a particular print cotton, under it, one lace fabric, two tulle, a special tulle and to the skin of the child a solid bathing suit type fabric for softness. I have an idea how to do this but if you have a tutorial or advise I could use it now!
Thank you so much
blessings,
Cheryl
I am from Algeria, I am impressed by the art of sewing and design, I liked your designs of skirts and thank you for clarification.
Hi! Thank you for such a great and EASY to follow tutorial!!!!! I will be trying this skirt this weekend!!! I do have one question though… Is it possible to make the double layer skirt without a serger? I am a beginner and so I only have a sewing machine to start. I love the look of the double layer skirt but wonder if I can make a good enough quality double skirt with just my sewing machine. Thanks in advance!!!
Hey Dana! I just wanted to drop you a note to say thank you! You make me want to sew!!! 🙂
Perfectly indited content, regards for entropy. “Life is God’s novel. Let him write it.” by Isaac Bashevis Singer.
http://is.gd/proxpncoupon
As a practicing textiles teacher, often education resources are scarce in schools or lack oomph and inspiration. This website has been my savior in learning how to make things and gaining amazing project ideas to teach my students. I adore this skirt tutorial and enjoy following your clear instructions and looking at the lovely photography. Your website is so well designed with so many goodies and excellent videos. Tutorials are all easy to follow and the design is consistent across all features. I’m so glad I came across this quality site and to see someone who has a friendly and down to earth, yet professional presence and genuinely passionate about what they do. Thanks! I’m totally sharing this with my friends.
Hello! Just found your YouTube channel and website. Any chance you have updated information for your fabric labels shown in this tutorial? The link didn’t work and I’ve been looking for some nice labels I can use. Thanks!
My novel time
http://love.pics.webcamsex.lgbt/?entry.ayla
cute little bj porn hub 3d porn toons gangpang porn clips horny sexy porn free woodstock porn
Study my recent contract
http://matrue.bbws.bigtitscam.webcam/?post.estefania
amatures gone porn famous cartoon porn comics passed out daughter porn old woman porn porn in mp4 format maria ozawa
Thank you so much for your easy to follow instructions. Just made my first skirt for my daughter. Thanks from Australia x
Just helped my 7 year old daughter make her first skirt. This is such a cute, simple project. Thanks for sharing!
If you wanted to add suspenders to these skirts, which step would you add them? At the end and stitch on top of the gathered fabric? I’ve seen this question on another post so maybe this is an idea for your next tutorial! 🙂
Thanks for all of your AMAZING video tutorials so far. I’ve really enjoyed watching and getting ideas for new projects.
Just a perfect tutorial.
Thank you. Going to make a skirt for my Granddaughter .
I can’t stop making theses!! I have made 6 and gay are so fun. For less than $20 my daughter has 6 outfits!! Thank you
How do I attach knit shorts to this sweet little skirt?
Thank you so much for this great tutorial!! I just whipped out two layered skirts in no time and I’ve hardly sewed anything in my life!! So excited about finding this, you did such a great job explaining everything! Thank you so much!
LOVE this post! Thank you! I just made two skirts size 12 months and 3 T! Adorable!
Hi,I’m a beginner n I found it so easy n simple to stitch a skirt by following your video.can u please post a tutorial to stitch a frock for my 5T kid
Hi Dana, I’ve been making your simple skirt for my daughter for a while now. She loves skirts and these ones are so easy to make 🙂 I’d like to make them in knit fabric so I’m wondering if the measurements would be the same or different since it’s stretchy fabric. Thankyou so much for your awesome tutorials 🙂
Hello! Could you please do a tutorial or add on to this one on how to do an adult one? I saw some tips in the comments but it was greek to me, I need things in by step form and spelled out…beginner sewer here! THANK YOU so much, these look wonderful!!!
I just made my first skirt for my daughter for Easter. I’m kicking myself for not using the wide elastic, but: How do you keep the elastic from turning on itself while weaving it through? I’ve tried three times, and every time it happens, ugh! Any tips?
Hi Katy,
Your casing might be a bit too tight. Next time, try sewing it 1/8-1/4 inch wider.
And I like to use KNIT elastic. I find that this kind stands up the best, and doesn’t start to fold over as easily.
Hands down the best skirt tutorial out there. I just used this pattern to make my Blythe doll a lovely little skirt. Thank you ❤️❤️
I had so much fun sewing this skirt with my neighbor girls and they created their first sewing project! Thank you so much!
Awesome! That’s a great beginner project! I’m glad they had fun 🙂
Thank you so much for sharing all this. Gives me lot of confidence now. I shall start sewing right now as I have a lovely cotton fabric.
Bye.
Hi! I love this! I’m going to attempt it for my daughters!
Can you use bias tape in a single layer skirt? And when you do, do you use the same color thread?
I’m a newbie, sorry!
Sure! It would look cute as a trim along the bottom of the skirt!
You can use whatever thread color you’d like. If you want the thread to blend it and not be noticed, use the same color as your fabric. If you want the stitches to stand out, use a contrasting thread. It’s all the aesthetic you’re going for!
Have fun with your new sewing adventures 🙂
Love your tutorials! I especially love your guidance on creating your own shorts pattern! Still use that method. Very straightforward tutorial here but my 5yo is not “skinny” and is moving from 6x to 7 and has 22 in waist. I was shocked to read you estimate your skirt at size 3-4T?! Seems off to me. But, love the tutorial. Thanks!!
Thanks for the kind words, Nicole! And your mileage on the sizing may definitely vary. That’s why it’s always most important to go by measurements, rather than size/age. It also depends on how snug you or your child likes the elastic, etc.
Hi,
I’ve just started sewing again for the first time in 25 years. I came across your site and decided to make one of your skirts for my granddaughter. It turned out great! Thanks so much for the easy to follow instructions. Very happy with the results!
Aw that’s awesome to hear! Welcome back to sewing 🙂 I’m sure you’ll have tons of fun sewing for grandkids!
We made 4 skirts this week. Each of my 2 daughters picked out a fabric, and we made 2 matching skirts from each fabric. I cut the fabric in half widthwise so they have two side seams and added pockets. My 9 year-old did a good deal of the sewing. Without the pockets, she probably could have made them all by herself. This was a great first sewing project, and my girls are so excited to wear them.
Hi Dana,
during a long time I had a dream to do some clothes for my twins daughters, but I decided do not take the risk because I learned to sewing by myself and sometimes (for me) is difficult to give the next step. But I decided that will be this year that I will learn and do something for my kids. After a few searches I found you. I´m so happy to find you. I love your tutorials, they are so well explained that it was impossible not to try… I made for the first time this two simple/ single skirts and my daughters loved :). After, I did more two simple skirts but double layer and once again I received a big smile from my daughters. Now I´m completely addicted 🙂 and I decided to take the challenge and I bought your pdf. pattern ” Anywhere skirt “. Amazing, I´m almost finishing the skirt. I only need to open the buttonholes and sewing the Buttons. Thank you very much for share your knowledge with us.
Big Kisses,
Letícia
Awesome! Thanks for sharing! And have fun with your new sewing adventures!
Thank you so much for this tutorial. I’ve had a sewing machine for many years but only ever made small things, I always felt daunted by clothing. This tutorial looked so well explained that I decided to give it a try and I’m so glad I did. Some fabric which I had tucked away has now been turned into a skirt which will be an extra stocking filler for my daughter this year. Now building up the courage to make one for myself!
How important is it to follow the grain line for this garment? I noticed you mention in one of the comments about using the selvage edge for the hem which would mean you are sewing the skirt across the grain? Help please. Also, thanks for all the great content.
my 15yo daughter needed a costume for a party – she wants to be the leg lamp.from a Christmas story. the costume online was $50. I found your tutorial, and having NEVER sewn an article of clothing before in my life, successfully created a lampshade skirt complete with black fringe along the bottom. I wish I could show you a picture of how adorable it turned out.
thank you!
Thanks for sharing! Can you make this reversible?
can someone tell me what I did wrong? I did every step but my shirt just looks super bulky/makes me look fat. I did all of the measurements and made the whole thing. Why does it look so poofy/large?? help please!
dear,
before starting to sew a skirt for myself I wonder whether I can use for this project a medium weight silk fabric. I have a few pieces of lovely pieces of silk fabric – and would very much like to use them.
thank you
Gabi