
Welcome to Celebrate the BOY! with two weeks of boy-ish fun here at MADE and on Made by Rae.
A few weeks ago I was looking for short-sleeved t-shirts for Owen and they were nowhere to be found. Only long-sleeved Tees in the store. I was frustrated.
Then felt like an idiot.
And realized…why don’t I just make them??

Can you believe that in all my years of sewing, I’d never made a basic tee?!
In the first year of Celebrate the BOY, I shared the 90 Minute Shirt and couldn’t get enough of the envelope sleeve. But this, my friends, is even FASTER!
It’s my new go-to.
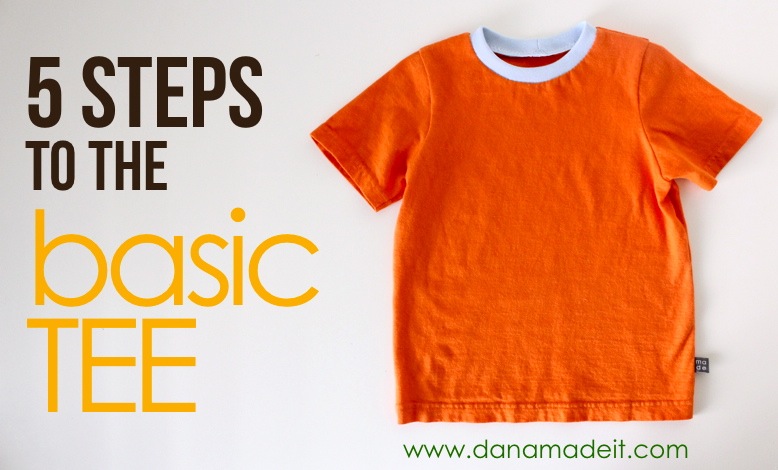
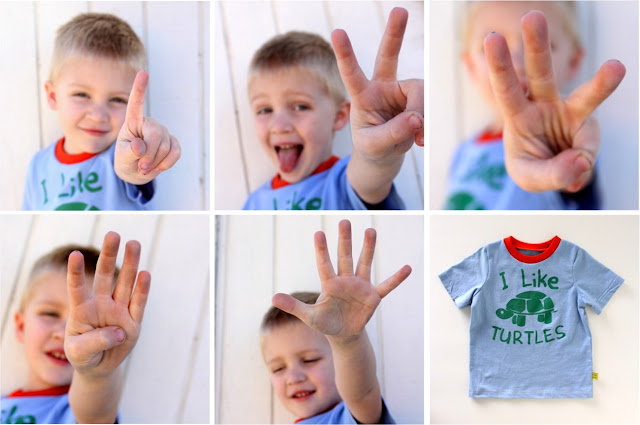
And it only takes 5 steps.
Yes! Only FIVE sewing steps and you’ve got a really fun Tee for all ages (and genders)
 For a full video tutorial, click here, or just hit the play button below!
Or for step-by-step photo instructions, continue reading below….
Of course when it comes to making a shirt, there are tons of options.
You can use the existing hem line of an old T-shirt, or create your own. Add a pocket, stencil an image, color block the pieces.
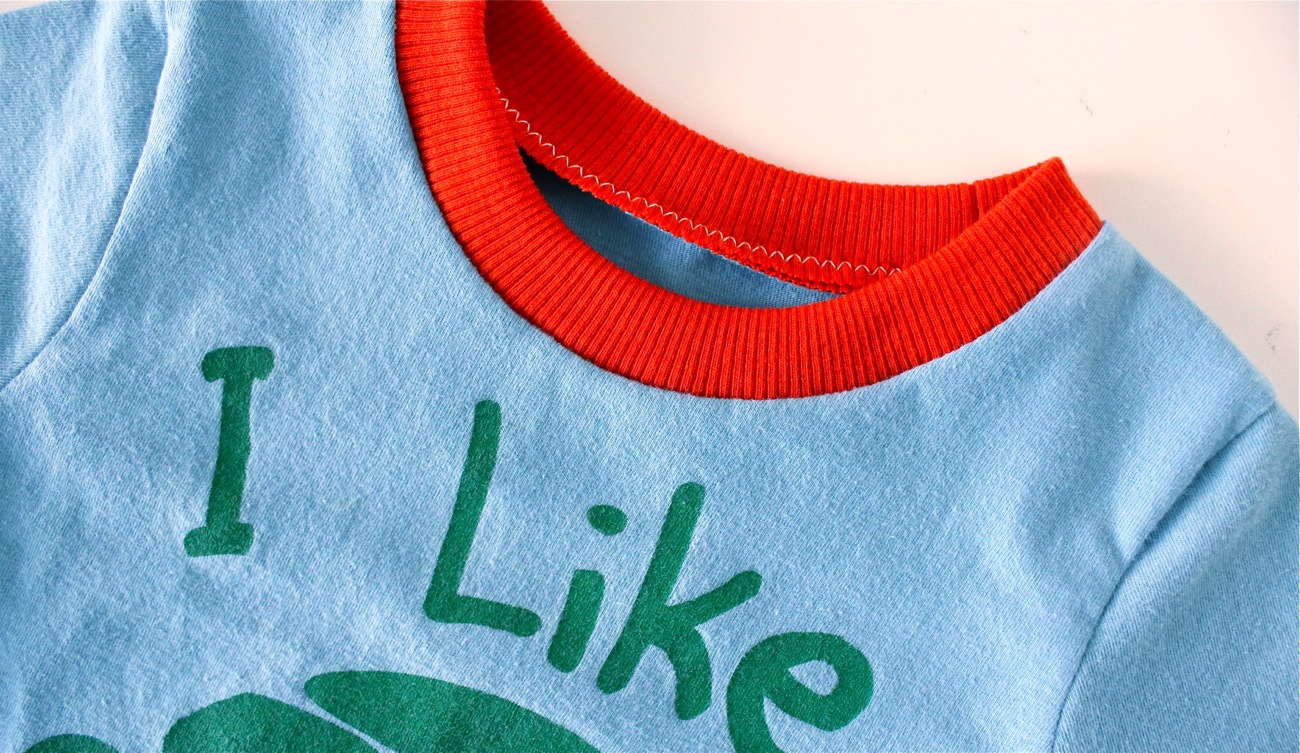
With just a little ribbing around the neck it’s simple.
And if you’ve never sewn with ribbing, have no fear! We’ll walk through the basic steps for sewing ribbing on a standard sewing machine. You do not need to have a serger to sew with knits.
Let’s get started.
Begin by printing my 1-size pattern HERE. (Or create your own pattern using a current T-shirt your child owns as your guide, or size down my pattern using a current Tee as your guide and creating similar lines.) You will be prompted when you click the above link to open a 50KB file in Acrobat, Preview, or other software on your computer.
PRINTING and PIECING:
• this pattern is a size 4-5 Toddler
• the pattern is 3 page PDF doc. It prints to standard US paper size, 8.5 x 11 inches. Print it using standard settings (if you’re having problems, you can always play with your print settings but I found that standard US Letter worked best). The pages do NOT print to the edge, so you don’t have to worry about borderless printing, etc.
• If you live in another country outside the USA, print to your standard paper size and measure against the sizing ruler to see if you’re printed properly.
• There are 2 size references on the pattern to judge whether you’ve printed properly. Use a ruler to measure against the printing ruler and the one square inch on the pattern. If they don’t match up perfectly, play with your settings and print again.
• Print the first 2 pages TWO times (so you have a front and back for the T-shirt). And print the third page only once (the sleeve page).
NOTE: There is a dotted line near the armhole line, which is for a MUSCLE TEE version! Get the detailed tutorial HERE.
You should end up with pages like this:
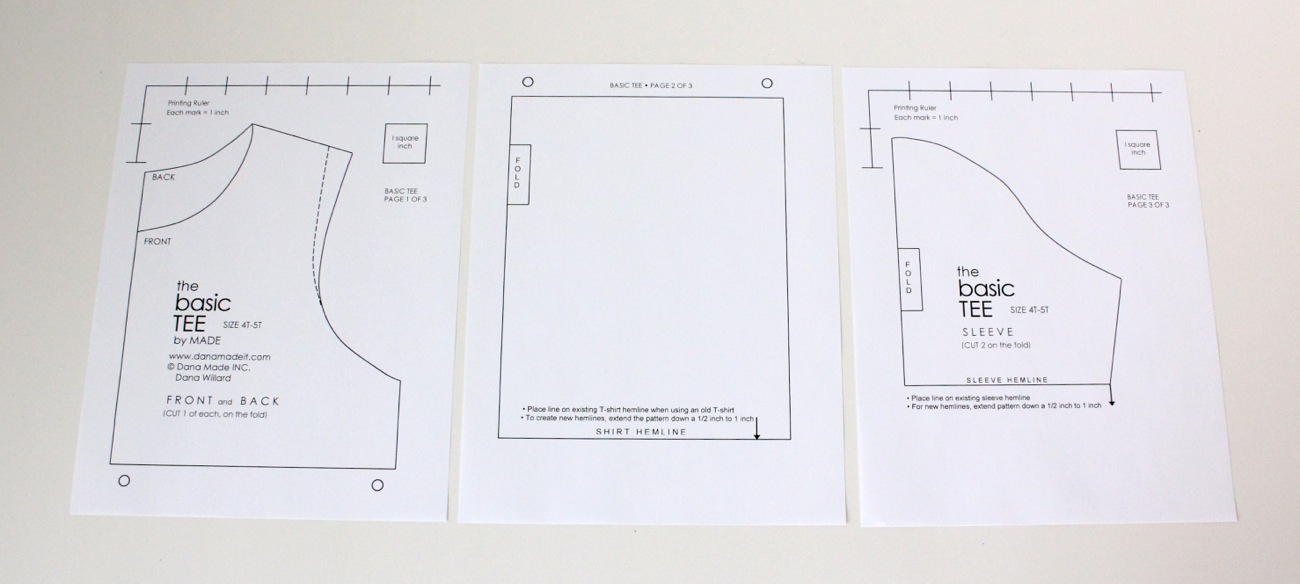
Now let’s piece them together.
• There are circle markers on the first two pages showing which direction to line up the pages. These are not meant to overlay each other, or to match up with the pattern lines. They’re really just directional markers.
• Where you do want to line up the first two pages is on the pattern lines themselves. So…
• Cut along the top line of the pattern piece on page two and line it up with the bottom line of the pattern piece on page one and tape them together. Tape on the front and back of the pages, then cut out the entire pattern piece. Do this for both the Front and Back pattern pieces, then cut out the sleeve piece as well. Remember, do not cut on the dotted line…unless you plan to make a MUSCLE TEE.

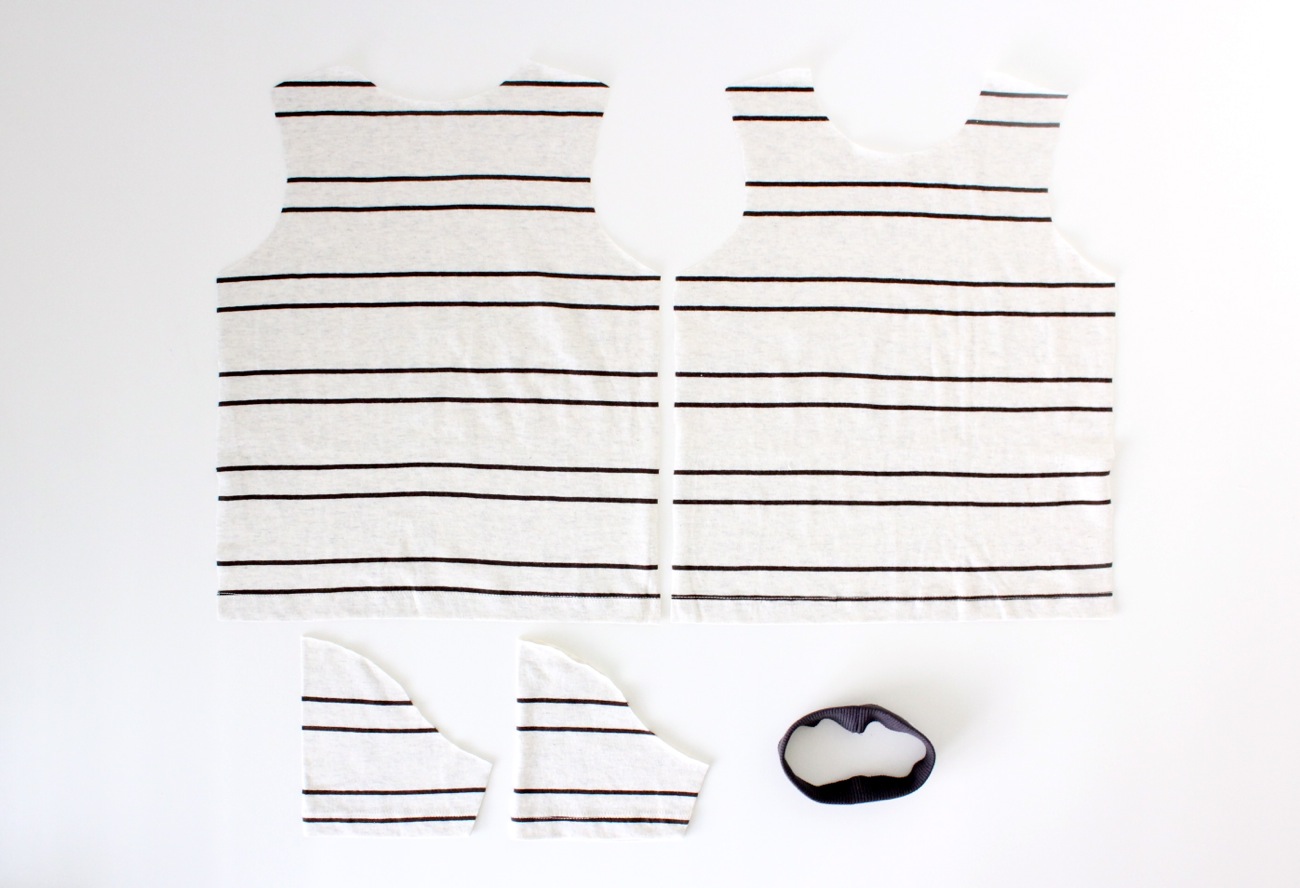
When you’re done you should have 3 finished pattern pieces.
Now let’s talk about knit fabrics.
If you’ve never sewing with knits, check out my detailed Sewing with Knits post HERE.
You don’t need a serger or fancy sewing machine to sew with knits. Of course I’ve found that people who feel frustrated sewing with knits are often using a lower-end machine, which is fine. Don’t let that stop you! But just keep in mind that if you plan to sew more knits in the future….you may want to upgrade your machine a bit. NOTE: if you prefer sewing knits with a serger definitely use it for all the steps! Personally, I like to sew with my standard machine first and then finishing off my seams with a serger because it allows more room for error (the serger cuts the fabric edge as you sew). So do what works for you!
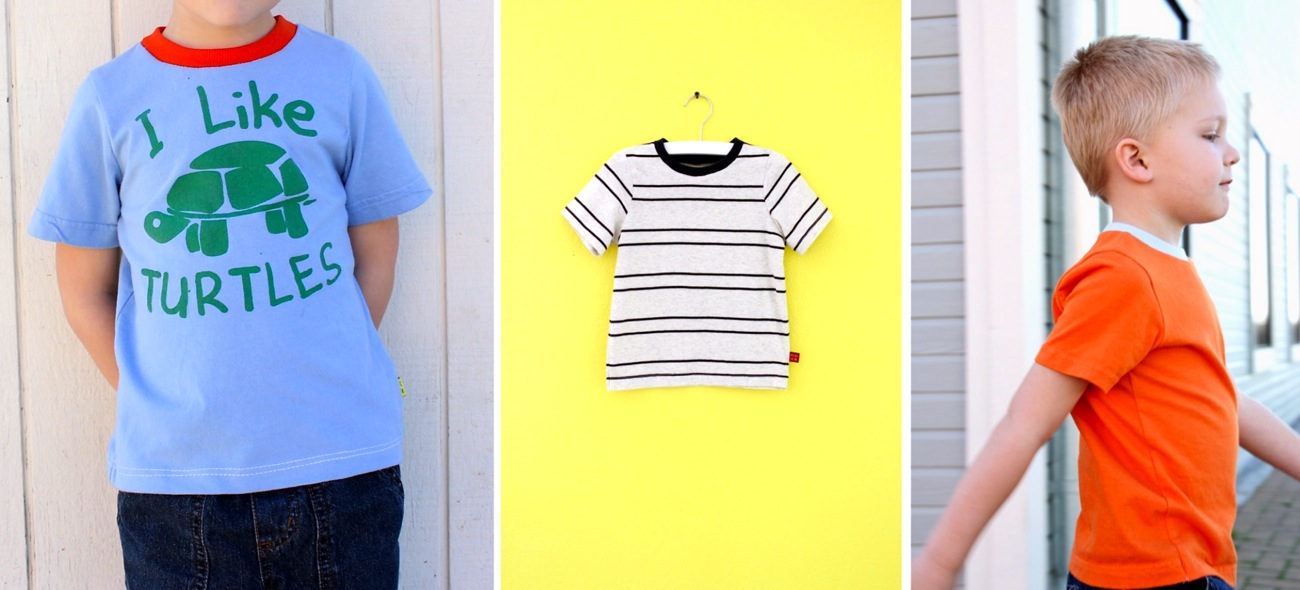
When it comes to finding cool knits, fabric shops are often limited which is why most of us turn to an old Men’s T-shirt for fabric. Check thrift stores, retail store clearance racks (like Target and Old Navy), or raid your husband’s drawer (asking permission of course) for good T-shirt fabric options. When purchasing Tees from a Thrift-store always rub your fingers over the fabric to make sure it’s soft enough to wear. Avoid t-shirts that are stiff/cheap because the fabric will be itchy on your child, which means they’ll never wear the finished product.
You can also find some knit fabrics in online stores like fabric.com, hartsfabric.com, and spoonflower. I purchase most of my knits in-person at Michael Levine and the FIDM scholarship store in LA. Read more about that HERE.
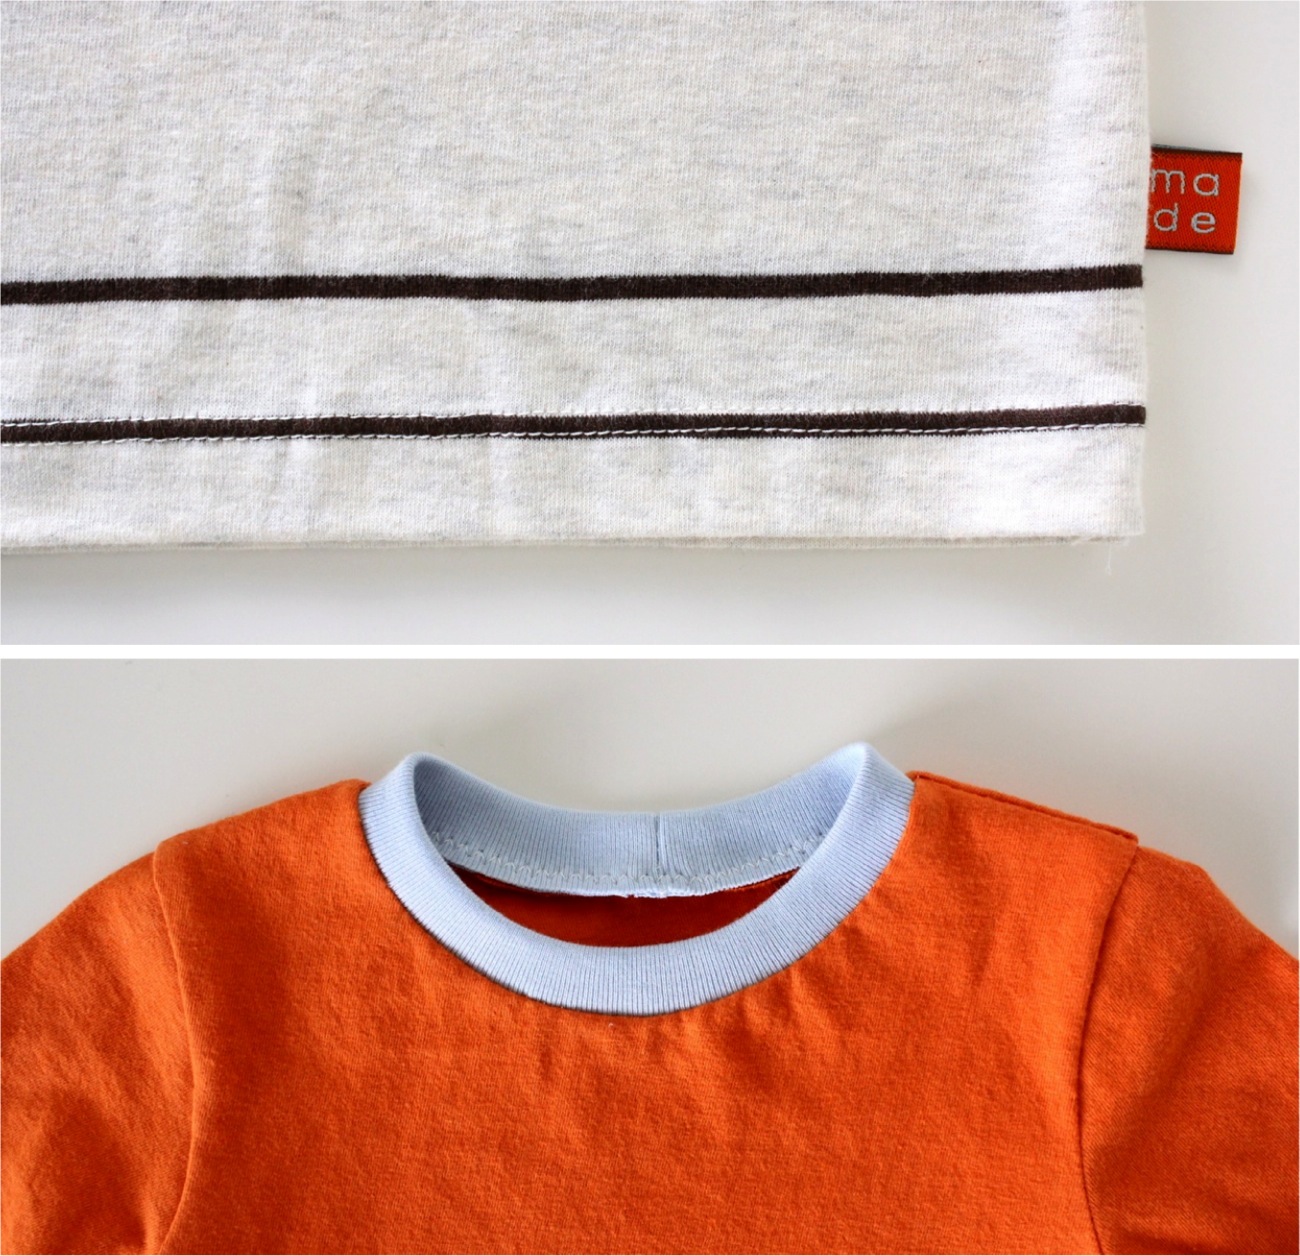
For this tutorial we’re using a men’s XL t-shirt (with an existing hem) as our fabric. But we’ll show you how to create your own hem as well. Okay….
STEP 1 – Cut and prep the T-shirt pieces and Ribbing
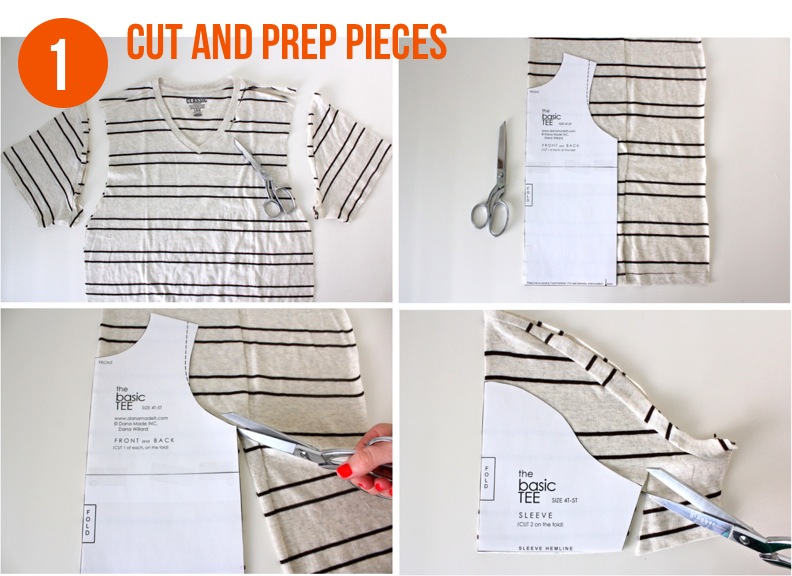
• Using a men’s Large or XL T-shirt, cut the sleeves, side seams, and neckline from the shirt. Now you have two large pieces of fabric to work with.
• Fold the first fabric in half (lining up the stripes if you’re using striped/patterned fabric) and place the Front pattern piece on one fold. If you’re using the existing hem of the T-shirt for your new Tee, line up the bottom of the pattern piece at the bottom of the old T-shirt hem and cut out your pattern piece. Do the same thing for the Back pattern piece
• Then place the sleeve pattern on the old existing sleeves and cut two new sleeves on the Fold.
Now let’s cut the ribbing for our neckline.
RIBBING is just what you think: a knit fabric with long vertical ribs. These ribs allow the fabric to expand and contract which is why it’s often used for cuffs, collars, and form-fitting clothes, such as tank-tops…
The key to ribbing is to cut it slightly smaller than the space it occupies. This allows it to stretch when needed then retract back so it sits snuggly around your arm or neck. It’s typically sold by the yard (and just ¼ of a yard goes a long way). If you can’t find ribbing fabric you like in the store, search online stores…and remember that tank tops and other T-shirts with very small ribs make excellent ribbing! Look in your drawers or the clearance rack at retail stores for items to use.

Also, never throw away the old neck ribbing from a T-shirt you’ve dismembered. I have a bin where I save all old necklines and sleeves for future projects. To use an old neckline, cut away the old knit fabric, cut a slice into the ribbing, use a seam ripper to open the ends slightly (or all the way), and you have useable ribbing!
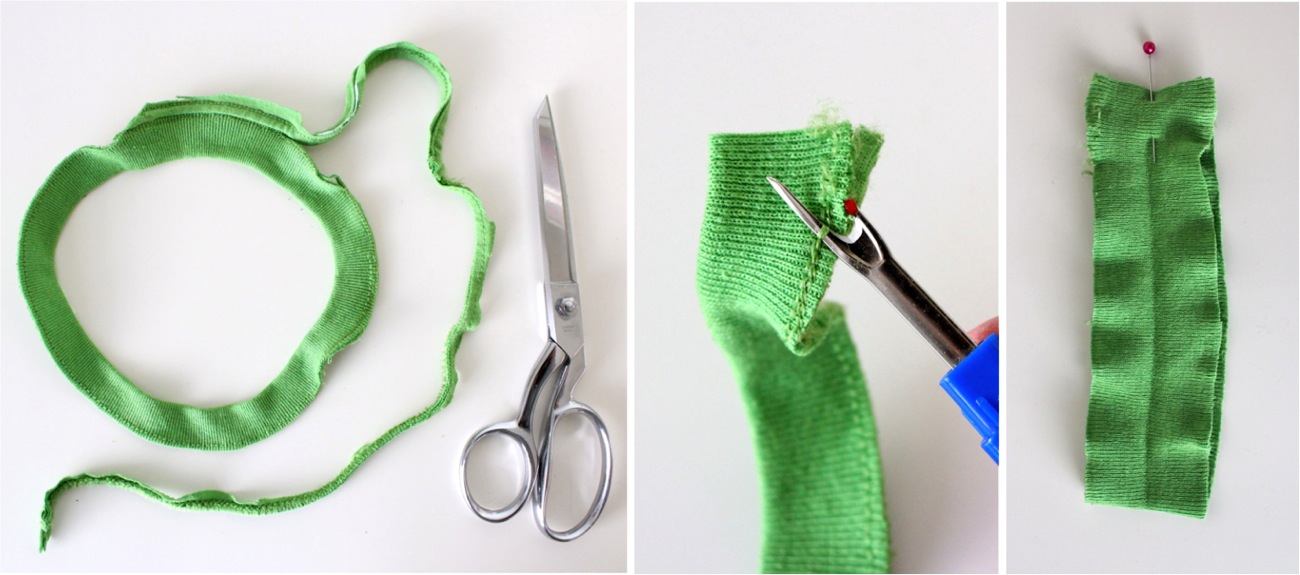
• Cut a strip of ribbing 11 to 11.5 inches x 2 inches (or whatever width you’d like. 2 inches is nice for a 4 year old). Remember to cut perpendicular to the ribs.
I say 11-11.5 inches because each ribbing reacts slightly different to being stretched and sewn. Standard ribbing found at Joanns tends to stretch more so you may want to cut it 11 inches. Ribbed fabric from a t-shirt has tighter ribs (my favorite type of ribbing) so you may want to cut it 11.25 inches. Just experiment with lengths as you make these tees, till you find the one you prefer.
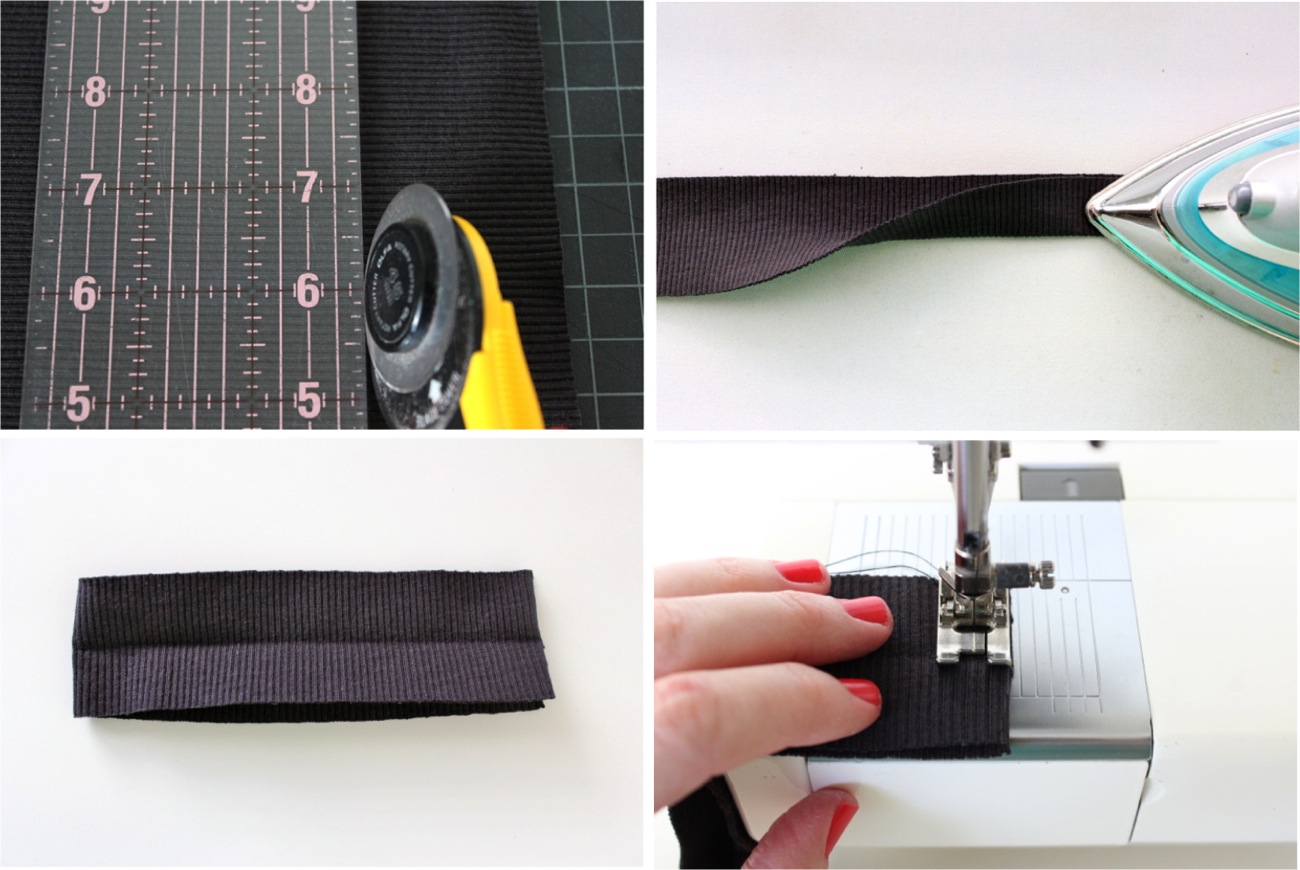
• Iron the ribbing in half, then open it up and fold it in half the other direction (with right sides of the fabric together….or with the folds pointed in. Pictured above) and sew the strip together using a 1/4 inch seam allowance.
You end up with a ribbed neck piece like this. Woohoo!
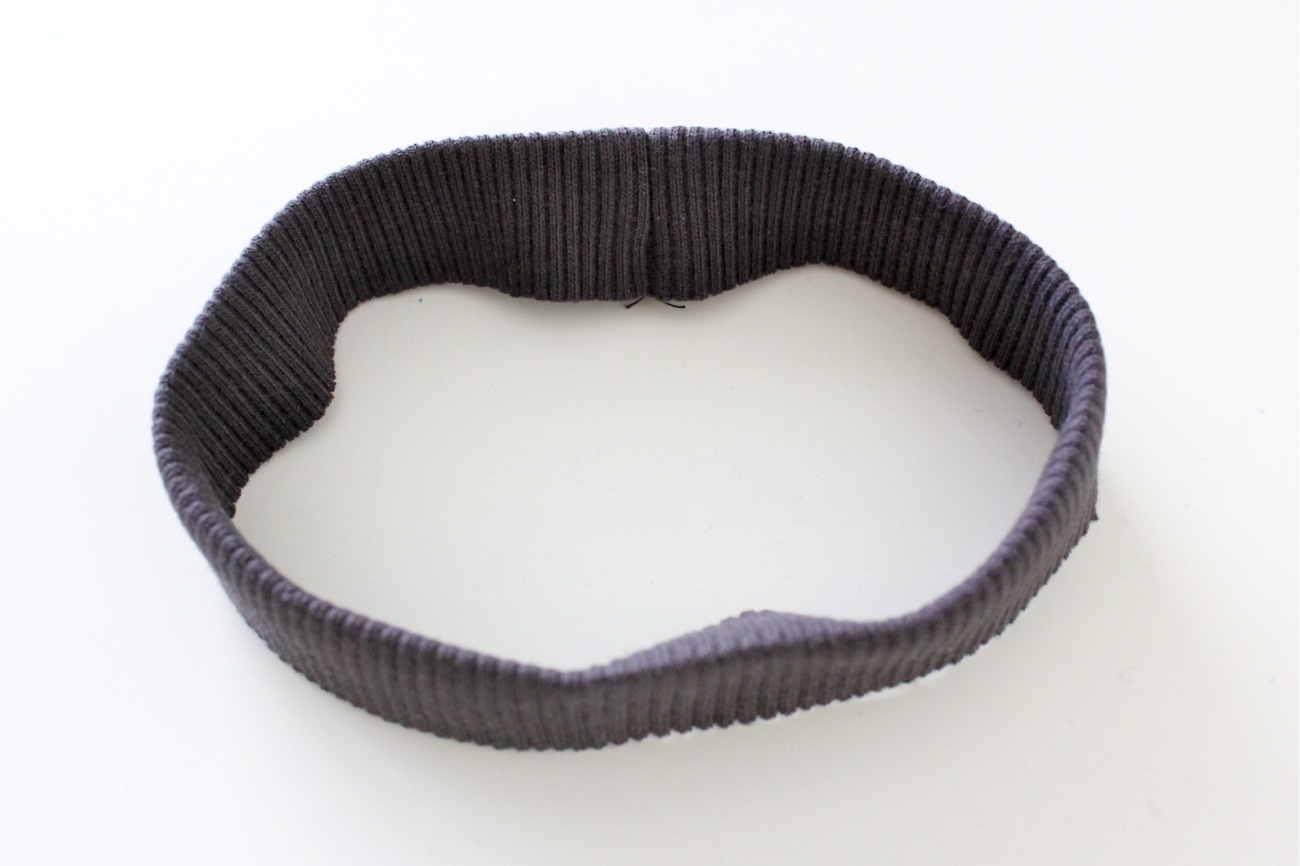
Combine that with the T-shirt fabric pieces and you’re ready to sew!
STEP 2 – Sew the shoulders.
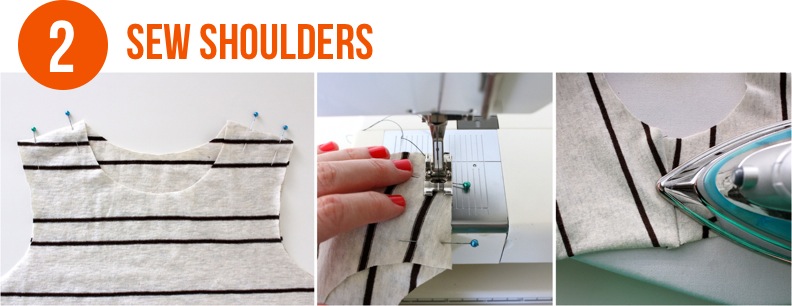
This is a super short step.
• With right sides of the T-shirt Front and Back together, line them up at the shoulders, pin, and sew them together using a 3/8 inch seam allowance and a straight/normal stitch.
• Iron out your seams. Always iron out your seams–this is key to making your garments look more professional and less homemade.
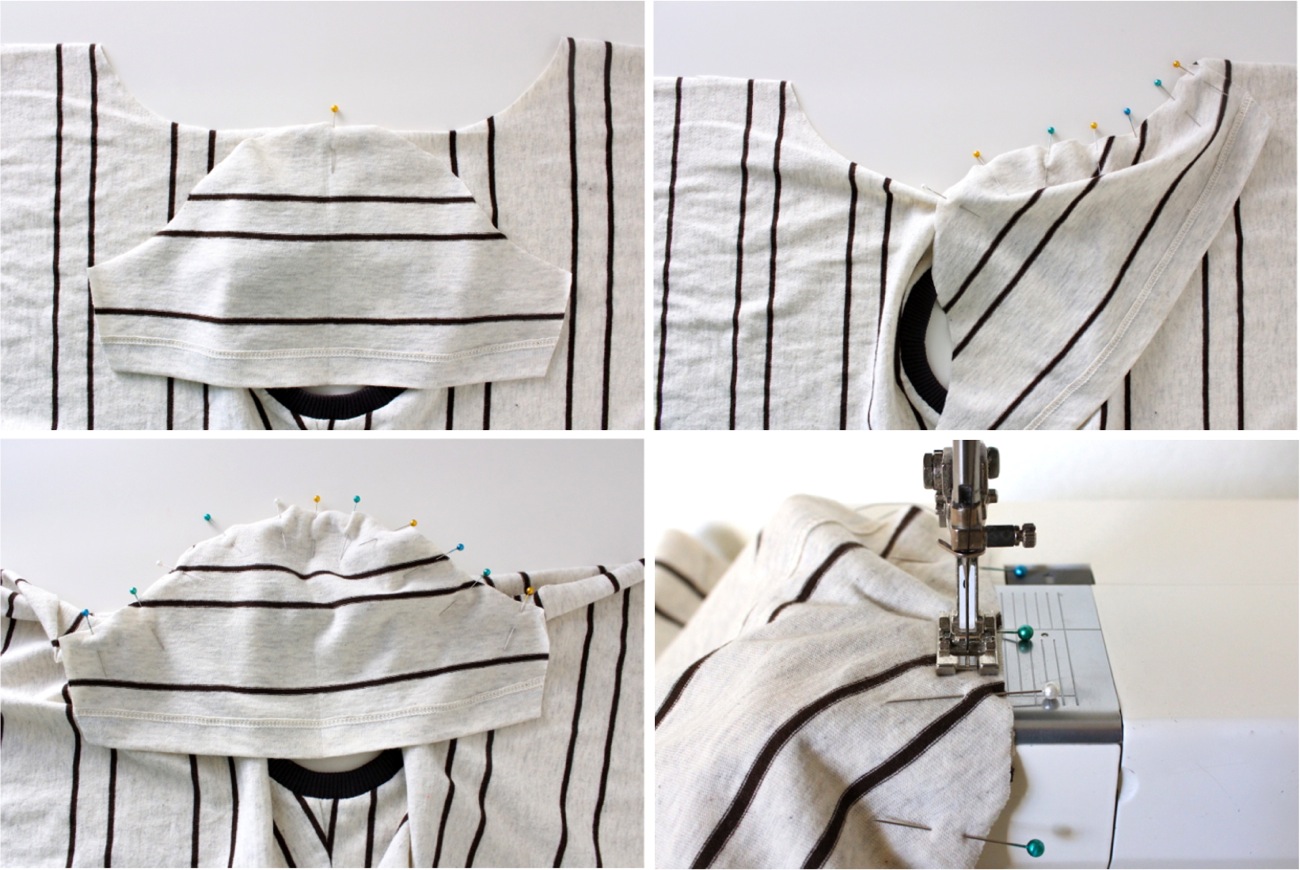
STEP 3 – Sew Ribbing to the Neckline.
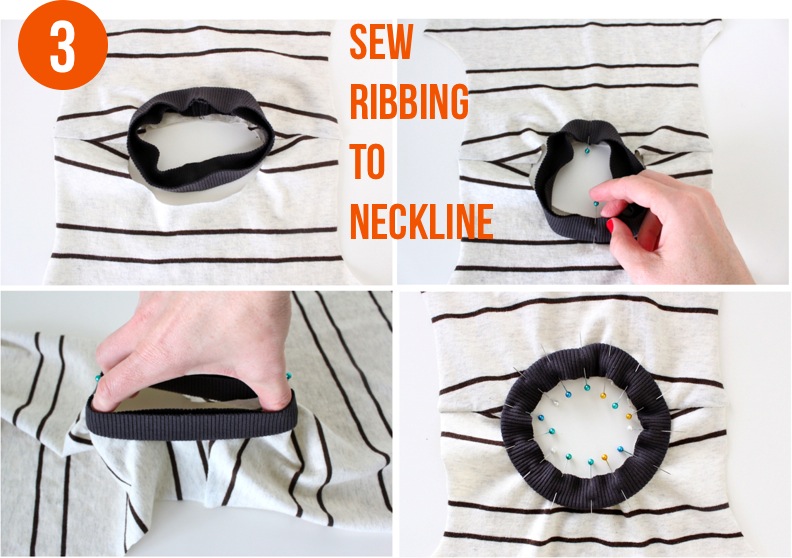
(refer to above photo)
• Lay the shirt open flat at the shoulders and place the folded neck ribbing over the neckline. As you can see it’s smaller than the space it occupies. This will make a comfy fitted neckline.
• With the raw edges of the ribbing pointed up, pin the ribbing to the raw edge of the neckline first at the center back of the t-shirt, then pin the other side of the ribbing to the center front of the neckline.
• Then stretch the ribbing with your hand so it fits around the rest of the neckline and little by little, pin the ribbing around the neckline so it’s evenly spaced. Be liberal with the pinning.
(refer to below photo)
• Sew the ribbing to the neckline using a 1/4 inch seam allowance and a ZIG ZAG stitch. A zigzag is important here because it allows the thread to stretch with the fabric as it goes over a child’s head.
• As you sew, use your hands to stretch the ribbing slightly so there are no gathers or folds in the fabrics. Don’t over-stretch it. Just stretch enough so it looks taut. It helps to hold the pins as you stretch.
• This step can be awkward with all those pins poking at you. So remove each pin after you sew past it.
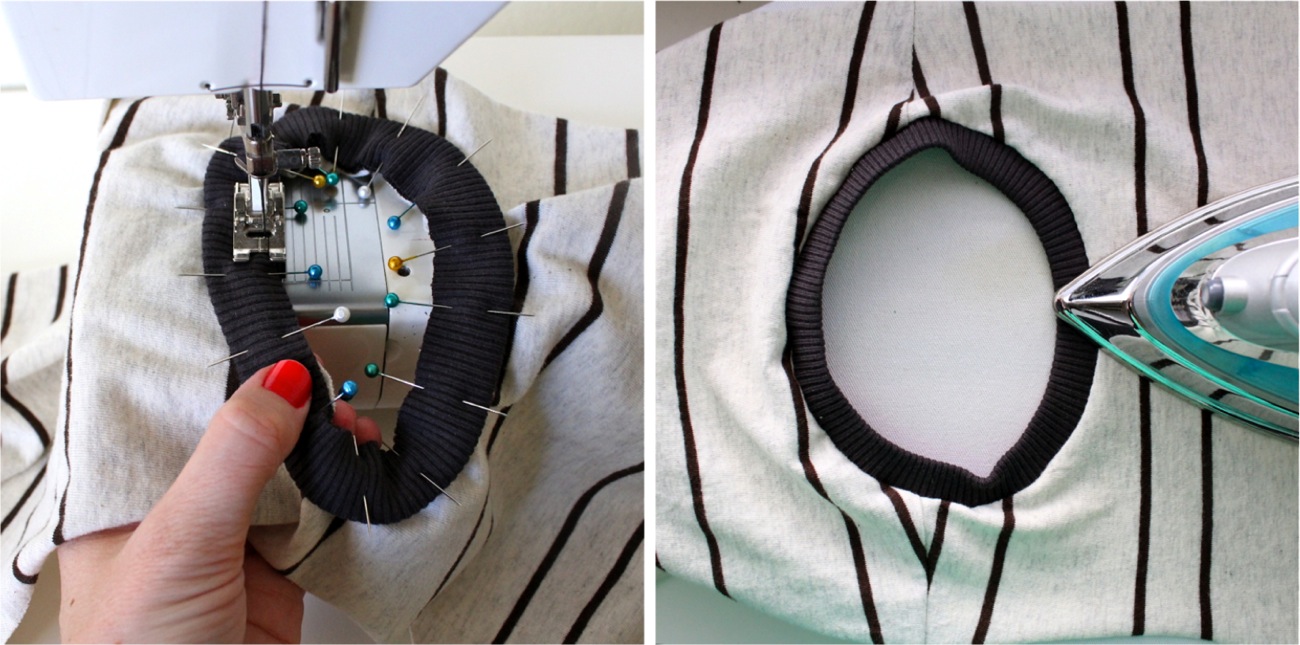
• If you do notice any gathers in the fabric after you’ve sewn, simply remove a few stitches with a seam ripper, smooth it out, and re-sew that area.
• Iron the ribbing flat at the collar.
• For an added touch you may want to sew a top-stitch around the edge of the collar on the T-shirt fabric (I chose to leave mine plain; no top-stitching). Remember to do this with a zigzag as well or your stitching may break as you stretch it over a head.
And whatdya know? You made a T-shirt collar!
Looks pretty professional right?
Totally exciting.

STEP 4 – Sew sleeves to the armholes.
The photo below shows how the sleeves fit into the T-shirt puzzle. So….
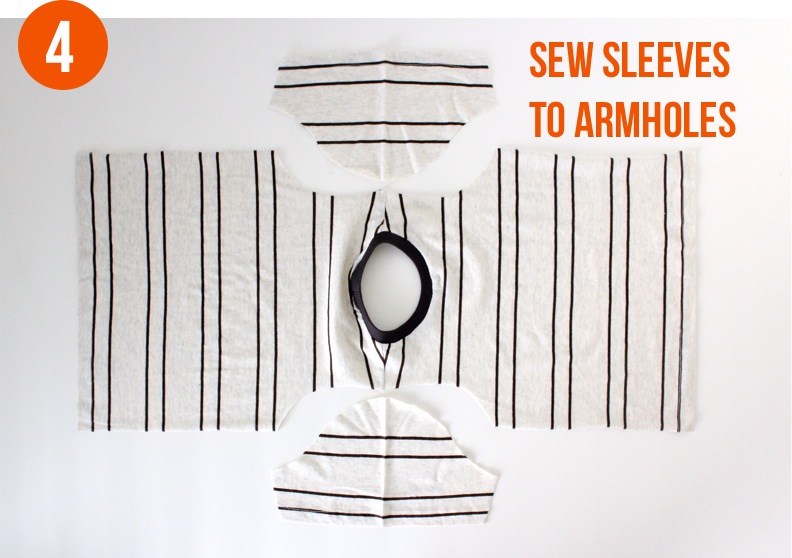
• With right sides of the fabric together, pin the middle of the sleeve curve to the middle of the armhole. Continue pinning the sleeve down one side of the armhole to the end of the armhole. Do this for the other side of the armhole as well…and for the other sleeve too.
• Sew the sleeve to the armhole with a 3/8 inch seam allowance and iron out your seams.
Just one more step!
STEP 5 – Sew arm and side seams.
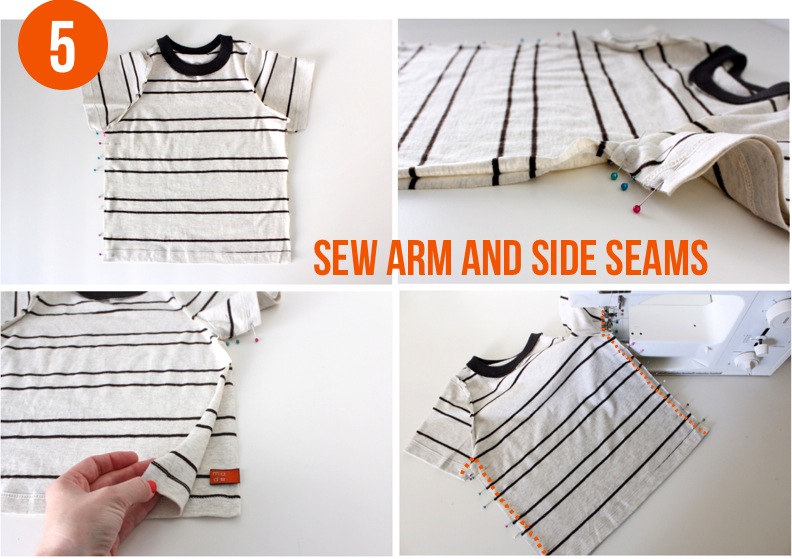
• With right sides of the T-shirt together, fold the Front of the shirt over the Back of the shirt and pin down the sleeves and sides. It’s easiest to pin first at the armpits, matching up the armhole seams. Then pin the rest of the sleeve and then the side seams.
• If you have a side-tag throw one into the side-seam about 2 inches from the bottom (read about my labels HERE)
• Starting at the end of the sleeve, sew down the sleeve, down to the armpit, and continue sewing down the side seam with a straight stitch (as show in dotted orange below).
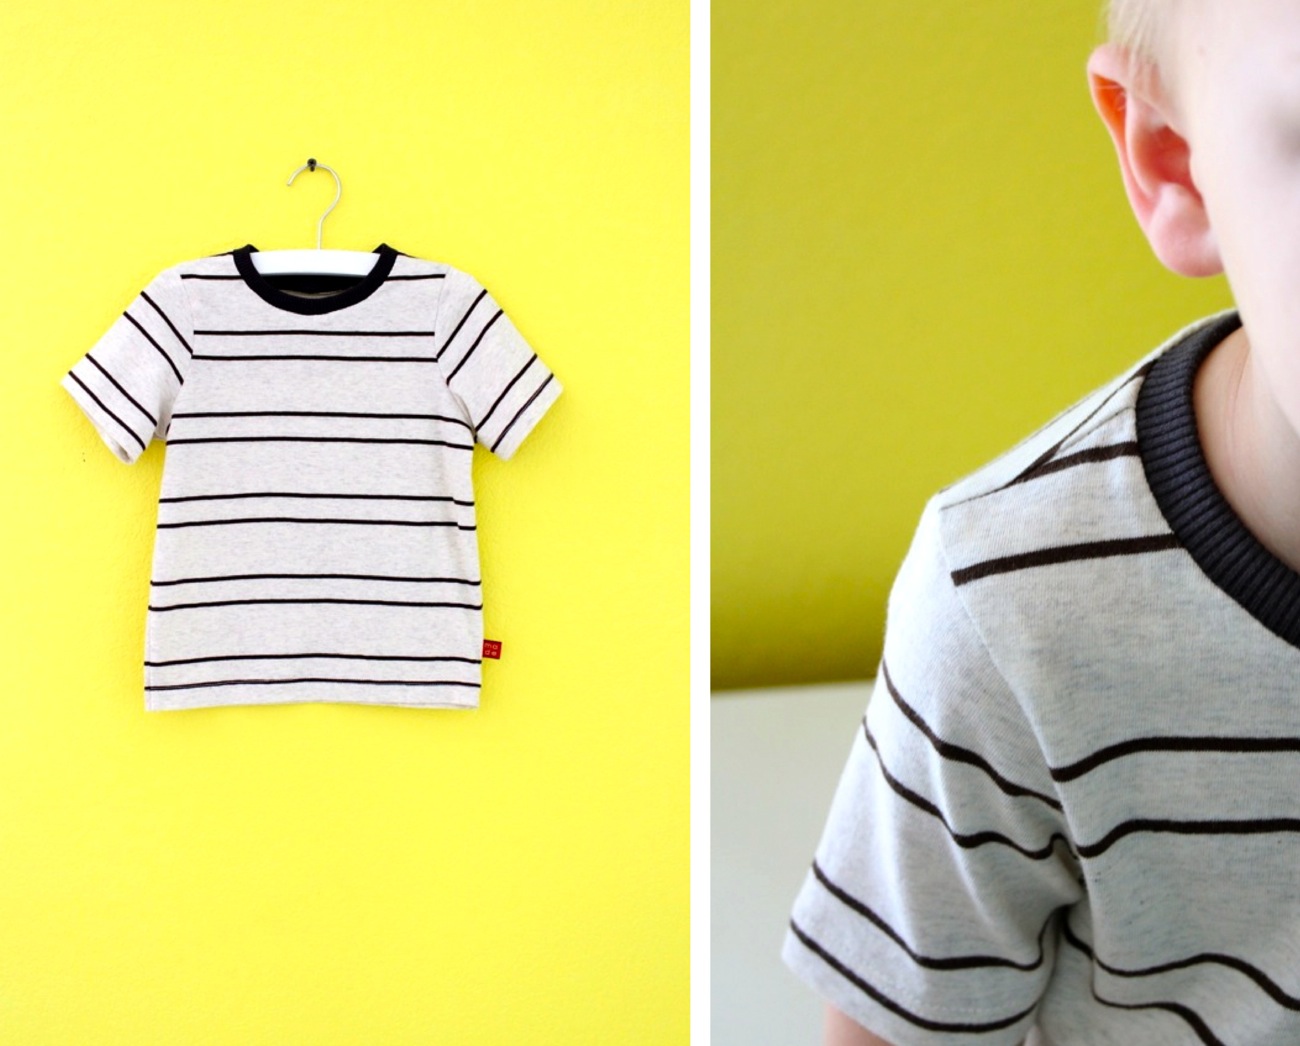
And…You’re done!
One Basic Tee!
(and many more to come….)
SEWING YOUR OWN HEM
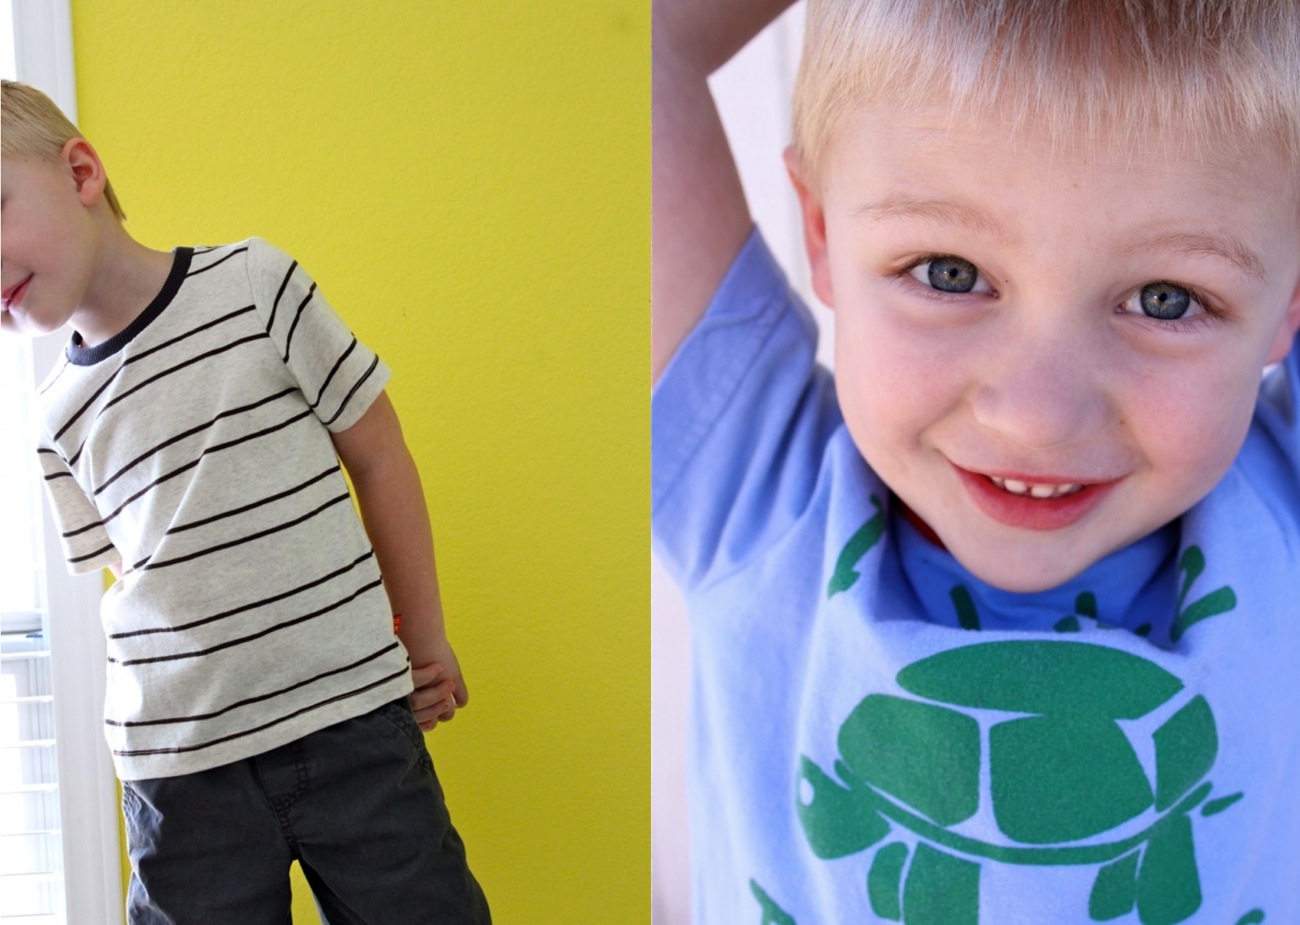
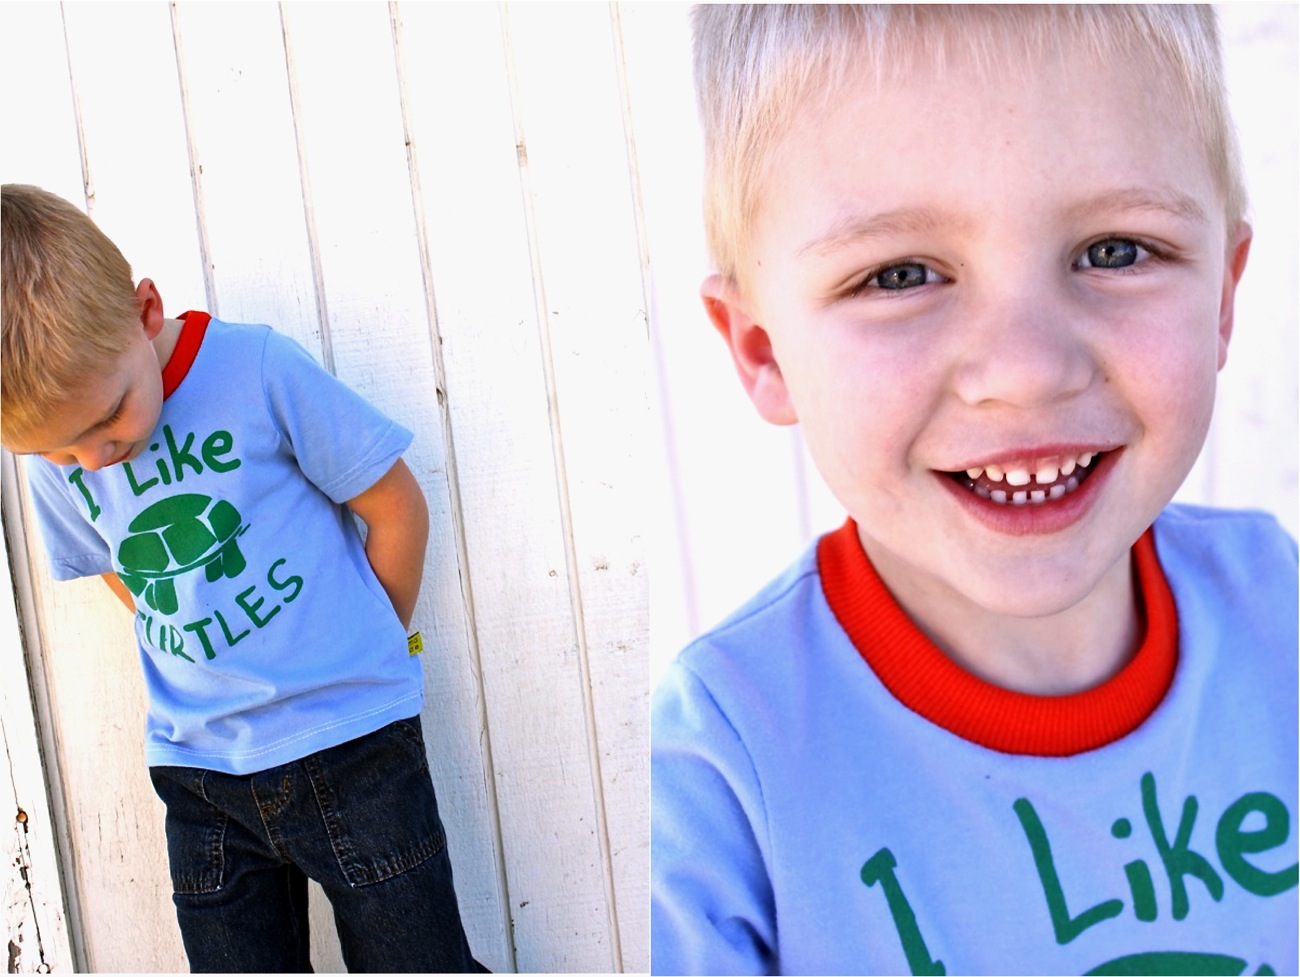
I found this awesome turtle shirt by American Apparel at the thrift store and knew Owen would love it. But in order to include the logo in the new shirt, I had to shift my pattern piece up a bit. If you’re in the same boat, or using original knit fabric, here’s how you sew your own hem on the T-shirt (and sleeves if needed).
• Cut the t-shirt apart as we did above.
• Fold the t-shirt fabric in half so the logo is centered on the fold.
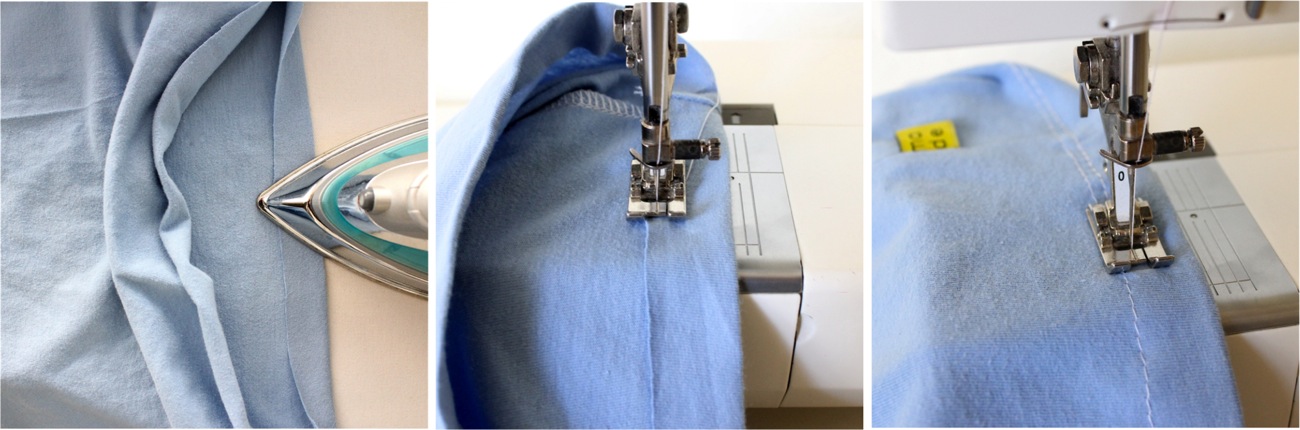
• Place the pattern piece on the fold and use a ruler to draw a new hemline….adding an extra 1/2 inch to 1 inch of fabric (just depends how chunky you want your hem to be. I used 3/4 of an inch)

• Sew the shirt as outlined above.
• When you’re finished, iron the bottom edge of the shirt under 1/2 to 1 inch (whatever extra length you added to the pattern) and sew the hem in place with a straight stitch.
• Sew a parallel second line 1/8 inch over from the first line just for a cool look.
• Press the hem one more time with an iron to get a nice good fold.
If you look at the stitching on a store-bought professional Tee, it’s sewn with a coverstitch (found on some sergers or sewn with a special coverstitch machine). The way the machine stitches on the wrong side of the fabric allows the front stitching to stretch slightly. This is why it’s so wonderful to use the existing hem of a t-shirt for your new project. So if you’re worried about stretch (perhaps in a tight fitted Tee, use a zigzag stitch on your hem)

And that’s a Basic Tee wrap.
Enjoy your turtles and tees!
Now head over to Made-by-Rae to see the Sweet Saffron pants she made for Elliot!
And don’t forget to add your photos to the Celebrate the BOY Flickr group.


Really cute! Basic tee patterns are super versatile and I’m delighted to have another one in my arsenal. (I always haul out the twin needle for the bottom hem though.)
Thanks so much for this tutorial! I’m sure it will come in super handy! Especially if this new bump of mine turns out to be a boy 🙂 I’ve pinned and shared already 😉
those posts are AWSOME Dana !!!
Love it! I can’t wait to make one for my little! (I so lucked out the he and Owen are about the same size. I used to use your pants pattern years ago. 🙂
Yay for the basic tee!!! You know I’m always a fan 🙂
Great tut! Super easy and waaay cute!!!
Good info Dana!…Tq very much.:)
Thank you so much for this tutorial! I’m slowly working up the nerve to sew with knits…
Adorable! I love making tees for my boy, so quick and easy! I also like a double needle for the hem and topstitch around the neck.
Thank you for this! I really want to make my little guy some shirts and have lots of thrifted shirts to use. And he’s also a size 4-5 so this is even more perfect. No guesswork trying to make my own pattern (which I sometimes fail at).
This is SO CUTE!!! Thanks a TON for making the pattern available for free! <3
So excited to try this out and make some new shirts for my little man. Thanks!!
Your tutorials are amazingly thorough. Wow. Plus, you always make it all seem so do-able. Awesome work, Dana. You rock.
Thank you thank you thank you! This is so just what I need to do my first knit project and make something fun for my little guy 🙂
Love, love, love it. I experimented making shirt with knit fabric for my kids fo Halloween. They turned out perfect for the outfits I made for them, but not well enough for me to make them as everyday wear. Now, I can. Thanks.
So cute and fun. Excited about Celebrate the Boy again!
Yay! My husband works for Apple and has a ton of those iconic logo T-shirts. My son and daughter will LOVE having mini-versions so they can look just like Daddy!
I love the turtle tee! This tutorial looks great and I just realized tonight while doing laundry that my middle man’s drawers were lacking. I am so glad it is Celebrate the Boy!!!
Thanks so much for this! I know you prefer not to use a double needle but I have one I’ve used a couple times and like the look a lot. The backside looks just like a store bought hem and allows a little stretch as well. I am not so good at sewing two lines and getting them to stay just the same width apart.
This is SOOOOO awesome. Thank you!
thank you so much for this pattern! i love that owen is a year older than my younger son so whenever you share a pattern it’s the perfect size!!!
i am so excited for celebrate the boy this year again!
Been looking everywhere this week for a basic T-shirt pattern to make for my little nephew. Thanks so much!
Yep, basic tees are very quick to stitch up (I love raglans, too ;)). I often use a flatlock (serger) stitch for my son’s hems and sleeves- nice and stretchy, super quick to do and adds some nice color accents, too. I use it to attach stretchy ribbing waistbands to knit skirts and shorts for my daughter, too- it’s a casual look, but, they’re kids.
Thanks for another great tutorial and pattern! You are amazing – great instructions, great photos, and three kids! There is an excellent explanation for using a double needle for t-shirt/legging hems here – http://www.makeit-loveit.com/2011/05/sewing-tips-basic-stitches-plus-double.html – I could see it working very well for the turtle shirt. Thanks again!
Great tutorial Dana!
I LOVE this! My little boy is 20 months old, and it seems like the only t-shirts I see are covered in graphics I don’t like. I’m so excited to try my hand at some new tees for him out of some materials that I actually will like!
Thank you for this! Ive been wanting to try and make a tee for my son and have been a little scared. Im going to resize the pattern to a 3T and try it!! Thanks again…
thanks for this! Its right on time too! I’ve been plunging myself into knits these days, its good to get a refresher. Have you heard of the book sew u home stretch? Its a great resource but is mostly for women’s clothes, not kids. Thats fun though, right?
Thank you for the fabulous tutorial! A few weeks ago I bought some knit fabrics on sale to make T-shirts with, but I’ve been a bit afraid to try it. Now I feel like I can finally tackle it. Thanks for all the detail you put into this!
There are tons of tutorials out there now but this is the BEST I´ve seen so far. Thanks for sharing Dana, there´s a lot of effort in writing these instructions, taking photos, etc and you outdo yourself all the time.
Lucky me! I have a 5 year old at home 🙂
María
Thank you so much for this tutorial i am making a jersey dress for my 4 year old daughter and was struggling a bit with the line this will help so much. And again perfectly written .thankyou for taking the time to write such a detailed tutorial
Thanks for sharing! I’ll know what to make this summer…
Such a great tutorial….I love your clear photos detailing every little step and little tips and tricks along the way. You are such a cheerleader, I don’t think I’d be sewing now if it wasn’t for your circle skirt tutorial! You have this way of making it look easy, not just for you, but for everyone. Thanks for that. 🙂
FELICITACIONES…….. estoy facinada con sus patrones, pero podria ser es castellano
Loving it!!! Cannot wait to try, you make me wanna sew!! 🙂
Such a cool post! Thank you for all the details.
I thought I was the only one who recycle my/my DH T’s and sweaters for my daughters to wear! (how silly!)
here is one of them – http://irishagold.blogspot.com/2012/10/october.html
~ Iryna
Thank you so much for taking the time to post this tutorial. I am just starting to sew again and appreciate the easy instructions and step by step pictures. I can’t wait to use up some old shirts and make my little man some new clothes. Thanks again!
muchas gracias por este excelente tutorial. Eres una personal genial
Thanks!!! Love the tutorial!
One thing that I do differently….I sew only one shoulder seam….then attach ribbing for neck (easier because not a closed circle), and then I close the other shoulder….
These BOY things are so exciting!
Thank-you, thank-you! I have been wanting a basic tee pattern! And this is the perfect size-my son is in 3T right now so I can start making his shirts for when he’s ready for the next size. I was going to make a basic tee pattern myself (eventually) but this makes it so much easier. I can’t wait to make one or 10.
Thank you for the fantastic tutorial!
Great tutorial! Absolutely love it. Just whipped one up and have a couple more in the works. These couldn’t be easier when you use pre-existing hemlines! I think this pattern does run a little small, though. It fits my almost-3-year-old better than my almost-5-year-old (who wears a 5T). No bigger, will just make it roomier next time so both kids can get some use out of it. Thanks!
Yay! I love it!
Hola! Gracias por compartir este tutorial! Me encanta, porque todo lo explicás con total claridad. Muchas gracias!
Yey! Loving this series! As a Mom to along boy, I get a little depressed sometimes looking over all the super cute dresses, but you’re rocking my socks off with all of these patterns!
Thank you, thank you, thank you for such wonderful practical tutorials! Amazing!
~M~
Another great pattern + tutorial from MADE. Totally love it. I featured it here:
http://sewprettysewfree.blogspot.com/2013/02/basic-tshirt-pattern-and-tutorial.html
Hi Dana – I’ve been enjoying your tutorials so much.
I’m currently making dresses for my daughters and am trying to figure out how to add sleeves to the pattern. What formula or method do you use to figure out the right measurment/proportion for your sleeves?
How do i resize to size 2?
Thank you Dana! Great tutorial. You make it look so easy!! : )
This is an awesome pattern. I made it larger to fit size 7. Thank you!!
Gah! How perfect is it that I found this? My nephew is in 5T at the moment! New summer shirts from the best aunt ever? Yes, I think so! Thanks, Dana!!!
Great pattern, thanks so much for posting! I have you bookmarked for this summer!
Dana, you are awesome. Thank you for another great tutorial with lots of pictures (and free pattern). These are so perfect for a new-to-sewing-clothes person like me. It’s like having a friend there to teach you how to sew. I’m excited to sew up some clothes for my kids.
Okay Love the basic T in five steps BUT I am curious what about the post with the dotted line- where do I find what you did with it?
I’m going to attempt this for my growing 2 1/2 year old today. Thanks so much for sharing with us! My friend just introduced me to girlcharlee.com for knits…cute knits at much cheaper prices! Found some cute mustache fabric that would be a great boys t-shirt print and went for it. 🙂
Hi! I can’t tell you how happy i am with your tutorial!
Im not an expert but I really did a great job with your help!
Thank you once again
Greetings from Sweden
Caro
I live in Southern California and have not been able to find t-shirt ribbing in any yardage stores or on-line. Where do you buy yours? Thank-you
Lynn
Hey Lynn, not sure if you ever got a response for this but I wanted to let you know I just made a tee for my son and used the same jersey fabric I did for the rest of the shirt on the collar and it turned out fantastic. Just make sure you cut your strip out with the grain running from short side to short side. When you do the slight stretch while sewing it actually looks like the ribbing! Good luck!
I was wondering if you could make this in adult sizes? I absolutely love your tutorials they are amazing:)
Please make a pattern for adult women! Thank you.
Can you make T-shirts out of a regular cotton or tutti-fruity fabric with the ribbed neck or would that look ridiculous? I need to make some cute easy tops to match skirts and shorts for my grand daughter. Thanks for being there for so many of us that are just enjoying making things for those we love, Vonnie
Thank you, Thank you, Thank you! I’m looking of such a basic tee for months! But everything I found for girls was with something my daughter didn’t like. So now I can start sewing…all my tries to take a pattern from a basic tee didn’t work. So I hope this will be it!
Kind regards from Germany! Sarah
I made this tee for my daughter, and made a skirt to match. I am blogging about it (and of course leaving a link back to your fabulous tutorial) in a post that comes out tomorrow. I’d love it if you’d check it out!
http://coffeewithus3.blogspot.com/2013/06/the-sweetheart-skirt-tee.html
Wow.thats’s cool
Hey, this pattern was so great! I just shortened it about 2ish inches and it fit my 3 year old son perfectly. I left it as is for my 4 year old daughter and it was perfect. Thanks so much, this is such a great basic pattern that I can makes variations on or just leave as is.
🙂 Thank you so much! I love these
Thanks. This is really great and well explained.
it wasssss so awesome which i ever seen .The making of T-shirt is very good as compared to seeing as videos. thank you for hosting this site for us .
You make some of the best stuff for kids, and make it look so ez…thank you for that, your tutorials, your patterns, your pics, just alot of fun to check out. I have two questions: (1) is a ball point needle necessary when sewing knits? from what I’ve read it pulls apart the knit, as opposed to cutting through it, but wondered what your thoughts are….and 2, why do you sew the sleeve on flat and not in the round?
Yes, a ball needle is recommended, because yes, it’s round and less likely to snag or catch on the fabric. But in all honesty, I just sew with the standard needle that’s always in my machine!
If you’re really curious about sewing machine needles, I have a detailed section in my book that I spent hours researching! it’s really helpful! (well, the whole book is helpful):
http://www.amazon.com/Fabrics-A—Z-Essential-Choosing/dp/1584799560/ref=sr_1_1?ie=UTF8&qid=1334208633&sr=8-1
My best advice though is to just start sewing and see where the knit fabric takes you.
I also have a detailed blog post about sewing with knits that might help too:
http://www.madeeveryday.com/2012/05/ask-dana-no-fear-how-to-sew-with-knit-fabrics.html
Have fun!
Thank you for this. It was perfect for whipping up a last-minute first-day-o’-school shirt for my son. It needed long sleeves but it was super easy to alter the pattern.
I can’t wait for him to wake up to it tomorrow morning. The body fabric is blue with stars, and the sleeves are red glitter swirls. His choice. 😉
This was so great, thank you! I was worried because I took the ribbing off another t-shirt, but the shirt wasn’t very good quality and the ribbing immediately got all chopping looking and was kind of falling apart around the edges, but since the edges didn’t show at all, it was perfect. I love your 90 minute shirt because of the envelope sleeves, but just haven’t had very good luck with creating my own patterns for it, so an extra thank you for including a pattern as well!
THANK YOU THANK YOU THANK YOU!!!!!! Your tutorials are among the best I have found for someone who it self teaching themselves to sew!!!
Loved this tutorial!! Thank you so much… I was able to turn a shirt that I never wore into something cute for my daughter. I’ll be raiding my husband’s drawers later to do the same for our son!!
Your tutorial was very helpful, I always repaired and hem and sewed loose buttons, I’ve have always done it by hand. My wife does not nor like to sew, I got tried by doing it by hand, so I brought a sewing machine I never used one, so I wanted to try to make a t-shirt I got stuck on the collar, thank you I saw alot of you tube videos, but nobody really explained the collar part, your was very detailed and help me out alot, now I can finish my t-shirt I’ve been working on for the pass two days, thank very much.
I absolutely LOVE your tutorials!! You make me brave enough to try new things. Thank you so much.
Dana,
I know this is over a year old BUT I am just now getting into blogs. I wanted to ask if you always sew over the pin needles? Is it safe for my sewing machine? Id really like to try it! Thanks for keeping all your tuturiols up, they are amazing!
I do sew over my pins!
Because the pins are round, the needle will (usually) just slide off the pins. Everyone once in a while I break a needle but it’s not a big deal to me. And makes some projects easier (and faster) to sew!
– Dana
Can I just tell you that I made two t shirts and two pairs of shorts (one knit, both with pockets) last week and had so much fun. This week I am working on a stuffed dinosaur pattern I came across. I am so missing your clear, articulate instructions. It makes such a difference to have tips about which seams are going to lie flat, which are going to need working, and what will really show up in the final product. I keep getting frustrated and having to put it aside for a while. Makes me not want to use commercial patterns at all anymore! Thanks for making your patterns and tutorials so well-thought out and accessible.
aw. thanks Sarah. What a nice comment.
Sorry I don’t have a dinosaur pattern 🙂
Have fun sewing!
– Dana
Wow Dana, I have discovered an absolute love of making children’s clothes from your blog and patterns!!! I just love them. thanks so much, everything I have made so far has been super easy thanks to your simple and clear instructions. I love the shorts and this t-shirt has been todays project. just awesome!
thanks again!
charlotte 🙂
Fantastic tutorial, thank you!! Do you have any hints as to how to reduce the pattern for a smaller child? This pattern fits my 3 year old perfectly but I’d love to make some tshirts for my 15 month old, I just can’t get to grips with how to alter the size. Thanks ever so much!!
Thanks a lot for the great tutorial – finally I managed to sew a t-shirt that is actually wearable 🙂
What I like the most about your tutorial is your reminder of putting a tag into the side seam as I always, I mean ALWAYS, forget it, which really annoys me every time 😉
I needed a last minute pattern to recycle one of Dad’s t’s for baby boy. This was perfect. Thanks so much for simple and clear Tutorial and pattern.
Thank you for this tutorial as well as the pants. I have a little boy who has no butt so the pants are amazing for him since I can add extra elastic and he seems to get every one of his shirts dirty and stained so now I can take our old shirts and make him some with out having to spend a fortune this summer. Thank!!
thanks so much!!!!!!! you helped me with my problem!!!! more power!!!
I love this!! I just made 6 shirts for my little guy. He’s about 10 months old, so I just modified the pattern a bit. What a great way to save money and get creative. I practiced with the paper stenciling, too.
I don’t know what I did wrong! Everything matches up with the shirt I went off of for a template but the one I made looks terrible. The shoulders stick up like little pointed wings. Ugh! 🙁
I totally love you! I’m just so glad I found your blog because I have an almost 3 year old boy and had started feeling like I couldn’t really make his clothes anymore. BUT, your designs and outfits you make for your son are super cool and not homemade looking at all! I’m inspired to try harder. Thanks!!
Thank you so much for this tutorial, I didn’t use any knit fabric for my daughter’s shirt (Im actually sewing her a cow costume for Halloween), but a cow print fabric from JoAnns and it turned out awesome!! I subscribed to your YouTube channel and can’t wait for more of your crafty ideas! It was my firrst time sewing bias around a neckline too, that took some time to figure out, but got it!
ThankU thankU thank Uuuuuuu!!!!!! Omg!!! I’m so happy to find this site that helps to sew without a asking for a fee! Thank U you don’t know what it means to learn to sew for the first time and get instructions!!
Thank you so much for your tutorials and free patterns. I’ve finally mastered the art of making a tshirt and I couldn’t be more thrilled!!!
do you know how to make a T/Shirt from scratch please as i would like to make for one of my son’s who is 16. but have none that fit him to use as a patten all so how to gage how much ribbing to use around neck line for neck size. and what if ribbing is not being used ie a V-neck.
Thank you. x
Hi Dana
Thank you so much for this tutorial! Do you think I can also follow these steps to make a longsleeve shirt? (By just adjusting length of the sleeves)
Greetings from Belgium!
Hi Dana.
I love all of your tutorials. But I was wondering if you would know about how much I would have to shrink the pattern to be a 2t. Would I do half?
Thanks so much Allison.
Just started making these as I had a bunch of new marathon shirts left over. I’ve also been digging into my son’s old clothes and cutting out a previous decoration (like fire truck) and will be sewing them on the fronts to give them a little pizzazz.
These have been super easy to make. I’ve also been raiding my son’s old shirts for decorations to put on the new ones or making easy patterns as decoration.
Thanks for your pattern and Tuto! your Shirt is now in France !
Nice!!!!! Thank you
I love this site but was unable to download the basic T pattern…. not sure why.
thank you thank you thank you, for all your tutorial, for all your inspiration!!!! This tutoriol help me a lot!!!!!
I LOVE the idea of add-ons for the First Day Dress! I would definitely buy it 🙂 Please make it happen!
Hey! I’m so confused about the parallel second line. What is it? I can’t find anything on my sewing machine that will match that stitch!
Great tutorial. Thank you!
I love the look and simplicity of this design, but I’m interested in making one for myself. Is it possible you have a design like this for a men’s medium?
I love your tutorial, and just one inquiry; do you cut without leaving seam allowances? meaning that the pattern already include seam allowances?
Can you make this out of the “eat it all” fabric in your boardwalk delight.
i love it
This is really nice, thanks. Dana, when I tried it, the sleeve didn’t fit exactly at the arm. What should I do?
AWESOME TUTORIAL!! I MADE MY OWN PATTERN BASED ON ONE OF MY DAUGHTERS OTHER T-SHIRTS AND IT TURNED OUT GREAT. THANK-YOU SO MUCH! VERY SATISFYING. 🙂
Fantastic!
It’s such a fun feeling, EVERY time.
Have fun sewing!
Hi Dana, I love this pattern. Where do you buy rib knit? I am having a hard time finding it in local stores. I would like to find a good online source. Thank you for all of the inspiration.
Thanks! Check:
Fabric.com, Girl Charlee, Joanns
Cute tees and adorable boy! Also I love your fabric lines and am so glad you included knits! Thank you for using a sewing machine vs serger for this tutorial! What size zig zag stitch did you use?
How would I adjust this for smaller sizes? I’m a beginner and want to try this but I’m needing a 12-18 or 18 month size!
Use one of your child’s t-shirt to gauge the size, or trace it!
Follow the steps I did in this video to create your own pattern for a 12-18 month old shirt:
https://www.youtube.com/watch?v=qAIfrCViTBY&t=125s
Thanks Dana! Just found your blog and Facebook page and I’m so excited to get started!
love this
Hi, I was wondering what size paper this should be printed on I have previously struggled with printing patterns and I was wondering how to do it.
Thanks
Hi Sara, print to your standard paper size. In the US this is 8.5 x 11 inch paper. But you can print to other paper sizes as well. Just check the ruler markings on the pattern piece to make sure it printed to the proper size, and make adjustments on your printer as needed.
Sorry for commenting twice
I just LOVE your patterns Dana, they never disappoint! I hand sewed two of these in o8nk for my 6 and 8yr old daughters this week… loved it so much that I pulled out the serger and whipped out 4 more today! Now on to the shorts! Ever since I got your basic shorts pattern two years ago, Ive yet to buy another pair for themThanks for offering such a versatike pattern with such an array of sizes. I can’t wait for our little boy to reach the 12 month size!
with happiness from Panama!
Dashaina
*pink
Wow you made myvday
When our 15 year old daughter finially made her First Holy Communion with the 2nd graders last may,she wanted to be one of the “little girls” and wore a cute,poofy,top of the knees,short sleeve communion dress and veil with the lace anklets and white mary jane style shoes.Under her dress,she wore the traditional,white cloth first communion diaper with white plastic pants over it and a tee shirt as her top.The same white lace that was on her anklets was sewed on the end of the sleeves on her tee shirt as well as across the bottom of it.Six rows of the same lace were also sewn across the back of the plastic pants from side seam to side seam. Her tee shirt,plastic pants and the lace anklets all looked cute and all matched with the same lace on them!
So far I love this channel and it is helping me learn how to make clothes for my kids. I found some Paw Patrol fabric for my son. I seen how you can just trace a shirt to make a shirt for the size you need. By doing that though, how would you cut the sleeves if the pattern you provided is too big and you aren’t using an existing shirt. Sorry if this is a dumb question, beginner here!
awizuotfjrrumscclveqbcxtqkfmva
very useful words
What a great idea!