
 It’s long for the winter and short for the summer.
It’s simple, it’s colorful, it’s The 90 Minute Shirt!
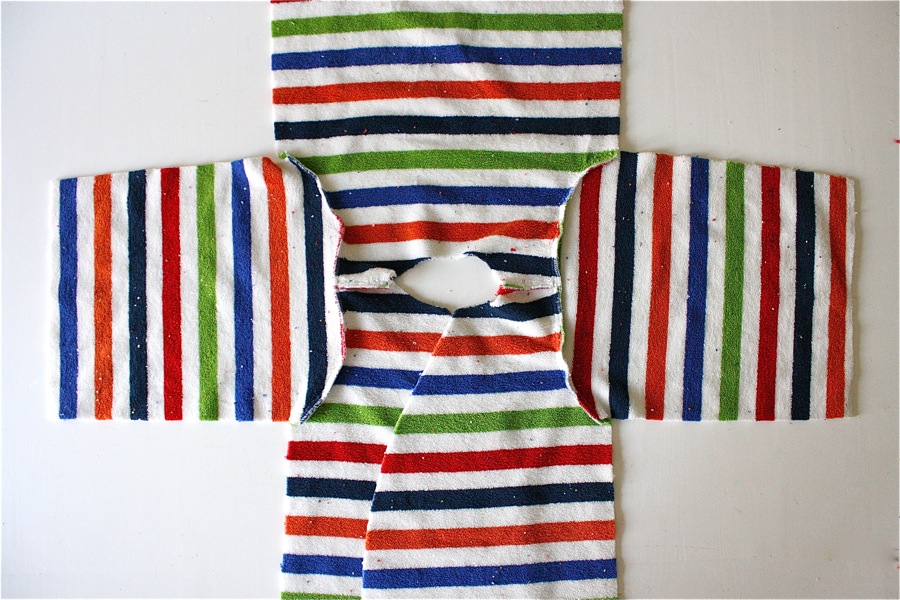
Taking a men’s T-shirt (or your own fabric), we’ll refashion it into this:

 Skill Level: Intermediate
Needed:
* Mens’ XL tshirt (or appx 3/4 to 1 yard of fabric)
* Appx 1/4 yard knit ribbing
* SERGER (optional. Makes for the best look but instructions included for sewing without)
Size used in this Tutorial: 2T
I call this the 90 Minute Shirt because I’ve made it so many times that I can do it 90 mins (and sometimes even in 60!) The first time you make it, it will take longer than 90 mins. Don’t feel ripped off. It took me longer the first (few) times. But over time, you’ll get the routine down and you’ll be cranking these out for all your little guys and gals!
The first step is to make the pattern for your shirt, using our Make Your Own Pattern Tutorial:
 Then gather your T-shirt and fabric supplies.
It’s hard to “embellish” a boy’s shirt. So I love to use ribbing to spice things up. It’s subtle, but adds a pop. Ribbing is simply this: knit fabric you find in the fabric store with little ribs in it. That’s it! There’s often a variety of colors to choose from. I buy mine at Joann’s and I usually get many different colors when they’re on sale (since they look so pretty together) and then I have options for whatever T-shirt I end up using. Of course you’ll only need about 1/4 yard (or less) for each shirt, so even if they’re not on sale, it’s pretty cheap. (If you don’t want to use ribbing, you can use fabric from another T-shirt or even the same shirt! Just use something KNIT, so it can stretch):
 Now for your shirt fabric….
I love the concept of Refashioning or Upcycling something old. So for these shirts I often hit the local Thrift Store and buy a Men’s XL T-shirt. If you’re using new fabrics from a store instead, you will need appx 3/4 to 1 yard of knit fabric for a little boy’s shirt (1-2 years), depending on sleeve length. If you’re making something larger than that, take your pattern pieces with you to the store and figure out exactly how much fabric you need.
Once you’ve made your pattern pieces, using our Pattern Tutorial above, you should have pieces that look similar to this:
 Prep your existing Men’s T-shirt by cutting off all the seams and laying it out flat. This orange shirt didn’t have a seam on the sides, so I had even more fabric to work with! Carefully cut off the sleeves. If you’re making short sleeves for your new shirt, you’ll want to use them!
Decide how to lay your fabric pieces to maximize your space. If you made pattern pieces similar to mine, REMEMBER that the shirt pieces are only HALF of the shirt, so you’ll need to trace part and flip it over and trace the other side.
 BUT DON’T DO WHAT I DID AND TRACE DOWN THE MIDDLE. See those squiggly lines down there? you DON’T want to trace that part!! That’s the MIDDLE of your shirt! Yep, and I did it….
 Look at this picture below. See the mess-up one in there? Thankfully I had enough fabric to make a new piece. LESSON LEARNED: if you think you’ll make this mistake too, make your pattern pieces FULL-sized shirt pieces.
If you’re going to use the hem of the existing shirt for your new shirt (which I LOVE to do. Saves time and looks cool), make sure your pattern pieces are placed along the bottom of the shirt. Don’t worry if your shirt is a bit wonky and bent out of shape. It works out in the end:
 And if you’re cutting short sleeves (instead of the long sleeves above), use the hem of the existing sleeve as well. Just place your pattern piece right on the edge of the hem and cut out the new sleeve:
 Measure around the neck of both the FRONT and BACK of the shirt pieces (they will be different lengths. The front neck scoops further down).
 Add those two lengths together, and this is how long you need to cut your strip of neck ribbing. For my two shirt pieces combined, it was 27 inches long. Now the width of the neck ribbing is to your preference. 1 1/2 to 2 inches wide is good. The ribbing will be folded in half, around the neck, so keep that in mind. For the orange shirt I cut it 2 inches wide. For the brown shirt, I did 1 1/2 inches wide.
 If you’re adding a cuff to your sleeves, cut two cuffs just slightly larger on the sides that the bottom of your sleeve piece. And cut it 4 inches wide (or whatever width you like. The cuff will be folded in half when finished):
 Now your pieces are prepped and ready to go!
 The first sewing step is to prepare your ribbing pieces.
NOW IF YOU DON’T HAVE SERGER, DON’T FREAK OUT HERE. There will be more info below.
But for those who have a Serger, there are more proper ways for doing this, I’m sure. But if you’re like me, you find a way that works for you and continue to use it. So that’s what I’ll show you here. Using your serger, serge down both sides of your long ribbing strip. I like to use contrasting thread on my ribbing so it adds more color to the shirt:

 It should look like this:
 Do the same for both your cuff pieces:
 Now, if you don’t have a serger….
Just leave all your edges raw. They won’t unravel (knit does not fray). The serging is really just to add decor. It’s not a necessary step. Your shirt won’t look quite as “decorated” but it’ll still be plenty cute. Just make sure that your edges are cut straight and even (a rotary cutter is best for that).
Okay, iron your long strip in half, with the back half just slightly higher than the front. This makes it easier to attach to your shirt later on (in the same way that store-bought bias tape is slightly wider on one side):
 Then starting with your back shirt piece, sandwich the neck edge into the ribbing, with the longer side of the ribbing on the back (inside). This ensures that when you sew it on near the edge, it will definitely be sewn on the back too:
 When you get to the end, just snip off the ribbing and use the remaining ribbing to go around the front pattern piece:
 If you have a label for your shirt, insert it into the back, tucked into the ribbing and pin it in place:
 Then, sewing on the OUTSIDE of your shirt (the side everyone is going to see), start sewing your ribbing on to the shirt. I sew two lines, one on the right side of my serged lines:
 And the other line, near the left edge of the ribbing:

 If you don’t have a serger, you will just sew two parallel lines. You can use a double needle for this (see your machine manual. You’ll likely need to purchase one), OR you can just sew two separate lines. I often do this. First, sew the line on the left, near the edge, using your presser foot as a guide so your line is “straight” with the fabric’s edge. Then sew your 2nd line about 1/4 inch to right of your first line. I often use that method for hems and other decorative sewing. When you’re done, it might not look as pretty on the inside, but no one’s going to see it much:
 Another option for your shirt label is to add it to the back of the shirt. If you’re really lame like me and made the same mistake twice when tracing your pattern (SERIOUSLY), then you ended up with an unwanted Sharpie mark in the middle of you shirt. So…..I cut out a rectangle of ribbing, matching the neck ribbing, sewed my label on top, and sewed it right over the mistake spot.
 An impromptu (and needed) design:
 Okay, on to the sleeves…..
NOTE: if you don’t want to add cuffs, you can simply serge the edges of your shirt sleeves (and bottom hem of your shirt) or even leave them raw. In this tutorial, we’ll be adding cuffs.
* UPDATED NOTE* : The color of my sleeves have changed here because I realized an easier way to do them after creating this tutorial. So, the sleeves here are gray and the cuffs are white. We’ll pick up with orange sleeves again in the next step.
Okay……
With your cuffs serged on the sides (for decor, not necessary), iron them in half and get ready to sew them to the ends of each sleeve:
 Sandwich the end of the sleeve right inside of the cuff:
 Like this:
 Then sew each cuff down (similar to how you did the neck line above):
 Each sleeve bottom should look like this:
 SEWING ON SLEEVES:
There are two ways to do this.
This is the alternate method I use from time to time — you’ll find the info HERE.
(photos used on a beach robe, but the concept is the same)
 And this is the method I learned years ago.
Decide which method works in your creative mind and go use that…..
With RIGHT sides together, fold the sleeve in half:
 And sew down the entire side:
 Serge off the seam (zigzag or leave raw):
 Iron down your seam and you sleeves are done!
 Pretty easy! Now let’s attach them to your shirt…..

NOTE: we are now back to the orange/yellow sleeve color 🙂
Okay, with RIGHT sides of your shirt pieces together, pin the sides down. We are ONLY sewing the sides right now:
 If you have a side tag/label, insert it about 2 inches from the bottom of the shirt:
 Sew down the sides of the shirt , serge them off, and Iron out your seams:
 Okay, this part isn’t tricky but it’s hard to show visually. Now it’s time to sew in your sleeves and sew the top of your shirt closed. This is the final step. Yay! So, with your sleeve turned RIGHT side out (the way it will look when you’re done) and with your shirt INSIDE out, take the armpit seam of your sleeve and match it to the armpit seam of your shirt:
 and pin it in place:
 Then you start to wrap the shirt shoulders around the sleeve, one piece at a time. It always takes me a moment to remember which shirt side to wrap around first (the front or the back?) When your shirt is finished, the back shoulder will wrap around to the front. SO (though it will feel backwards to do it this way), start by pinning the BACK shirt shoulder around the sleeve first (if none of this is making sense, study how a onesie looks and it should help):
 When you finish pinning the BACK shoulder side down, wrap the FRONT shoulder around and pin it to the sleeve also:
 As you go around, it will start to overlap where you pinned down the BACK shoulder. Just take out the pin and pin the Front shoulder to it also.
 When you’re done, it should look something like this:
 Now before you sew it down, ALWAYS DOUBLE-CHECK that you pinned both arms down properly by turning the whole shirt right-side out slightly just to see that you have both sleeves with the BACK folding over to the Front. I’ve made the mistake before and had both sleeves going in different directions. Good thing I caught it before sewing!
If everything is good to go, sew the all the way around the sleeve. Turn your shirt Right side out again to make sure it looks good and then serge off the edges and iron out your seams:
 And woohoo! You’re done! Go throw it on your little guy.
 He sure looks cute, scrapes and all.


 Other variations on the shirt….
 (UNO image done by Freezer Paper Stenciling….Tutorial HERE. Image HERE.)


 And that’s the 90 min shirt! How fast can you make a t-shirt?


Does anyone know if this will work with a fabric without stretch, like flannel? I’m looking for a simple pajama top to go with a pair of flannel pajama pants, but I don’t know if the lap should will be enough to comfortably get the shirt over a head without additional stretch in the fabric. Any ideas? Thanks!
i think it would be a little tight but it might be cute to make the shirt in a solid colored knit that coordinates with the flannel pj bottoms.
That’s what I was thinking too, and a little tight around the neck is probably not what we want for pjs. A coordinating knit is a good idea. Thanks for the quick reply!!
Thank you so much for this tutorial! I followed your easy-to-understand directions and clear pictures, made a pattern, then two shirts for my daughter, with more to follow! I feel extremely pleased with myself, she looks very cute, and I wouldn’t have tried any of it without your helpful instructions. Mwah! Thank you!
Thank you so much for putting this tutorial together! I just finished my first shirt and the best part was how perfectly the the sleeves and shoulders came together. I didn’t time myself but I know this first shirt took longer than 90 minutes. I’m sure after a couple more shirts I’ll get quicker. I’m excited that I don’t need to buy commercially made shirts and can instead upcycle what I already have. Thanks again!
I also like to use flannel for PJs. I often use an oriental type closure around the front neck/side with three snaps. The snaps and V cut takes care of the too tight in the neck problem as well as the child’s head stuck in the shirt issue!
I can’t wait to try this – thanks so much for the super detailed and clear instructions. now if only my 37 week extra large belly would cooperate…
Just made the shirt (l/s) SUUUPPPPERRRR Cute!!!! Thanks for a very easy to follow tutorial!!!! I love it!
Thank you so much for this awesome awesome tutorial! I have just made my first 90-minute shirt and although I need to tweak the pattern a little bit, I’m over the moon with the result!
If you’re interested here’s the link to my post about it:
http://craftandnappies.blogspot.co.nz/2012/04/starting-bit-early.html
Must buy some ribbing!
So question, I just made this shirt and love how easy the instructions were to follow, but I was wondering if you have any tips on how to make to back pieces even when they wrap around to the front? Mine turned out pretty off. Thanks so much! Love your blog!
I have totally enjoyed your awesome tutorials!!!! I was wondering if you sold or had a pre made pattern for the 90 min shirt??? I have LOVED making them but I just can’t seem to get my pattern to be right, there for it throws off the look of the shirt. I took apart a onsie and an old t-shirt of my sons but cant seem to get it right. Let me know if you have a suggestion or if you do sell a pattern!!! Thanks!!!-Emily
This was fun – thanks for sharing! I tried it out using hubby’s old t-shirt & didn’t need to hem the bottom or sleeves on the 90-minute shirt as I used the originals. It was quick even when I had to unpick one sleeve when I sewed it on back to front!! Oh well you live and learn 🙂
Thanks so much – your tutorials are absolutely amazing. I’m so excited about giving these a whirl. People like you make the internet a wonderful place!
Is there a way to do this without taking apart a onesie or shirt? Despite the fact that half our onesies are hand me downs, stained or ugly to begin with, I still feel strangely too sentimental to cut them up!
This is my first time sewing anything and so far so good. I am surprised at how easy it is. Thank you so much for this tutorial!
Great tutorial from pattern drafting to completion! I was a bit nervous because the only onsie I could locate was 3 sizes down from where I needed. But your advice worked like a charm. I’m going to whip a bunch of these up for kcwc. And I totally almost drew a line down the center of my back- even though you warned!
Just found this shirt tutorial. Great! So cute. Will try. Thanks
Hi, I was wondering where you got you fabric clothing tags made? I have been searching but I cannot find a reliable manufacturer.
I made this shirt for my girls and I love it!! one of the best shirt patterns for kids I have used!! thank you!
I just tried to make this style for my 4-year-old son and, much to my disappointment, it did not work! I think my problem was that I didn’t know what to do with the shoulders of the shirt. I just pinned them to the sleeves as described, and the back neckline was very tight across the back and the front neckline was very loose and hung forward. Could you or anyone who has had success making this shirt for an older kid help me?
I love the look of the shirt and would love to make some for my boys! Thank you so much!
Do you have a youtube page? I’m one of those people who need to actually see it being done. By the way, nice work.
Hi, this is such a fun tutorial! Back in the 80s when my four children were young I took a whole series of stretch sewing lessons and ended up teaching. If you’d like a very simple method for binding the edges of knit fabrics, let me know. You don’t even need ribbing!
I’d be happy to have that hint for binding knit edges Joanne Phillips mentioned. (I don’t have a serger!)
Would love to hear the tip as well!
Thanks for this tutorial! I am making some of these for a friends little boy who has a rather large head and she was complaining to me she cant fit normal tshirts over his head. But I must let you know of an awesome discovery I saw on one of the sewing blogs I subscribe to. I now use and LOVE LOVE LOVE my Pilot Frixion Erasable Gel Pens, the ink disappears with heat so when you iron or tumble dry, the marks vanish!! No more mistakes yay! I’m in Australia but I purchased them from amazon and I got a pack of 8 different colours so I can use them with any colour fabric woohoo 🙂
I use these pens too. My teacher found out by accident that heat removed them after her son drew all over her ironing board cover with them! ???? I told my husband how good they would be for this work diary as he could just erase mistakes! All went well until he left his diary in the sun! Blank page! ????
Just came across your blog and you had me at this awesome tutorial! I cannot wait to buy some fabric! LOVE!!!
Thank you so much for sharing this tutorial! I am in love with that type of collar! Your son looks so cute in them! I can’t wait to try some of these out for my little one!
Soy de Chile, eres genial, me encanto el blog, Felicitaciones
Thank you for the great tutorial on pattern making and the 90 min shirt! I am planning to use this to make my baby girl a few night gowns with her daddy’s old shirts for her first birthday. She will be comfy and cozy! Thanks!
Can you believe this post is going to turn 5 years old this year?? You are amazing. I just for around to doing the trace and this shirt tonight. You’re not kidding. Even my first time it didn’t take that long. I always pick up the remnant knit bundles in the clearance bin and this will certainly help clear out that stash, not to mention upcycling old knits. Tank you bazillions lady; I heart your work!
Er, got around. All the technology in the world and I still can’t form a proper sentence.
Sorry, I just saw that a few people were interested in my easy ribbing technique. I’ll try to describe it, but showing would be so much easier. It’s called a Chanel edging. Cut ribbing a little more than three times as wide as you want your finished edge. With right sides together, stitch while stretching the ribbing a little. Where you want it to sit flatter (neckline), stretch a little more. Turn the ribbing over the seam to the other side and press down. On the right side, stitch in the ditch, where the ribbing meets the fabric. On the other (wrong) side, snip the extra fabric very close to the stitching. Hope this makes sense. Maybe I’ll do a YouTube video, LOL!
One other thing. It’s much easier to sew in the sleeve flat, and then sew the entire side and underarm seam.
Do you think there’s any way to modify this into a polo shirt? My husband is throwing out an old polo that’s still in great condition, and I would love to make it into a polo for my little boy, but haven’t been able to find any ideas how.
Hi, I just bought my first knit fabric and am so happy to have found your site!! Your tutorials look great. I have a possibly silly question, that has probably been answered somewhere on here…when you are sewing seams, do you use a straight stitch or do you need to use a zigzag? I know for areas that need to stretch, like sleeve openings or legging leg openings you would need a stretch stitch, but should I use the zig zag everywhere else too? Hope that makes sense…thanks so much!
Thank you for a pattern to a great shirt! ‘Gotta try that! And what an ADORABLE model! -Marci @ Stone Cottage Adventures
THANK YOU SO MUCH FOR THIS POST:
I’m a bloody sewing beginner and your tutorial gave me courage! and great advice!
I made just one t-shirt, but I definitly will make more…
Florence from France
Hi Dana,
Thank you so much for all the inspiration and fun you’re handing out here!
Do you think bias tape would work instead of ribbing?
WoW! This awesome, you are heaven sent!
I love this pattern, Matt just looks so cute in it. He is about 4 months older than Clara. It’s been so fun seeing her grow up in pictures. Matt yells “Baby” every time he sees her picture.
I made this for my 11 month old and somehow the last part isn’t going to work for me. How did you sew the sleeves on? Maybe because your son is older it’s easier to fold back the sleeves?
Can’t wait to try this!! My hubbie gave me some too-small band tee’s that I’ve been saving in my sewing stash – my middle-child is going to be the coolest kid in preschool! Thanks a whole bunch.
Loving your tutorials! Is there a way to add them to my Pinterest Board? I can’t locate a “pin it” button on any of them.
Thanks!!
Just made this. I used an old shirt of my husband’s, which had some stains, but had a very sweet print on it– I centered the picture for the little shirt, and hooray, it worked beautifully! So much fun!
Thank you! What an awesome tutorial!
PS, totally took about 90 minutes from start to finish– lovee that, as time is precious now 🙂
I was wondering if you knew of a YouTube tut on how to do the sleeves? I’m really bad with visualizing it without watching someone else – or maybe a different way to explain it? I think I get it but just would love a visual aid!?
I love the rest of the tut – great job! I just bought some cute knits so I can’t wait to try this and match it with some Maxaloones!
Thanks for the fabulous tutorial! I have been eyeing it since my boys were a few months old and finally, now that they are most of the way to 3, have finally acquired a sewing machine and was able to make each of them one of these beautiful shirts. The second one did take only 90 minutes. 🙂
Planning to make MANY more of these with short sleeves for the summer.
Your tutorial is really fabulous. Easy and clear. Thanks a bunch. Hugs fom Poland, Europe!
Hi!
Thanks for this tuto, your son is so cute!
It seems not easy I don’t now if I will try but I’d like ^_^
Thanks so much for sharing this tutor. I love this type of collar but don’t know how to do it, now I know. You did a great job.
It is very fine to learn different patterns
Hi Dana,
Is the PDF download pop up ad on your website safe, I clicked on it but it ask me to add Chrome extension and looks like not safe to download. How can I down load your t shirt pattern, do you have t shirt pattern for women? Thanks, Dana
Regards,
Kirten