
Back when we were prepping the old house to sell, I had the hardest time finding a shower curtain for the kid’s bathroom.

I know. A shower curtain.
That’s easy! There are so many options out there. And if you can’t find one, they’re super easy to make. But for some reason the vibe wasn’t meshing in my brain.
Until I noticed people painting curtains with fun stripes.
Duh! You know I love to paint stripes, and stripes, and more stripes.
And it finally all came together.

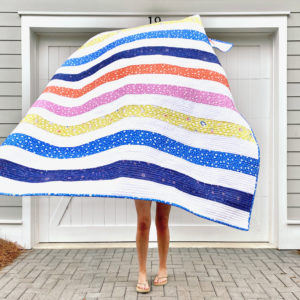
And I loved it so much that it was the first item I brought over to the new house (and spent 30 minutes trying to secure the blasted curtain rod in place, with my arm muscles burning, and the rod falling on me three times). But aside from that silly fiasco, the curtain is easy to make and looks so fantastic when you’re done!

And I really love this idea of using a painter’s dropcloth as fabric because the tan cloth has a real natural, almost linen look to it with slight nubbiness here and there. It gives the bathroom a cool beach-feel, which is exactly what I wanted.

Okay, the concept is obvious, but here are some tips to help along the way.
• Start with a painter’s drop cloth. Purchase these at any home improvement or paint store. Or if you want to skip the trip, this one will work great. Iron the cloth as best you can to get wrinkles out before painting (since it will be hard to iron over the paint when you’re done unless you use a press cloth over the top).
• Determine the measurements of your curtain. There are no rules here but you probably want the bottom of the curtain to fall 2-3 inches from the floor. The dropcloth should already be sewn around the edges, so you can use one end of the dropcloth as your bottom hem for the curtain (no sewing! yay!) Leave some room at the top so you can fold it over and sew a top hem in place. You can do this before or after you paint the stripes…though it probably makes more sense to do it before. Just cut the cloth to your desired height, fold the edge under 1/2 inch, then fold it under another couple inches (or however chunky you want the top to look) and then sew it in place. OR….if you don’t want to sew, just hot glue it in place!
• Then determine the width and spacing of your stripes. I painted 5-inch wide stripes and spaced them 7 inches apart because I wanted a little variation. You can do it however you want.
• Lay the dropcloth over a plastic tarp or something that can get messy, because some paint will seep through to the back side.
• Tape the stripes in place with painters tape. This is a two-person job. Casey and I started at the bottom of the cloth and we each measured up 7 inches, then we pulled the tape from one side to the other carefully pressing it in place, trying to keep it straight, and pressing firmly so no paint could seep out the sides of the tape.

• Roll paint into the striped areas. A skinny roller brush is helpful.
• Let it dry and apply a second coat if necessary.
• Remove the tape! This is always the fun part. The cloth may stick slightly to the tarp underneath. Just peel it back and admire your fantasticly stripey cloth.

Now, if your painting skills are anything like mine….there’s always that deflated moment when you realize that some paint DID seep through the tape. Arrrrrggg. On walls, that’s not a problem. On fabric, it sort of is.
But have no fear.
There’s a solution!
I used small scraps of dropcloth to create a “patch” for the painted areas, I ironed the patch to fusible webbing (like Thermoweb or Wonder Under), then ironed the other side right to the curtain! More details in this tutorial here.
Check out this before and after photo below….it worked great!

In certain light you can see the patch. But when the curtain is up, you never notice it. Can you find the two spots in the photo below?…..
(okay, they’re in the middle of the middle tan stripe).

One final step.
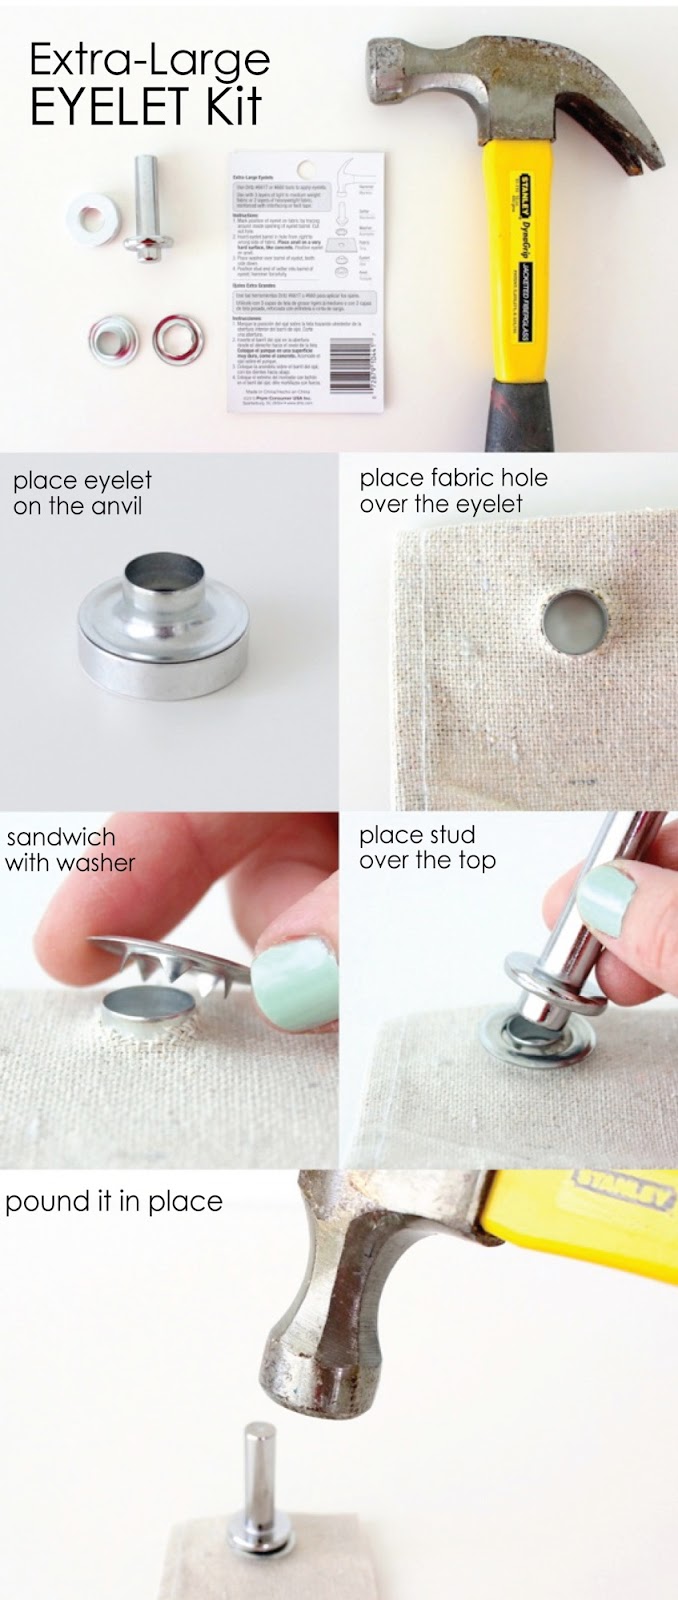
• Determine how you’d like to hang the curtains. I love that metal-hardware look of grommets (also called Eyelets) so that’s what I’ll show you here.
• Purchase a package of Extra Large Eyelets from any fabric or craft store.
Read the directions on the package for specific details. And here are some tips.
• Evenly space and mark where each eyelet will be placed. At each marker, cut a hole in the fabric large enough for each eyelet to pass through.

Then do just as the package instructs:
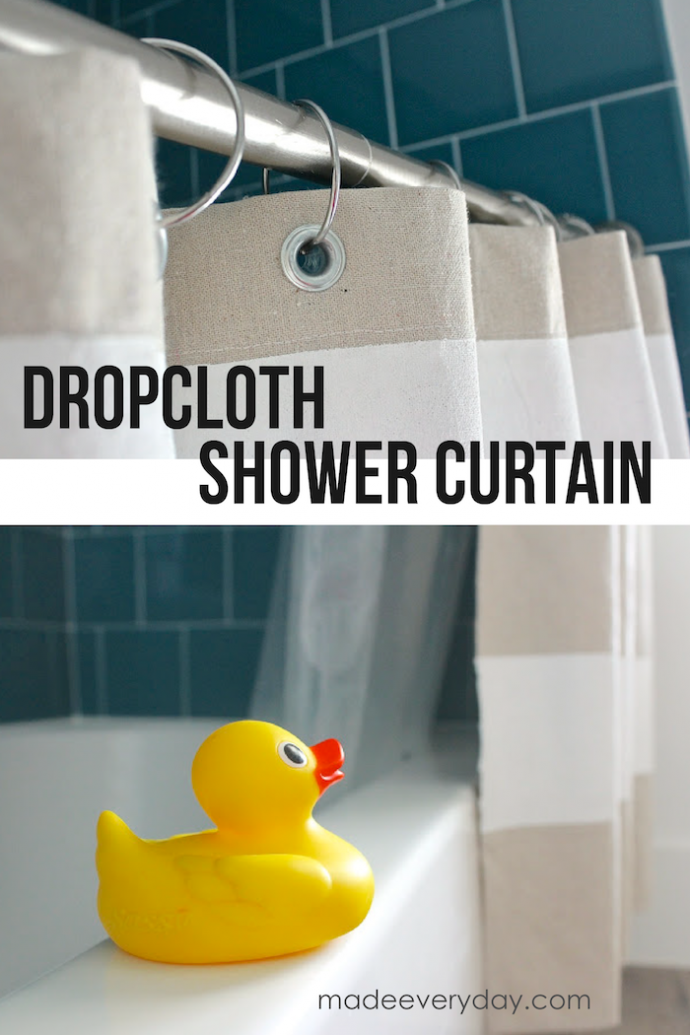
Then thread shower curtain hooks through each eyelet, along with a plastic liner curtain for the back side….and you’ve got all your ducks in a row!

Hang that baby up and you’re done!


love this so much Dana!!! and that color tile is so perfect.
Love the stripes!! I’ve got a Craft Gossip post scheduled for this morning that links to your tutorial:
http://sewing.craftgossip.com/tutorial-striped-shower-curtain-from-a-drop-cloth/2014/03/06/
–Anne
So cool! I’ve used drop cloth for bedroom curtains before but never thought of it for shower curtains. Also that blue tile is such a great color.
Oh My!! Seriously that is wonderful, gives me so many ideas. And thanks for the eyelet tutorial too.
That looks great! I love the stripes and light colors. And I do love the tile in that bathroom as well, so pretty! We are planning a bathroom redo very soon, so any idea helps!
Very cool! You did a great job – love it! (but we all know you ROCK with great ideas/tutorials!)
Haha! Love that you used the word ‘blasted.’ Blast is my ‘go to’ word when things don’t go right. Love the painted stripes too. 🙂 I’ve found that when I make a mistake with fabric paint, mixing up a matching color to the background color and applying it on top of the mistake works like a charm.
what type of paint did you use?
That tile is amazing!! Lovely curtain, too.
Nice Job!! did you use a fabric medium? oh and how did it fell when you where done?
It looks like it is somewhat soft? cause of the way it drapes when hung.
Dana, I have been stalking your blog for quite some time and I think it’s safe to say I’m pretty much obsessed! I never would have thought of painting curtain. Brilliant!
To prevent paint seepage try Scotch’s best quality painter’s blue tape or freezer paper. Both work really well.
This is so lovely Dana! Love it. It would be fun to do a stamp on the drop cloth too? Maybe? I too have a hard time finding shower curtains I like. So weird right? The ones we have now are the transparent PVC kind with some white designs on them because those are the only ones I liked enough! I actually have drop cloth, I’ll have to pull it out and see if I have a piece large enough for a curtain.
Fabulous tutorial – thanks for sharing 🙂 Also, LOVE the bathroom tiles!
So, I have never seen a shower curtain in my life made out of fabric that isn’t somewhat plastic. Maybe it’s an Australian thing (I live in Perth) but the ones you can buy over here are always made from fabrics something like vinyl laminated cotton (if they’re fancy), plastic, or that kind of plastic that cheapo party tablecloths are made from. Do you guys find that cotton or canvas shower curtains dry out ok between showers? Might be something I have to try.
Jess-
If you look closely at the last picture of Dana’s shower, you can just see the plastic liner peeking out. Most fabric shower curtains here in the US have a secondary plastic curtain hung inside–simply using the same rings. The plastic stays inside the tub during the shower, the fabric stays outside to keep it dry. Seems crazy impractical to have a shower curtain that can’t get wet. The price for great style, eh?
Microfiber cloth liners/curtains are somewhat common here in the US. They get -soaking wet- at the bottom during the shower, but they don’t let water through and they dry quickly. Plus, they’re much easier to wash than the plastic, at least to me.
I have always liked them a lot better than any of the plastics. Some people use them by themselves, or it can be the ‘liner’ to a more decorative curtain (and those more decorative curtains can still help contain any water that does escape, you just don’t want them to get -soaked- because they don’t dry as well – but really, if you pull it closed so it’s not bunched, most anything will dry pretty well).
What tile is that ? We are thinking of doing the same type and I would love to know what the pattern/color it is!
The tile on the floor! Sorry…
It looks more like laminate than tile, but Home Depot has some crazy new engineered “tiled” hardwoods and also cool new high-traffic travertine that could also fit the bill.
Hopefully Dana can answer, you’ve got me curious now too c:
Just a little tip… if you don’t want the paint to seep through the tape, paint it with clear paint (like a clear glaze, etc) first, let that dry, then paint your stripes! 🙂 Works like a charm. Works on walls, too! 🙂
Hi Dana, it looks great. I am so excited for you and the family enjoying the new house now. We are getting very close to needing to make a final decision on our flooring. I am dying to find out what and where you got everything!?