Transforming an adult-size BIG sweater into a child-size little sweater is one of the easiest upcyling projects to tackle. In fact, I’m not sure why I don’t do it more often. I love fast projects. And I love it when my kids want to wear the things I make. I put this on Owen and he didn’t want to take it off! A very good sign.

 If you remember our Sweater Vest tutorial from last year’s Celebrate the BOY, the concept is similar.
 Take a big sweater (from your closet or a thrift store) and slim it down to fit a child.
 Using the existing hand cuffs and waistband, the project is fast and easy.
Let’s get started!
* Grab a big sweater; wash and dry it (if appropriate). Use a current sweatshirt or other shirt that your child already owns to create a new pattern. Turn the old, big sweater and the current sweatshirt inside out.
* Lay the current sweatshirt on the big sweater, matching them up at the waistband and trace a new pattern on top. Do not trace the sleeves, just trace the body.
* Cut it out, cutting through both layers of the big sweater at the same time so you have identical front and back pieces.
* Cut off the ribbed neckline from the old sweater, about 1/2 inch down from the neckline. We’re going to use this to make a new neckline.
NOTE: if you don’t have a use-able neckline….you can make your own from knit ribbing fabric or grab one from an old T-shirt. The neck doesn’t have to match in color–contrasting color is cute too!
 Lay the current sweatshirt sleeves over the big sweater sleeves, lining up the cuffs and cut two sleeves.
 If the sleeves are too slim near the cuff to accommodate your pattern, you can cut the sleeves further up but you’ll have to add a new cuff. On the flip side, if the sleeves of the old sweater are too wide, you’ll need to sew a new seam to make them a bit slimmer.
My big sweater sleeves were the perfect width.
 Okay, these are the pieces you should have:
 * Start by attaching the new neckline. With right sides together, pin the old ribbing neckline around the neck of the sweater front.
* Sew the ribbing to the sweater. Sew right on the existing neck seam from the old sweater (where the ribbing was attached to the old sweater). Use a normal straight stitch or zigzag. Don’t tug the fabric as you go, just let it feed naturally. Do this for the front and back of the sweater.
* Flip the neck up and admire your new neckline! For added charm, top stitch around the neck on the right side of your sweater. This will help it lay flat as well.
 * With right sides of the sweater together, pin the shoulders and sides together.
* Sew the shoulders together.
* Sew the sides together (add a side label in there if you have one).
 Final step!–sleeves.
 With right-sides together, place the sleeve inside the sweater and line up the seam of the sleeve with the side armpit seam of the sweater. Pin the sleeves in place and sew them on.
 You’re DONE!
 TROUBLE SHOOTING.
If you were off on your measurements (like me) and made the sweater too small to get over his head (grrrrr)…..then cut the neckline off and make a new one!
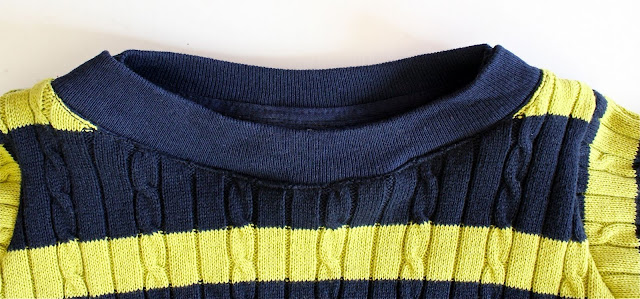
You may not ever have known if I hadn’t pointed it out….but here’s the new neckline:
 I couldn’t reuse the old ribbing, since it was cut too small. So….I cut off the ribbed neckline from a thrifted blue T-shirt I had laying around and sewed it on to the sweater. Of course you can always make a new ribbed neckline using knit ribbing fabric, folded in half.
I have to admit, the new neckline turned out a bit larger than I hoped. But it fits over his head and sure looks cute. Even when he makes this face and tells me “mommmmm. I’m collllllld.”
 I place a few smarties in his hand and everyone’s happy again.

 Enjoy your new little sweater!


I loooooove this!! I have a 15 month old son and this would be a great way to get him some new sweaters and shirts without spending so much money. I love repurposing. Thanks for sharing!
I love it! I’m always looking for something to make for my boy. Now I’m on a sweater hunt, thanks!
Wonderful! Thank you very much for the great tutorial.
normal sewing machine is used
I just wanted to say that I ran across your site last week as I struggled with puffy sleeves for my daughters Halloween costume… Anyway, I have been on here every evening since. You’re amazing.
Wonderful! I love it and what a little cutie pie. I for sure can use this technique. It’s always fun to find new ways to reuse. Thanks for sharing!
I know this isn’t your latest work but it’s a staple in refashioning a sweater… so I’ve featured it in a Sweater Refashion Roundup on my blog.
Congrats for your You Tube show (subscribed!)
Hugs from Italy,
MammaNene @ SergerPepper.com
Would it work with wool s weather? I am kind of afraid to try…
Hi! Just discovered your site and love it! I’m new to sewing. I’m just starting to upcycle my old clothes to my 18-month-old daughter. I love this tutorial, thank you for your easy instructions for someone like myself just starting out. However, the old neckline looks a lot bigger than what you cut for the front/back of the shirt. Did you shorten the old neckline ribbing somehow?
I absolutely love this. I’m already making my kids pants and dresses now I’m going to make them sweaters!
I made my son sweater. only I made the neckline way too big. please advise me how to make the neckline smaller so it will look better and more appropriate for my son to wear.