
How many bags do you own?
Probably a lot.
Maybe a better question is….how many bags have you made?
Um, probably a lot.
But isn’t there’s always room for one more? Similar to the KID PANTS series, I thought it would be fun to share a series of Tote bag tutorials. Start with the basic tote, then show how to make it reversible, boxed out, etc, etc, etc (gotta keep some of it a surprise). When it comes to sewing it’s easier for me for understand the basics and then start adding the twists.
So,
These are the bags we made at my design camp class for ALT in January.
And they’re so much fun to make! They’re perfect for gifts too.
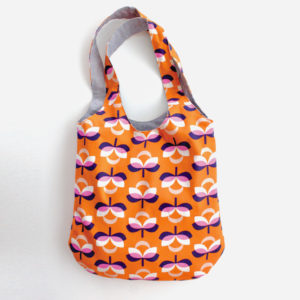
They’re your standard tote bag, made from one piece of fabric, cotton or twill straps, with a simple pocket inside because I can’t stand losing my keys in there. You gotta have a place for the essentials.
Ready to sew?
Let’s get started. Fabrics to Use:
• Heavy Cottons such as Canvas, Duck, Upholstery fabrics, Corduroy, Twill
• Standard Cottons such as quilting cotton, broadcloth
• Knits
Or basically, you can make it from whatever you like….a painting dropcloth, a dishtowel? Think outside of the box and have fun!
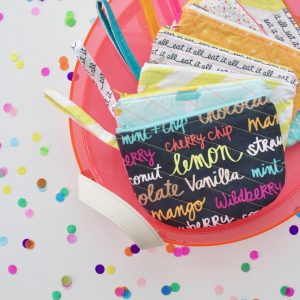
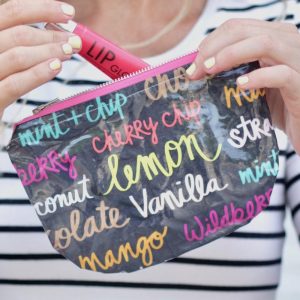
(NOTE: orange fabric shown here is from Joanns upholstery section and black/white fabric is from IKEA)
Fabric Size:
You can also make a tote bag whatever size you like but I prefer:
– either two 17.5 x 14 inch rectangles OR
– one long 35 x 14 inch rectangle
(note, depending on your fabric print, you may want to cut the fabric as one continuous 17.5 by 28 inch horizontal piece, rather than a long 35 x 14 vertical piece –see striped fabric below).
 (Cutting your fabric this size also means you can cut 4 bags from 1 yard of 60 inch fabric or 3 bags from 45 inch fabric).
First, prep your pocket. Cut a piece of fabric 9 x 7 inches (or whatever size you like…larger, smaller, multiple pockets, etc.) If you have a serger, serge the edges off. If you don’t have a serger you can leave the edges raw or cut them with pinking shears (zigzag scissors). Then iron three of the edges under 1/2 inch and iron the top of the pocket under 1 inch and sew a hem on the pocket. If you have a personalized label, you may want to sew one on top or into the side (more about my labels here). Then pin your pocket in place, either inside your bag or on the outside. The choice is yours! I placed mine 4 inches down from the top of the fabric on the inside of the bag.
 Then decide if you want any compartments in your pocket. I used my phone to measure and divide my pocket in two.
Then sew down the dividing line (mark it with pins, or a fabric marker, or iron it lightly to create a visible line). Then finally, sew the outside edges of the pocket in place. Now sew the bag together.
Easy, right?
With right sides of your fabric together, sew down both sides of the bag (or if you’ve cut two separate rectangles, sew down one side, around the bottom, and back up the other side). Then hem the top of the tote. Iron the top edge under 1/2 inch, then iron it under another 1 inch, and sew the hem in place.
 Now we’re ready to add straps. You can create your own straps from fabric. But I love to use cotton webbing or twill tape because it’s easy and looks cute. You can typically buy this by the yard at most fabric shops.
 Cut two straps, each of them 27 inches long (or 1.5 yards total for both).The ends will fray, so iron them under 1/2 inch and pin them to the hem of the bag (about 2 inches over from the side of the bag). Make sure both handles are equal length and sew them in place. Sew a square around the strap end and then sew an “X” in the middle of that to secure it well.
 And….
And….
you’re done!
Yay!

 Now the only question left is what to put in your bag? Sewing books, magazines, a knitting project or two?
 Happy Sewing!


love those bags! and I also am way jealous of your awesome yellow sandals. 😉
Honest to goodness, I don’t know how you do it. I had a baby six weeks ago, and I have yet to get back to my sewing; I did however move our entire household when my Clara was 9 days old, so I guess we all are super-moms in our own way. I am just so in awe by all of your creativeness… Thanks for the bag tutorial; I want to teach my daughter to sew this summer, and this will be a fun project for her to begin learning!
great tutorial, but i LOVE your yellow sandals. where did you get them??
haha. thanks! They’re from H&M last summer. I hope they have something like it again this summer!
Very cute and totally do-able for this novice sewer…I just have to do it! Thanks for the tutorial 🙂
So, when I first saw the black and white stripe I thought “I bet that’s from IKEA.” I was right!!
Second, I used to have a bunch of bags and so I got rid of them. I think I went too far because now I have none! I love this simple bag, it would be a great way to gift wrap!
I also love those sandals!
Dana, is there an H&M near Texas? Or do you buy online?
i bought them at an H&M in LA last year :(. sorry! I know there’s one in Dallas but not one here in Austin.
Tote bags are the best! I’m excited to see the variations you come up with. And yes. The sandals are gorgeous!
I also have tote bags on the brain. I just saw a cute idea in the special issue- Modern Patchwork magazine that has you make a Velcro pocket out of some quilted patchwork. It called for you to make the tote yourself but I was going to be lazy and put purchase one and put the patchwork on that but now with your tutorial I may have to step up and make it myself! Thanks!
Oh Yay! I am so excited for this series! I will be making me some of these, and I am sure my daughters will be wanting some too! Thank you for sharing!
nice! a girl can never have enough bags. these would also make great gifts!!
Awesome! I will make many of these!
Awesome bags. Can’t wait to try this tutorial.
So simple, I love it! This may be a silly question, but what size needle do you use for sewng canvas? I just love your blog, I’ve done several of your projects. I especially love all the boy stuff you have! Thanks for sharing your talents!
You know, I’m a lazy sewer so I usually stick with size 80 needle that’s almost always in my machine. But you could use a larger size 90 needle. A good way to remember needle size is that the heavier the fabric, the higher the needle number. The more delicate the fabric (like silks), the lower the needle number (like a 60 or 70). I go into this topic is way more detail in my book, if you need the nitty gritty :). Hope that helps!
Perfect, Thanks! Where can I find your book?
I love your sandals!
Love your sandals! Super cute. 🙂
It would be fun to make it two toned too. One fabric on one side, another on the other. Great tutorial!
Great tutorial! I will definitely be making some bags in the near future!! 🙂
These bags look so cool! Love the colors and prints you used. Everyone needs more new bags 🙂
So cute and easy! Outdoor fabric or oilcloth might make great bags for the pool/beach.
Perfect timing. I was just contemplating making bag for kiddos in my son’s class. How long did each bag take? I’ve got a fair few to make.
Nicole, I’m a very new sewer (sewist?), anyway, I’m new to sewing, and I just made one of these bags in less than 45 minutes, so if you’re more experienced then I am they probably wouldn’t take very long at all!
Dana! I saw a tote this weekend that had boning at the top so it stayed open for munchkins to throw toys in! I’ve been trying to think of how I could make s huge beach tote that could used with shoulder straps or as a backpack. Ya know what I mean? I hope you have something like that planned!
Just what a girl needs… another tote bag 🙂 I have an obession with buying the recycle tote bags when given the option when shopping so have LOADS, but i dont think im going to be able to resist making one of my own…. i *DO* need a larger one for my boxing class… yep, i just justified adding another bag to my tote collection! 🙂
Very cute! I have SO many but none with a pocket inside! I might make one for Vince’s library books 😀
I was just thinking about making some market totes! Vintage sheet stash here I come…
Awesome. And you look even more awesome. Giving us pregnant ladies hope for a less frumpy tomorrow.
Wow! I just had this …how many bags do you really need!!!! with the hubbie. I showed him this post and we both had a good laugh…cause we both know I’ll be making one or more 🙂 tomorrow!!!
These are so cute! I have the same Ikea fabric, but in green, so you inspired me to pull it out and finally make something with it!
As always, Awesome! I just started sewing in January and found your blog during my “self taught venture”. I love it!! And quickly became addicted. Have already made my daughter some adorable skirts, and she is asking for more =)thank you so much for the inspiration and tips. My seam ripper would get a lot more use without out you!
Your tutorial comes at perfect timing for me since I’ve been looking to make totes for the first time. This is a simple and good visual tutorial I will definitely use. Thanks!
love the bag. thanks for starting simple. NOW, if you could just figure out how to make the yellow sandals, and explain it to us, apparently we’d all be very excited 🙂
This is probably a dumb question but when
You see the inside pocket on, do you see the
stitches on the outside of the bag? I’m a beginner
at sewing and would love to try out this bag.
Oops I meant sew not see
Hi Elaine,
My pocket stitches did show up on the outside of the bag. I thought too late that it would be a great cover of those stitch lines to put a bigger pocket on the outside. But I had already sewed the sides together and was feeling too lazy to utilize my seam ripper so I just colored the thread with a matching Sharpie… I know, I know… But I swear it looks much better and my bag is really just fancy gift wrapping. 😉
Thanks Di I just wondered. And I think thats pretty crafty of you to color in the thread!!! Glad it worked out!
Did you washed your tote fabrics before sewing? Thanks
If you think you”ll wash the tote down the road then yes.
If it’s a very thick canvas that may never be washed, then probably not.
Thank you for your great tote bag tutorial. I’m on a bag craze and I can’t stop. I’ve even blogged about it! Thanks for your inspiration!
http://antsi-pants.blogspot.com/2012/05/easy-diy-tote-bag.html
i have a question about sewing the pockets. When you sew the pockets, are you going to see the stitch on the outside?
I’m making bags tonight, because these great outdoor canvas prints were 1/2 price at JoAnn’s today, so of course I bought 12 yards. seriously. yes, it’s a problem, but in my defense, first, I already have 100’s of yards of webbing, from my previous belt business, AND I have a shop, so I COULD sell the bags, except I’ll never get them all made, and I’ll want to keep the one or two I make, or my daughter will…
BUT, I’m going to try to make one side of the pocket longer, and sew it into the top hem seam. Think it will work?? Then it won’t show on the outside.
Anyone, thoughts or advice on this? maybe, as usual, someone will want the leftover fabric in a few years. My sis or mom will want to make new outdoor pillows – and presto, I have just the thing. see, the excess fabric is good, not bad.
I just made this today! My very first sewing project! Thanks for posting the tutorial!
I was at the library with my 2 year old daughter today and she is always so proud to carry her books she’s picked out. Only the stack was too many for her little arms to carry. I immediately said, “We need to make you a library bag, and I know just the tutorial to us.” I can’t wait to find a fun print to make my daughter her own size library book bag with this great tutorial!
Thanks!
Love these bags! They look so stylish, looking for gift ideas for christmas and this is just perfect. Hope my sewing is up to it, I’m a bit new to it all.
Hi… this is my first time visit your blog. I really love your tote bag. I will start learn sewing. But. Is it possible for beginner like me to make this wonderful bag???
I just made this tote the other day. It came out adorable, and was easy!! I love everything about your blog, and have now made a few things from here. Your instructions are always exceptionally clear, and easy to follow, and everything I have made from here turns out beautifully. You are such a talented woman! Thank you for all your inspiration! 🙂
Good news! We have an H&M in Austin!!! At the Domain…….happy shopping (and sewing!)
Hi Just wanted to let you know am enjoying everything on your site all the way from South Africa and lovely tutorials you have, i have benefited immensely from them am just new into sewing and you make it all seem so easy. Thanks and keep it up
So cute love those bags ,can you make a video for them ?
I hope to in the next set of videos! We shot the first season all at once (there are still 6 episodes)….so hopefully in Season 2
Love this tutorial so much, can i ask how thick is the webbing/tape is, that you use for the bag handles?
Thanks!
Do you pocket seams show on the outside of your bag?
Hello! Thank you very much for this tutorial… I’m a begineer on the sweing field 🙂 I am trying to create the pocket but I have one concern, when I sew it to the side of the bag, will the stiches show up on the outside of the bag when is completely done? Thanks!
yes they’ll show up….but just use a thread color that coordinates with your fabric and you should be fine!
What do you thinks good size would be for kids(6)? What size would you cute fabric?
What size is the final product? Making my own tote bag at school and not sure how big to do it. I don’t want it to end up too long and skinny or too big all round. If you could help it would be really appreciated. Thanks
You can make it any size, but I like 16 x 18 inches, or 13 x 15.
You can watch my video which has more info here:
https://www.youtube.com/watch?v=-OCRclg0hpU&t=24s
Would this be a good use as a diaper bag my little one will be 2 in December and we have been using a big hunting bad for his things but now we are not in need of so much space and I would love to get a new bag for his things
Hi I love your videos but do you have any patterns