
Whether it’s your first day of school or a lazy day at home, everyone deserves a dress that makes them feel special. So dress it up, spin around, throw on your boots or a pair of shorts, and just be you!


The First Day Dress is a PDF pattern in the SHOP, ranging from sizes 2 to 10 years old.
There are 5 different style options—each can be made with or without sleeves. And there are 4 different lining options to make it fully or partially lined.

If you’ve never sewn a lining, it’s so much easier than you think.

And the result is beautiful. All those seams are hidden, the garment looks polished, and hey your friends might even think it came from a store!
You’re that good.


So make your dress twirl! Keep it straight.
Cut it short. Or add on sleeves.


The choices are up to you!
And there’s something for everybody.

Here are the details….
This is a 46-page PDF document, with detailed information and pattern pieces for sewing a First Day Dress or Top.
Instructions are easy to follow, with beautiful photos and illustrations, and a conversational tone that helps you feel like I’m right there next to you, joining in the sewing fun!
SKILL LEVEL
Advanced Beginner +
Of course I encourage anyone to push themselves and take on a challenge. So if you’re a true beginner, don’t be scared off. You can always give it a shot! Or grab a sewing friend to coach you along the way. Sewing is always an adventure!
STYLES
The First Day Dress comes in 5 styles. Each can be made with or without sleeves:
• A-Line Dress
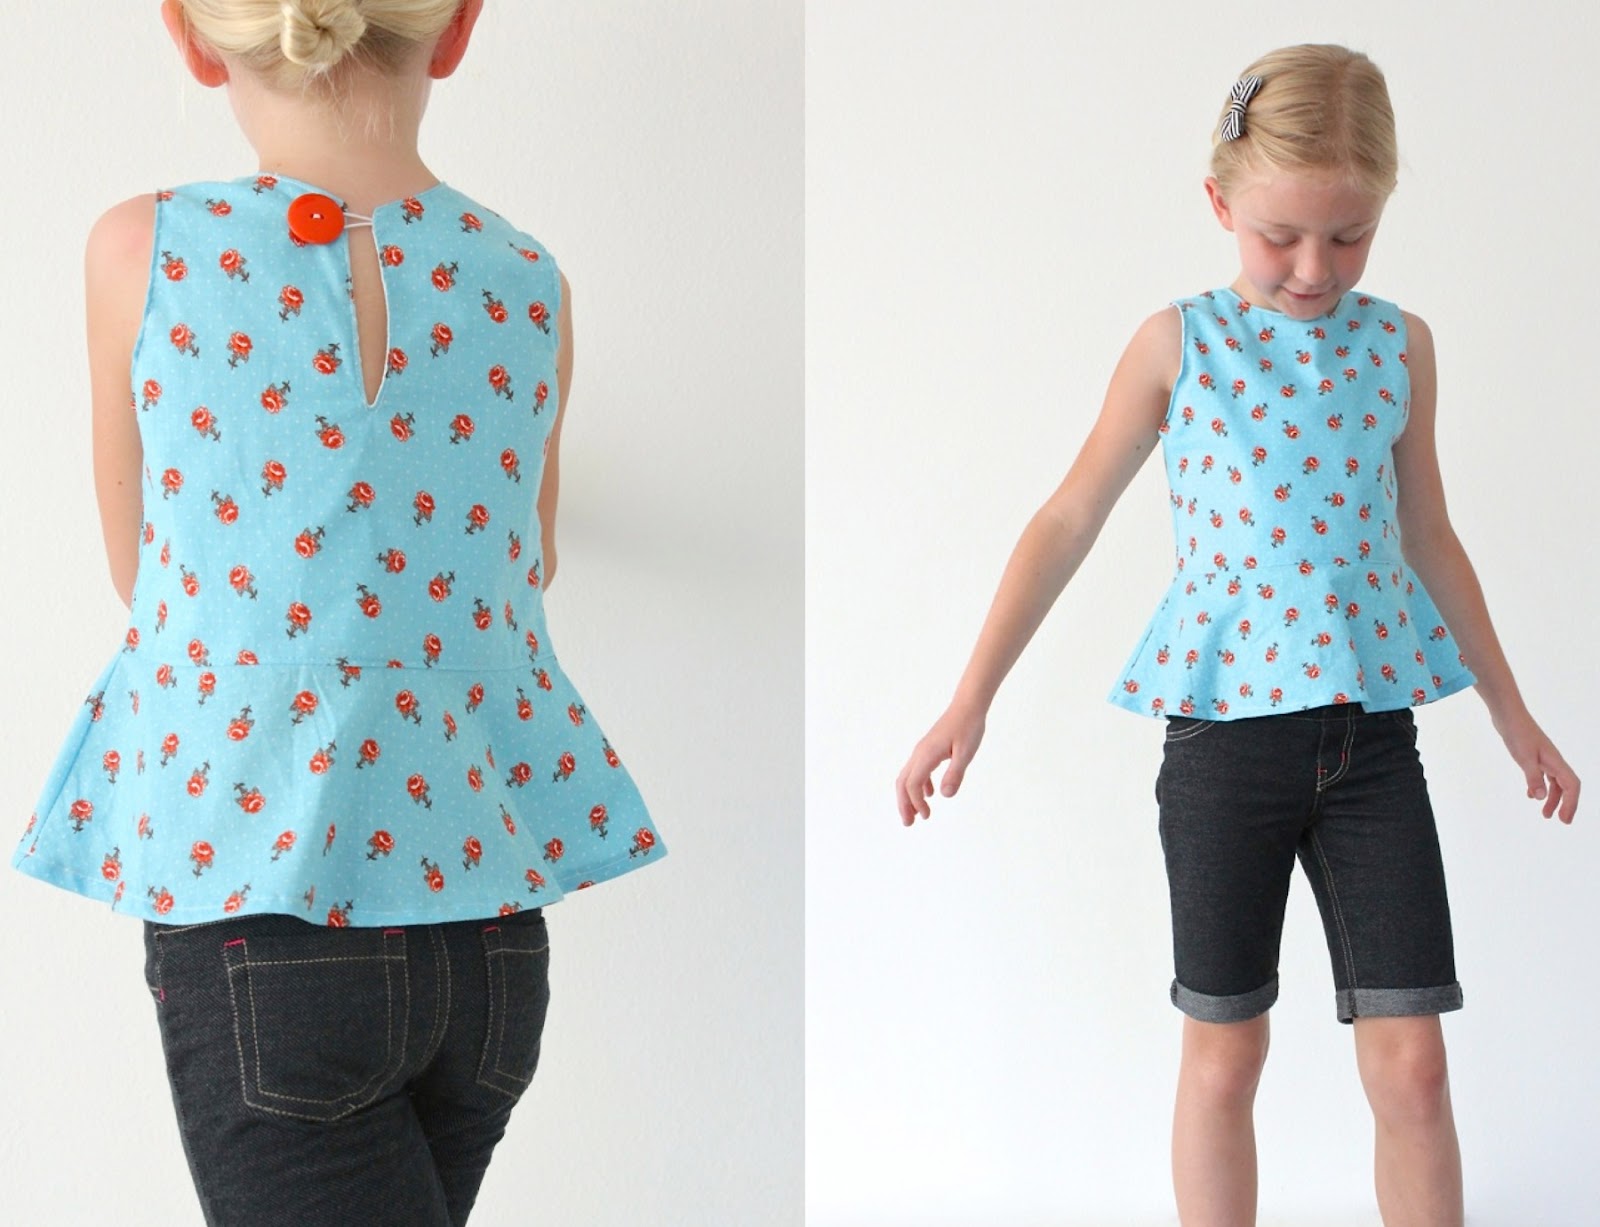
• A-Line Top
• Swing Dress
• Swing Top
• Swing Dress/Top with Front Placket
SIZING
• The pattern ranges from 2 to 10 years old.
• Sizes are labeled according to age and based on the average size of a child, similar to what you would find in retail stores.
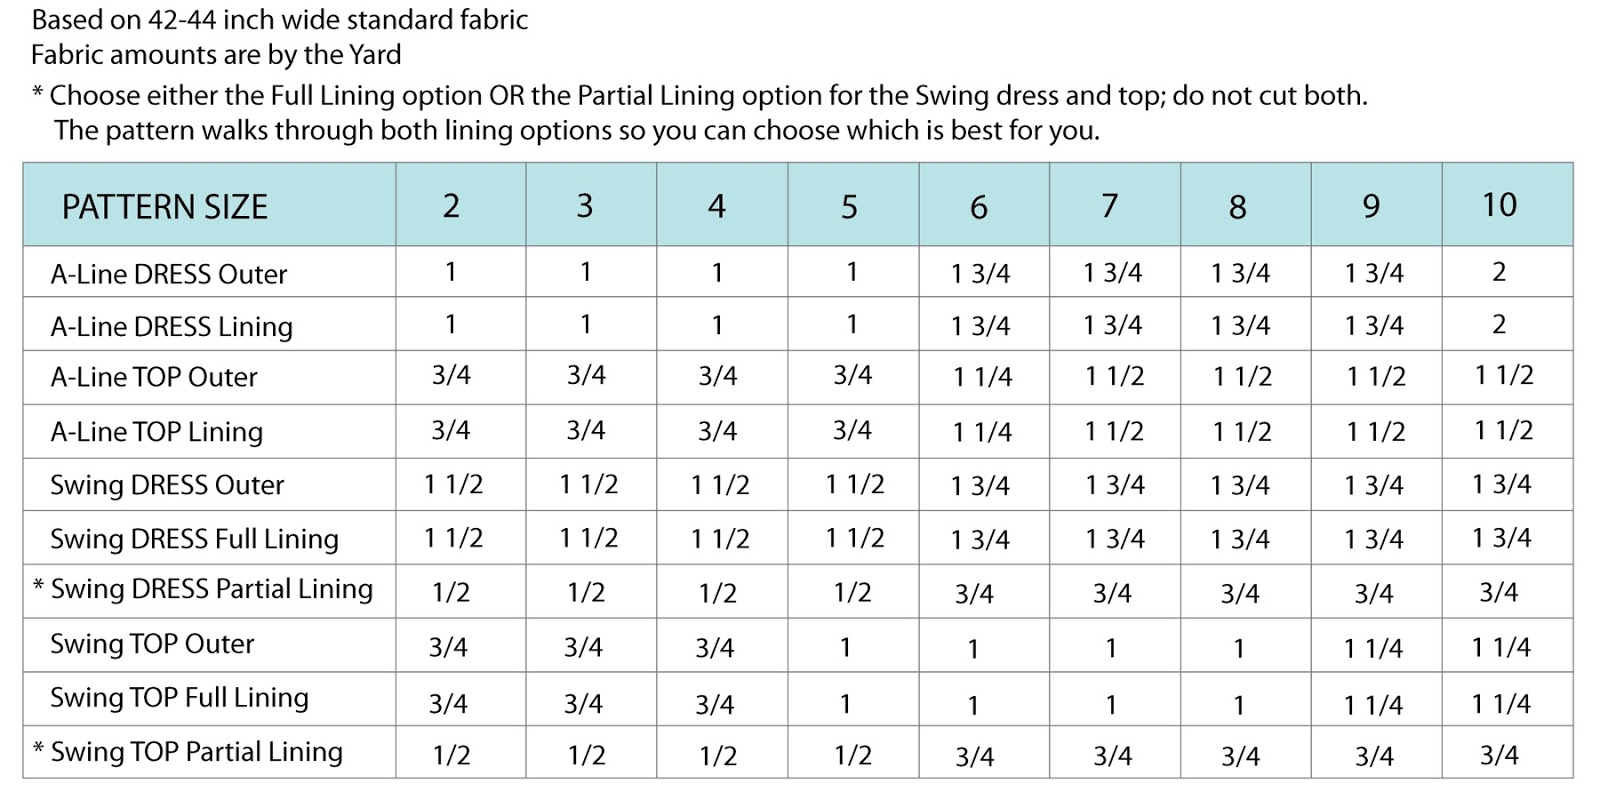
The charts below help you find the proper size and are included in the pattern with details and tips.

FABRIC and MATERIALS
For each Dress or Top you need:
• Outer Fabric
• Lining Fabric
• Back Button
• 6 inches of Elastic Cord
• small amount of Piping (placket option only)
• front buttons (placket option only)
Fabric types:
• Quilting cotton, medium-weight cotton, home decor fabrics, broadcloth, linen, lightweight cotton, etc. (more details and the chart below are included in the pattern).
DOWNLOADING the pattern
• After purchasing, you are sent a link for downloading the pattern to your computer. This is sent to the email address attached with your paypal account. When you open the download pattern link, make sure you save the pdf file to your computer so you always have it for future use.
• The file size is 3.6 MB
PRINTING
• You do not need to print every page. A chart is included, showing which pages to print for each size.
• Pages print to standard 8 1/2 x 11 inch paper (for printing outside of the US see below)
• Pages are pieced together by trimming along the border, matching them at the markings, and taping together. I’ve tried to make this as simple as possible with detailed instructions in the pattern itself.

Printing in another Country (outside of the US)
The pattern was created for standard US printers but should work for other countries as well. There are measuring rulers on the side of each page (in inches) so you can see if you’ve printed to the proper print size. The pattern images do NOT print to edge of the paper…so I recommend printing to your standard size paper, checking the ruler, and matching the pattern pieces up as outlined in the instructions.
And that’s about it!
Ready to Sew??
You can purchase the First Day Dress Pattern HERE.

When you’ve finished sewing, share your photos with us!
• Instagram them with the tag #firstdaydressmade and tag me as well @made_everyday
• Share them in the You Made it Flickr group.


YAY! I’m so excited to make this dress!!
Beautiful! I’m SO excited to get sewing!!!!
Just love it, cant wait to get sewing 🙂 🙂 🙂
Added to cart and checked out before you could say “Paypal”! So excited to make this in Nani Iro that I’ve been hoarding. 🙂
I usually don’t sew clothes, but I might just have to do this one! So sweet!
*squeal* YES! I am so excited! Such cute looks. I can’t wait to get started! Thanks, Dana.
I just downloaded the pattern, and I’m so impressed by the level of detail and photos in your instructions. Can’t wait to sew this up….many times!!
Fantastic! Thanks Lorna 🙂
I’ve been anxiously awaiting this pattern release! Do you think it would be suitable for knit fabrics without stretch? My toddler is sensitive to stiffer fabrics, so I’m thinking a thicker knit jersey or interlock would be her preference. I love love love all the variations. Your patterns are my favorites. I have a few. 🙂
yes, that would be fantastic!
I think it would work with stretchy knits too….I just haven’t tried it yet (but I plan to! :))
Yay! Now all my toddler’s dress dreams will come true. 🙂 She was gifted a j.crew peplum top that she wore until it no longer fit (almost daily, literally!) so I’ll be able to make that too.
Thanks! Can’t wait to whip some up!
how perfect! Now you’re making me want to try it in some interlock…. 🙂
aw man Dana, it’s adorable! love the options and it’s got awesome twirl factor! congrats on the pattern release!!!
Can’t wait! Now…I wonder if I can enlarge it for myself.. No seriously!
So cute! Congratulations on the new pattern!
I love the options! This is a top-priority project now, my girls took a look and can’t wait for their own!
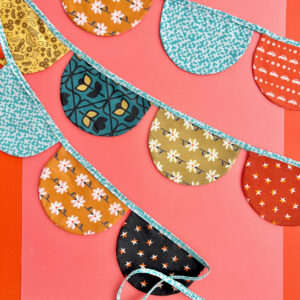
Sort of unrelated, but where did you get the striped fabric in the top right hand corner of the pattern collage?? I gotta have some! And now related – I wish I had a little girl to make this for! 🙂
And if it is discontinued Ikea, would you know where I could buy some? 🙂 (I’ll pay lots! ;))
Hi Amy!
Yes, the colorful striped fabric is from IKEA….but sadly, I don’t think they carry it anymore 🙁 I’m super bummed as well and wish I had bought yards and yards of it!
Sorry.
I just got the large stripe fabric from Ikea in blue just two days ago. They also had it in green stripe. Did not see the red. I was at the store in Chalotte.
LOVE IT!! Such nice pattern/color selections.
YAY!!!
I have been awaiting this pattern release since you first blogged about the dress!
BEAUTIFUL! Can’t wait to make…
…many different garments :-).
Congrats on the pattern launch! And tell Lucy she did a great job modeling!
You are such a clever girl, well done and thank you.
All the way from Darwin ‘Northern Territory’ Aus. A big big thank you for creating such an amazing pattern. You are the most amazingly creative person. I can’t wait to sew this dress using material I purchased 18months ago waiting for the perfect time to use it.
The material is designed my Sarah Jane and is called ‘children at play’
The print is called ‘on parade in multi’ it’s absolutely gorgeous with kids with balloons and an elephant and a pull cart. It’s to die for.
Thanks again and can’t wait to get started.
J
I’m in Darwin too! Have been waiting to make this dress for ages. My daughter will love it!
Fantastic! 🙂
Hi !
Those dresses are amazing , love em all . x
Now only if you made this in adult sizes!
Dana, I purchased your pattern and am so excited to make this dress for my little grand-girls. It is so totally adorable. And I absolutely cannot believe the quality of the pattern and the work you put into it. It is worth WAY MORE than the $10.00, you crazy girl! Thanks again! – Dori –
Well that’s wonderful to hear! Thank you 🙂
ahhhhh, such a great pattern! your versions are all adorable!
So cute! Just wish I could make one for myself.
Hi Dana (all the way from Cape Town, South Africa):
Just purchased you pattern for the day dress and the 6 minutes it took to download was the longest ever. Can’t wait to sew all the variations for my nearly 5yr old granddaughter. I avidly read all your newsletters and your tutorials are really something else. Thanks again.
Beautiful dresses.. love the options
Hooley Dooley. I’m so so excited. Just organised a babysitter for a couple of hours so I can whip up a mock dress before I cut into the good stuff. Pattern printed, cut out, machine fired up and muslin at the ready.
This is so beautiful! I have three boys. But I desperately want to make this dress! Love. Love. Love. And your girls are so cute.
Okay, gorgeous pattern and I can’t wait to make one or two or ten, but can I just stop a minute and ask…is that CLARA in the orange one??? When did she become such a grown up little miss?! These kids…stop it! Mine won’t stop growing either 🙂
HI I made this last night in a size 9, i just wanted to let you know that the sleeve for the 9 is about an inch too short on both sides. it doesnt line up very nicely.
Hi Melissa, the sleeve actually is NOT supposed to fit the entire length of the armhole. It’s more of a cap sleeve, rather than a full sleeve. Refer back to page 18 of the pattern and you’ll see one of the bullet points:
“Note that the sleeve does not fill the entire length of the armhole. There will be excess armhole fabric on each side of the sleeve.”
The pictures should help you see it visually as well.
Yes I understand that, I wish the sleeve had alternative option.
thanks from France. This pattern is very beautiful, I really love it and I want to sew it for my Constance. Made is wonderful ! Merci !
Love love, as always you have created a beautiful pattern. Can’t wait to download it on the weekend! Thanks again Dana. P x
So cute! Congratulations on the new pattern!
I look forward to your level.
Your explanations are perfect for a beginner.
Thank you from the other side of the ocean (from Barcelona)
I’m almost finished with my daughter’s dress and I absolutely love it. Without a doubt, your patterns are the best around. Thanks so much for spending the time getting this put together. You can really tell you put a lot of time into it. The dress is so cute on my little girl.
I will totally be making this for my girl but I have somewhat of an unrelated question.
Well it’s kind of related 🙂 I’m looking to make a dress for myself in the exact same swing style as the very first picture … any ideas where I can find one online that is adult size.
I consider myself advanced beginner but I definitely need to work from a pre made pattern. Thanks for your time! I love everything you design.
hmmm. I actually don’t know of a specific one but I would look at Colette Patterns. She has amazing women’s stuff and some very vintage/modern looks. If anyone else has recommends please chime in!
Hi! Thank you for your patterns! Today I’ll try this dess, I can’t wait.
I still have the kid shorts and I love it too!!
I only have a small suggestion: I’m italian and I alway have to convert the inch in cm.
Can’t you think to insert the table of converted measures in pdf files? It would be very useful for all us using cm!!
What is the blue geometric pattern fabric in the first pattern? It is so cute! Would you be willing to share where you found it? Thanks!!
It’s from Joann Fabrics, from the home decor section (not the fabrics on the big round rolls….but the ones folded on standard bolts). Sadly though, I bought it about 2 years ago and I don’t think they carry it anymore. But they have tons of other cute ones right now!
Thanks! I’ll keep my eyes open for something similar.
I’m so excited!! I had such great luck with your Baby Doll Basket, I can’t wait to try this out!
LOVE this pattern! You are so talented!!! Any plans to increase the size to 12-14 on this pattern?
Not at this time. Sorry
The pattern starts to change as you get into teen sizes, with girls’ body shapes changing. And it requires adding an extra seam and more fabric to the circle skirt as well….but who knows what the future holds! 🙂
so excited! yay! now i know what i’m making as a birthday present for my niece and a dress for my daughter!
okay, now that i’m all downloaded and printed and cut and taped, i have 2 questions!
1. i’m so confused about where to cut for the skirt (i’m doing the swing dress in size 2). i see the bottom hem to cut but where do i cut at the top? at the very top of the paper? by the peplum lines?
2. if i do separate hems for the skirt and lining, why do i do the hems opposite each other (meaning why is the hem for the lining done to the “right side”/outside and the hem for the outside is done to the “wrong side”/inside?
HI Elana,
1. Yes, cut the skirt at the top, along the very top lines (which is the waistline) The second set of lines is the hem (the bottom) for the peplum top (the shirt version)
2. You could totally hem the two separate skirts in the same direction. But it just feels natural to hem each one under as you would if they were stand-alone dresses….which means that yes, you do hem them in a similar manner (each hem folds under to the wrong side of the fabric)….but because the Lining and Outer dresses are facing each other, the hems end up being opposite of each other. Hope that makes sense. It’s just a little thing.
I am so excited about making lots of dresses with this pattern! But before I start I am trying to figure out the right size. I made a muslin of the bodice only for the swing dress in a size 5 and the unfinished bottom of the muslin is about 2 inches above her belly button. Does that sound right? Where should the bottom of the bodice hit typically? I am questioning whether I need to go up to a 6…..It is also a challenge to get the bodice over her head, even after going with a 5″ slit.
The swing dress is supposed to hit a little higher than the belly button, sort of a high-waisted look.
So your measurements sound about right on that.
The slit will open up more when you sew the two layers together, factoring in that the seam allowance will take away 3/8 inches of fabric all around the neckline and on the back slit (making the whole thing more open). Of course if you still feel like that’s not enough, you can trim the neckline down a bit (cut the neckline on the next size down when cutting, but cut it UP to the proper shoulder line for her true size), or you can cut the slit another 1/2 inch. You just don’t want the slit to be too large that runs down the entire back of the dress.
Just purchased and printed out this pattern and have started to cut the material, and my question is…… Can you cut the bottom (of the swing dress) in one piece (like the circle skirt) ? or does it need to be 2 cuts ?
Thanks !! and double thanks for a GREAT pattern.
The skirt is not a true circle so it doesn’t work exactly like the circle skirt tutorial.
So I recommend still cutting in two pieces. Also, it would be difficult to find a piece of fabric large enough to cut a full circle in one piece for the larger sizes of the dress, thus, the two pieces.
Hope that helps!
– Dana
Thanks…I realized this later on while getting father into the pattern.
Will you being making a video for this ? Having a small problem understanding the correct way to attach the top and bottom for the swing dress. I thought I had it until I sewed the sides and it didn’t come together like it should.
I’m so excited the pattern is here and bought it the first day, but circumstances conspired against me making it until tonight. It’s been such a joy to put together, I already did two little sewing dances in the middle. I’ve stopped for tonight but have a question about the armholes. In the instructions for the swing dress with sleeves, for the armholes, you write, “as you sew along the portion already attached, sew along the same line”. Do you mean stitch in the ditch or do you mean keep sewing the 1/8 allowance?
It already looks so pretty without the armholes finished. I foresee making MANY of these! Thanks so much!!
Fantastic! I’m glad you’re having fun with it!
And sorry maybe I should have phrased that better 🙂
What I mean is to continue sewing along the same stitch path that you’ve started. When you get to the sleeve area it’s a bit “blind”, which make is hard to see your true seam allowance. But just continue sewing on a similar path that you’ve been doing….which is yes, prob about 1/8 inch from the folded armhole edge.
Hope that helps!
I’m making swing dress in size 8 right now… Am I supposed to leave the waistline and side seams raw? You don’t mention anything about zigzagging them… just don’t want to ruin the dress in the washer. Did you topstitch the waistline at least on one side? Or could I or would it be beneficial to topstitch both outer fabric and lining together at the waistline? I pressed that seam open as well.
I love the pattern, and great that there is several different options! And lucky me, having two girls to sew for, just like you, Dana 🙂
I like it so much, i’m going to buy this pattern asap.
Congratulations for the blog i really like it
Ciao Federica 🙂
Did you get the pattern? I just would like to know if it works well on our italian computers 🙂
Grazie!!!
Hi Dana. Regarding the fabric amounts, are the numbers in your table for outer & lining fabrics all together? Shall I divide this number in 2, one for the outer fabric & one for the lining fabric? I am making the fully lined swing dress. Thx!
If you look at the Fabric Chart here in the pattern listing there’s a box for the Outer fabric, and a box for the Lining fabric. So you need the full amount for each layer (unless you’re doing a partial bodice—as described in the pattern)
Thank you for some other informative web site.
Where else could I get that kind of info written in such a perfect manner?
I’ve a project that I’m just now working on, and I’ve been at the glance out for such information.
How beautiful! I wish it came in adult sizes too because it looks like a dress you just can’t help but have fun wearing! Gorgeous job. I love your site BTW.
Lisa
Fresh Eggs Daily
finally i bought it. i’m so exited 🙂
Hi there! I just wanted to ask if you ever have any issues with hackers?
My last blog (wordpress) was hacked and I ended upp losing a few months of hard work due to no back up.
Do you have any methods to stop hackers?
Hmm is anyone else encountering problems with the pictures on this blog loading?
I’m trying to figure out if its a problem on my end or if it’s
the blog. Any feed-back would be greatly appreciated.
apologies for my third comment on this post: i just finished the dress for my niece in a size 2 and it is just about the best thing i’ve ever sewed. it looks totally professional…i love it and so does she!
do you have design for middle school kids
Hi Dana,
I would love to get started on this dress today but i would like to know if the pattern includes seam allowance.
I already finished the dress, she turned out beautiful. Come over to my blog & have a look!
Just finished the dress (it was my first apparel item I’ve ever done solo) and it is lovely! I plan on sharing photos, etc 🙂 I let my daughter choose the fabric since it’s for her bird watching birthday party 😉 Just quick feedback: maybe if I wasn’t a newbie, I wouldn’t have made this mistake, but I wanted to point out that when you get to the step of putting the lining into the exterior and sewing them together at the neckline, make sure to flip the lining so that the raw edges are on the inside (right side out.) The phrase “right sides together” was used, and that is only for the exterior fabric. I ended up starting the sleeves when I realized my mistake, and ended up taking out the top stitching and other sticking at the neckline. I probably could have left it as is,and gotten away with it, but I wanted to do it right! Thanks once again 😉
Hi, Are there any plans on upsizing this to a 14/16??? My daughter loves it but I already have to upsize it to a 12, Would be great if this was in place, pretty please?
Any chance this can be 12/14/16?? Love this pattern!
Finally purchased this pattern, yay! Before I get started, the notions list mentions 6″ of elastic cord…do you think that could be swapped out for 6″ of 3mm wide elastic trim? It isn’t rolled like cord, it lays flat but it is very stretchy since it is a polyester/rubber combo. I’m a little OCD about color coordinating and couldn’t find cord in colors other than black and white. I just want to be sure the button closure will still loop properly…any feedback is helpful. Thanks! Beyond ecstatic to get started sewing!
sure that would work great!
Dear Dana,
I have just now completed the most beautiful little 5 year old size peplum top with perfect little cap sleeves from your so very chic pattern and am excited to get started on a second, but would first like to ask your advice about a problem I ran into.
When I sewed around the bottom of the back slit (1/4″ margin), and then turned it right side out to topstitch, the area straight across the bottom was all scrunched up and I could not get it to lay flat although I struggled (and swore) mightily. With a lot of steam from the iron and pulling and smoothing it is now acceptable though still noticeably scrunched so I moved on and finished the top. I have looked closely at your photos of the back and they all appear to be perfectly flat and straight so I wonder if you could describe again how you create the opening. I am wondering if you sewed around the bottom in a “U” shape or a “V” shape, rather than a square shape (turning the corners 90 degrees) as I did. Or do you have any tips or tricks you could pass on. I have been sewing less than a year so may have overlooked something obvious.
Thank you for creating such a detailed and extremely instructional pattern. Even all the pattern sheets fit together perfectly. It is beautifully done and the result even with my imperfect sewing is adorable.
I’m glad you’re enjoying the pattern!
Here are two tips for getting the slit to lay flat at the bottom:
• On page 12 of the pattern, in the middle of the page, to the right of the photos, is this info:
“TIP: When you sew down the sides of the slit, I taper my seam allowance to 1/4 inch and sew slowly….especially across the bottom of the slit” This smaller seam allowance will make everything less bulky.
• Very carefully make a few clips in the seam allowance, especially at the very bottom of the slit. This will help the fabric “stretch” and lay flat, rather than scrunching up.
Thank you. I made only one or maybe two clips into seam allowance being fearful of fabric fraying/unravelling. I am about to start the neckline on my second dress and will try more clips this time around. Is there anything you do when sewing around the bottom as far as the shape of your sewing goes?
I sew it in more in a “v” shape. As you sew down one side of the slit, start with a 3/8 inch seam allowance, then taper your seam allowance in to 1/4 inch and only sew a small portion around the bottom. Then when you go up the other side, expand it out so that you’re back to a 3/8 inch seam allowance when you get to the top/neckline again.
Fantastic. Came out perfectly sewing only a small portion around bottom in more of a V shape instead of the square I did first time around. Cut clips very close to the stitching at bottom and used some Fray Block.
Thank you so much for your time and support. I love your dresses and completely copied your yellow lining in a blue and white print dress.
Fantastic! I’m so happy it worked out for you!
Thanks Thea 🙂
I would like to make the swing dress using a border fabric for the skirt. Would that work and how much extra fabric do you think I would need? It would be for a size four. Thanks!
Sure that will work….You just need to cut out the border fabric in the same way that you cut the skirt portion of the dress (in a circle shape)….except that you’ll only cut it 2 or 3 inches wide (or whatever width your border is going to be). Then sew the border to the bottom hem area of the skirt (with right sides of the fabric together). It will feel awkward because both pieces are cut on a curve, but once you turn it right-side out and press it will look nice. Then continue sewing the dress as outlined in the pattern.
Hope that all makes sense!
– Dana
How would the sleeveless A-line dress look with a turtleneck or mock under it for cooler weather?
That would totally work. And you could even cut the neckline down lower so it’s not as “snug”….to allow the turtleneck or longsleeve shirt to show through more.
Dana, I finished the dress! Both Miss D and I love it! BTW your tip of putting the dress on and off (arms first) is super helpful. We love how twirly this is. Here’s a review I wrote.
http://sewing.patternreview.com/review/pattern/102959
I am having trouble printing the pattern. I unselected “fit to page”. Only portions of the pattern lines are printing. I can’t cut anything out because there aren’t any lines to match up.
Me too… any help on how you fixed it?
This makes a really nice reversible dress too. Pick a “lining” that looks nice, sew according to instructions. I put one button on each side for the closure. DD loves it.
Is there an optional way to do the armholes where you don’t have to iron under and then pin them together and stitch that way? It was such a pain for me and took forever. Even then it didn’t look very nice and I couldn’t get everything to line up evenly for a reversible top. I was just thinking there has to be an easier way that doesn’t take so long! 🙂
Loved making the dress, I used thin ponytail elastic for the elastic cord. Comes in
lots of colors.
Do you think this would work with a narrow wale corduroy? I seems to have built up a stash of corduroy without really having any projects in mind….
Definitely, definitely!
Do you happen to remember where that red circle/flower fabric in the last picture came from? I just LOVE it!
I think it was from Joann Fabrics….but probably a couple years ago. Sorry!
Can you pretty pretty please make a tutorial on adding long sleeves to this dress? Would love to do a long sleeve version for my girl..
Hi dana, I really like the fit of this pattern on my 2 year old once it’s on, but have found the dress hard to get on without any stretch in the fabric. I was wondering if you have had anyone comment on this before. I was thinking of making the slit at the back longer?
Hi Lexi. I have just used age 5 pattern for my 2 year old (we are a tall family – not obese!!!) and we found exactly the same issue. I used a 4 inch slit and next time will do at least 5 inch. We LOVE the dress. My 5 year old now wants a matching one – and one in Jersey material….thanks Dana
The dress was designed to have a simple closure in the back for easy sewing (rather than a zipper closure). But the style is meant to be more fitted on the body (rather than loose)….so to make it all work….it’s all in the way you put the dress on the body (this info is also included in the pattern itself).
To put the dress on….go arms in first, then with arms up, pull the dress down over their head and around the body. When you’re taking the dress off, place arms up and pull it up over the head and arms, like you would when pulling a shirt off a toddler. “Arms up!”.
I really tried to give you the best of both worlds!
Hi! I just wanted to thank you for such a beautiful dress pattern! I bought this last week and have already made an A line dress and a swing dress for my preschool aged daughters, I adore everything about this dress… Well except the arm holes I do not like the arm holes. Haha oh well thanks again, your a wonderful designer.
I look forward to buying and using this pattern. I wondered about the same question as #58 – it looks like a really narrow fit for pulling over the head. Has anyone tried Dana’s idea about lowering the neckline and making a 5″ slit?
I’m having a hard time getting the swing dress off and on. I made a 3t and a 6t. I did try opening the slit bigger but it goes so far down the back it looks a little too much. I think I would use stretchy fabric if I did it again. Or do a zipper in the back. I love the dress style but my kids won’t wear it if they can’t dress themselves.
Hi Ceci,
Try using a larger size for the neckline. It will give the dress a slightly different look, but will help with that.
For instance, cut out a size 3 dress, but cut on the size 5 neckline.
Hope that helps!
i just ordered this about an hour ago, I think. How long will it take to receive the pdf? I’m excited!
This is THE Pattern I’ve been looking for…now if only it came in adult size…
LOVE your work 🙂
I ordered the pattern a while back, but I’m just finally getting around to making it for my 3-year old daughter. She loves dresses that she “steps into” as opposed to putting over her head. Do you think the back could be modified to use a zipper instead of a button? Thanks!
Hi Cathy,
Yes, you could modify the pattern to include a zipper…
The easiest type of zipper would be to create a seam in the middle of the back bodice piece and cut out the back as two pieces (you would need to add extra seam allowances for each piece in the middle, to add that extra back seam and zipper.)
Another idea is to add a side zipper to the side seam. I’ve never done this, but if you’re experienced with zippers you could play with that too.
Dear Dana,
I would just like to start to sew – alle the pattern and a beautiful fabric is ready. But one questions keeps me away from starting. Is seam allowance included in the pattern pieces? It would be great if I could have an answer quite soon. My daughter is waiting for her flower swing dress 🙂
Thanks so much,
Angela
Yes, seam allowances are included in all my patterns.
I believe that dress is a 3/8 inch seam allowance.
Thank you so much. So I can finally sew that dress tonite.
Cheers from Switzerland
Angela
After purchase of this pattern am I free to sell the items? Or do you have restrictions?
You are free to sell dresses based on the pattern. There’s additional info about that at the end of the pattern
Have you made this with a scuba knit? Do you think I would need to adjust it at all for a knit?
I have girls from 6 months to 8 and would love to do variations of this for Easter dresses. My 6 month old is in 9-12 month clothing…would it be possible for me to adjust down for that sizing from the 2T, or would it be too difficult? TIA
Has anyone used a knit fabric when seeing this cute, cute dress up?
I wish these came up to size 14!
I just want to say Dana, that you have made such a difference in my sewing habits, and I have used so many of your tutorials, that I feel obligated to give back in any way I can. I cant wait to get started on these dresses! Thank you for helping me make things for my daughter. Keep being amazing! XOXO
Hi There,
I apologize for the beginner question but I have never sewn anything lined before. Do you have to specifically have “lining” fabric or can you just use another cotton fabric similar to the dress fabric?
Thank you – beautiful pattern!
I’m making the a-line top! And I’m so confused! (I’m a beginner) I’m using two different patterns for the inner and outer… In a picture it looks like the outer is sewn with the right sides together.. How would I turn it out? I’m so confused. Lol
I made this dress last year and it was stunning. However my granddaughter has quite a large head and although it looked fine once on, it was a struggle to get it on her. I know some people have suggested using knit fabric, but I’m not experienced in using knit fabric and already have cotton fabric I would like to use. So, do you, Dana, or indeed anyone else have a foolproof method how to actually make a ‘proper’ front button placket for the dress? I have tried looking for suggestions on the internet, but haven’t really found anything that I can easily follow. I’m not that experienced in sewing, so need fairly precise instructions.
Great thanks! Really excited All I have to base IT off of is the helpdesk stuff I did at my internship which to me was still really fun
Love this pattern and my daughter too. She’s enjoyed wearing them for the past 2 Summers. We live in the Northeast & it’s getting cooler… Would it be possible to add a sleeve to the peplum top? I’m a bit of a novice and have been too chicken to attempt it. Any tutorial in the future?
Yes. I’ve thought of that before. But adding a sleeve would would mean redrafting the armholes, etc and would be a little more complicated than it probably seems.
You can always add the little cap sleeves that come with the pattern. Or make the dress one size larger and throw a long-sleeved tee shirt underneath so it’s like a jumper. Or wear it with a cute cardigan!
Or try this cozy fleece version I made for daughter in the winter!
She loves it!
http://www.madeeveryday.com/2015/03/just-a-little-hot-pink-and-mustard-fleece-dress.html/
nkqpbkwirsuzuuunfgisczjfcsponv
I love this dress, I purchased it and did not get any instructions to down load it, nothing .. so disappointed