
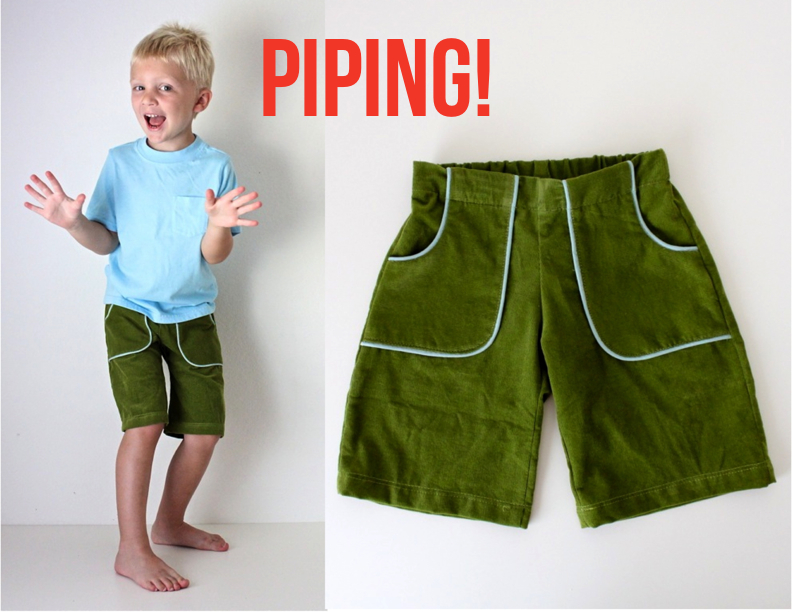
Welcome back to our KID Shorts series.
You guys have been sewing up a summer storm and I love it!
If you’re on Instagram, tag your photos to #kidshortsmade and tag me too! @made_everyday
This post is one of many tutorials that accompany the KID Shorts PATTERN, which you can purchase HERE.
So far we’ve tried Basic Shorts, Flat Front, Racer Shorts, and Front Pockets (click a button for the full tutorial):


Now let’s add another detail; a tiny detail with big personality…
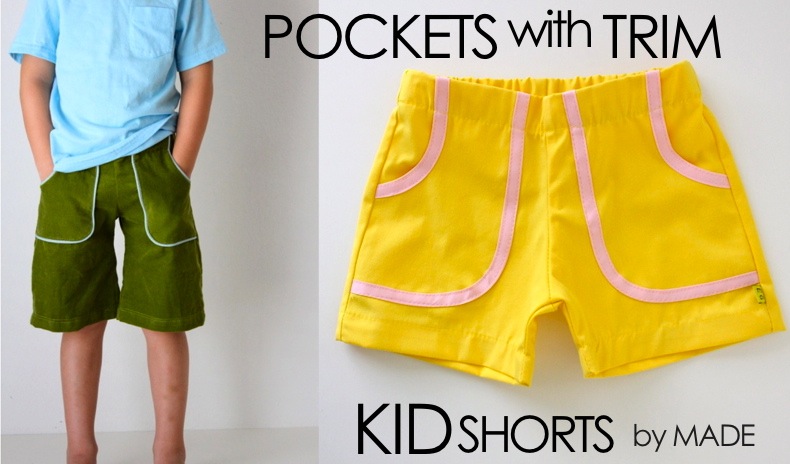
I love, love, love Bias Tape and Piping.
They add that perfect pop of color to clothing that might feel simple or plain (not that I don’t like simple things. You know I do). But even with just solid colors, you can create totally stylin’ shorts.
And we’ll help you do that in a few easy steps, with both bias tape and piping. Plus there’s plenty of room for your own imagination…try out ric rac, lace, ruffles, ribbon?
If you’ve never used Bias Tape read all about it HERE, and you can WATCH A VIDEO about it HERE.
And, if you’ve never used piping don’t be scared. WATCH A VIDEO FOR PIPING HERE:
Okay. Let’s start with BIAS TAPE.
We’re going to use our KID Shorts pattern, which you can purchase HERE. If you’re using a different pattern or if you’ve created your own
pattern, follow along with the instructions and make shorts with us.
I’m sewing the Flat Front version and adding Front Pockets.
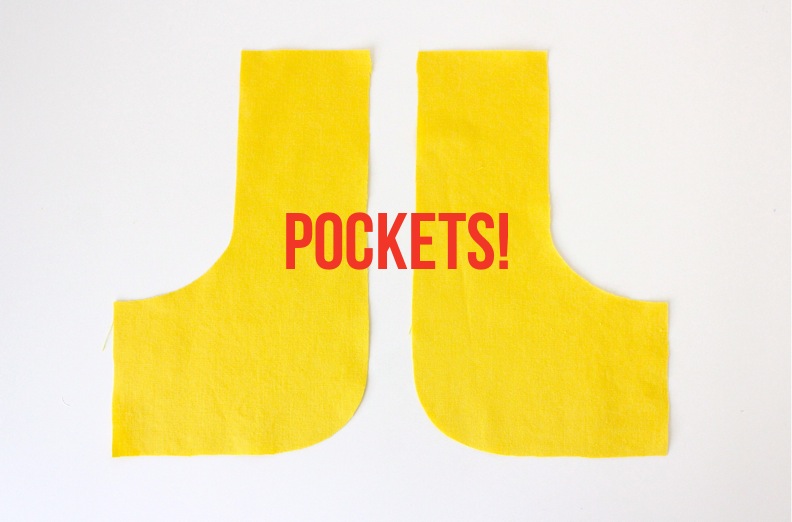
Use the info in the pattern to determine your size and amount of fabric needed. Then cut out your Front and Back pieces and Pockets.
 Now because our bias tape is going to bind the raw edges of the pockets, we don’t necessarily need to cut pocket lining pieces. But…if your fabric is on the thinner side, I’d recommend the lining (plus it’s fun to have a surprise fabric inside there, right?) This yellow fabric, however, is a medium-weight twill/denim fabric. So I choose NO lining pieces. And here’s what I got:
Now let’s pick a bias tape to trim out those pockets. Bias tape can be purchased in most fabric stores and online, or you can make your own. It comes in various widths. 1/2 inch wide is my favorite and I use 1/4 inch as well.
I have a very detailed tutorial outlining all you need to know about Bias Tape and how to make your own HERE.
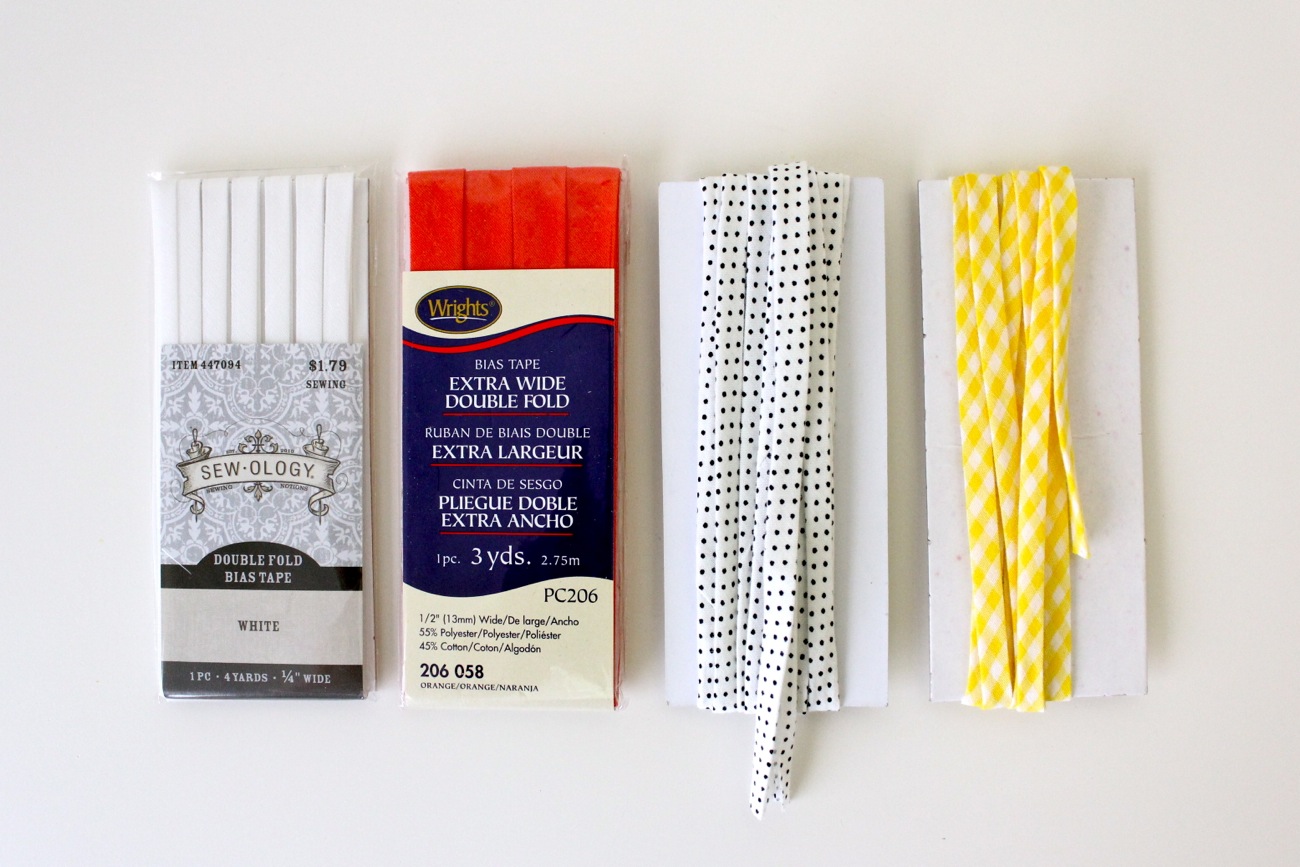
And since I love this little trim so much I always a good supply on-hand. So pull out whatever you have and do a test run to see which color grabs you.
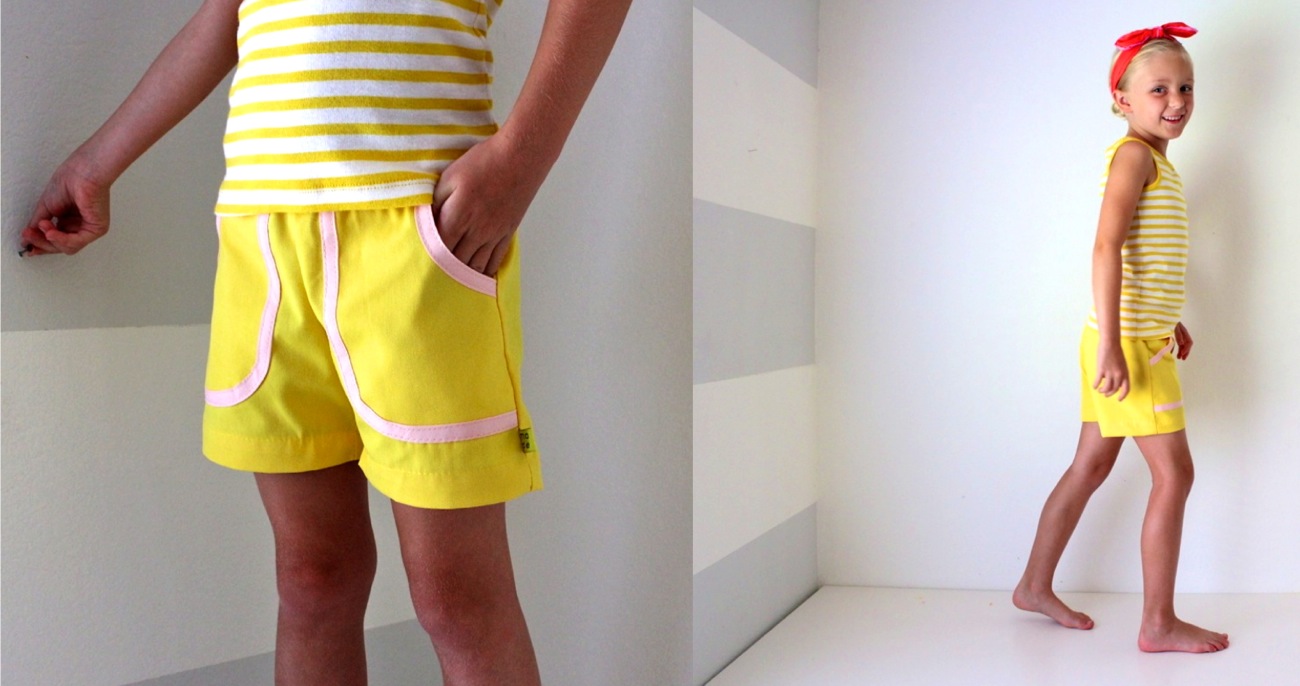
It was a toss up for me between the orange and pink. But mixing pastels with bolds is always interesting….so pink it is!
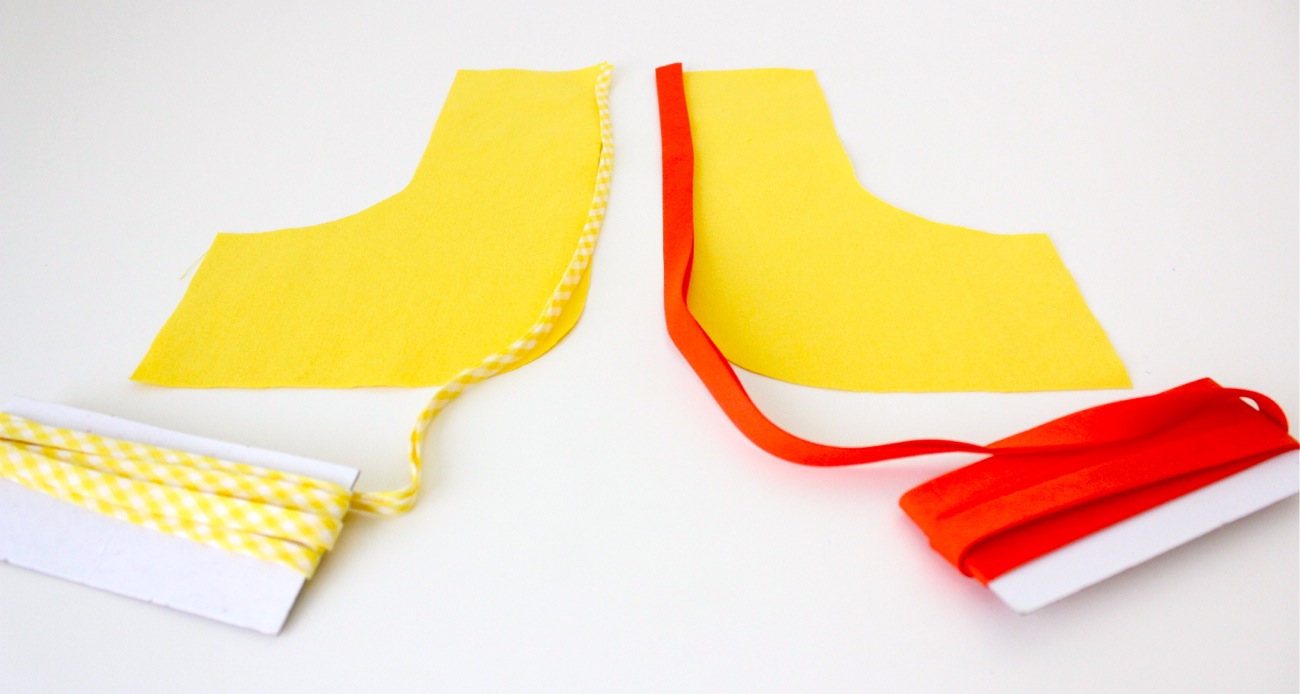
Okay, this is real easy.
We’re going to bind the bias tape around the two curved sides of the pocket.
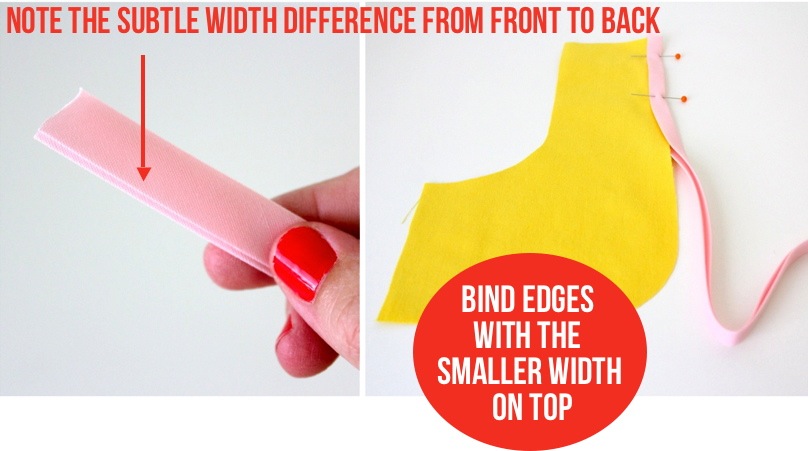
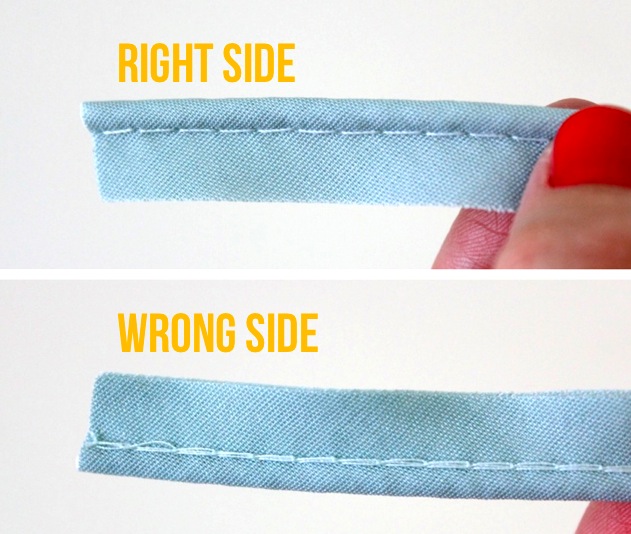
Note: If you look at bias tape you’ll notice that the back side is slightly wider than the front, by a fraction (see above photo). This makes the bias tape easier to sew with because it decreases the chance of sewing on the front of the binding and somehow missing the back of the binding with your stitching.
SO.
When you bind the pocket, make sure the slightly smaller side of the bias tape is facing up.
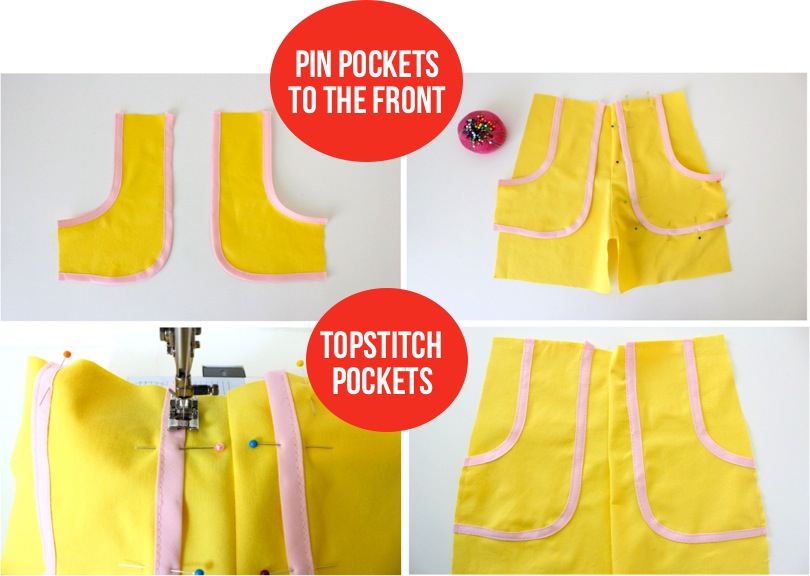
Now, with your bias tape pinned in place, sew it to the pocket (using a coordinating thread color…or a contrasting one! Just depends on the look you’re going for). Sew about an 1/8 of an inch from the bias tape edge. It helps to remove pins as you sew so you don’t get any small pleats in the tape. Of course if you do, no worries. You can pick those little parts out with a seam ripper and easily re-sew. When you get to the curved corners, go slow and try to make it as smooth as possible.

Then sew a topstitch on the outer edge of the bias tape, ONLY on the pocket-opening side (the part where you stick your hand into the pocket). And your first pocket is ready! Now follow all the same steps for the other pocket.
Pin both pockets in place on the Front of the shorts (more info HERE), sew them in place by sewing on the outer edge of the bias tape (so it matches the pocket opening side), then finish off your shorts as outlined in previous tutorials.
NOTE: you can also sew on top of the previously sewn stitch (where you sewed the bias tape onto the pockets above) if you want the bias tape to be snug against the fabric.
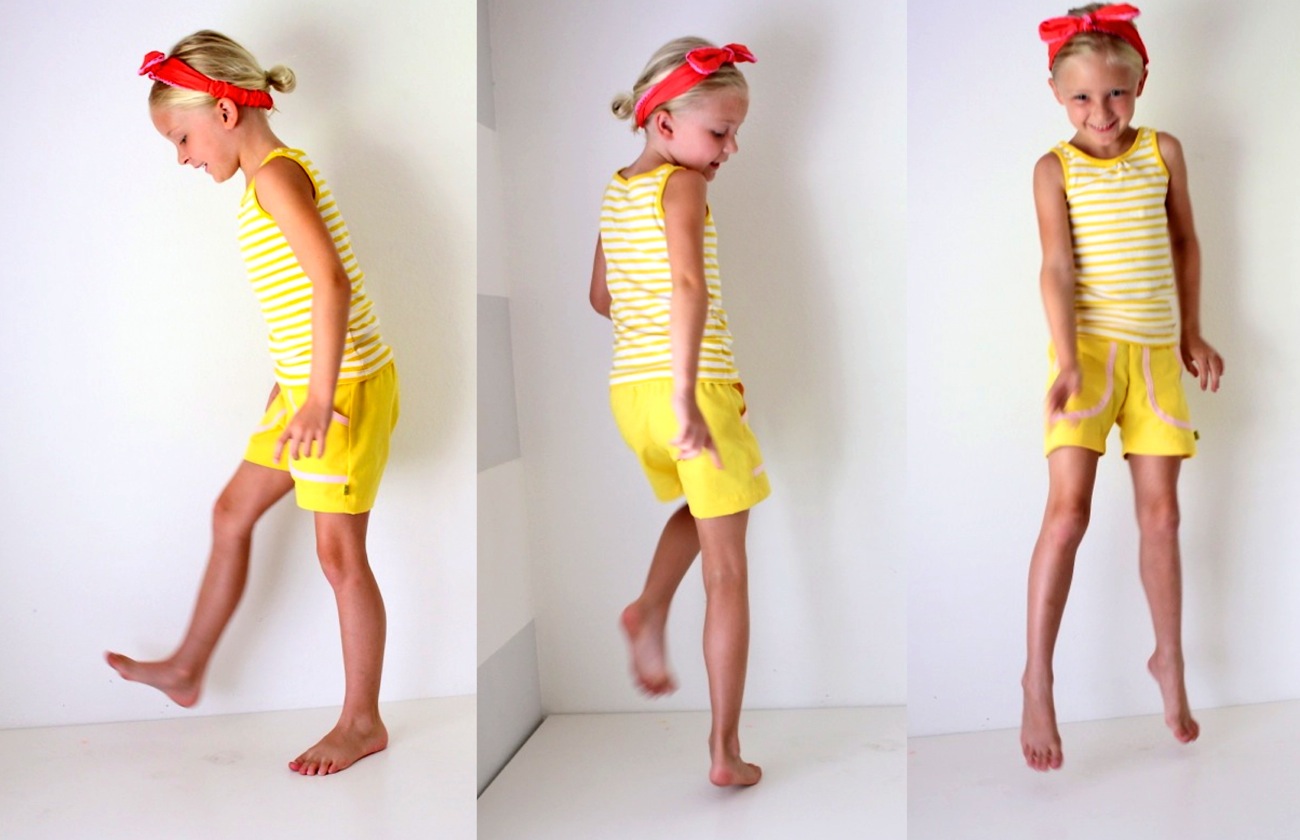
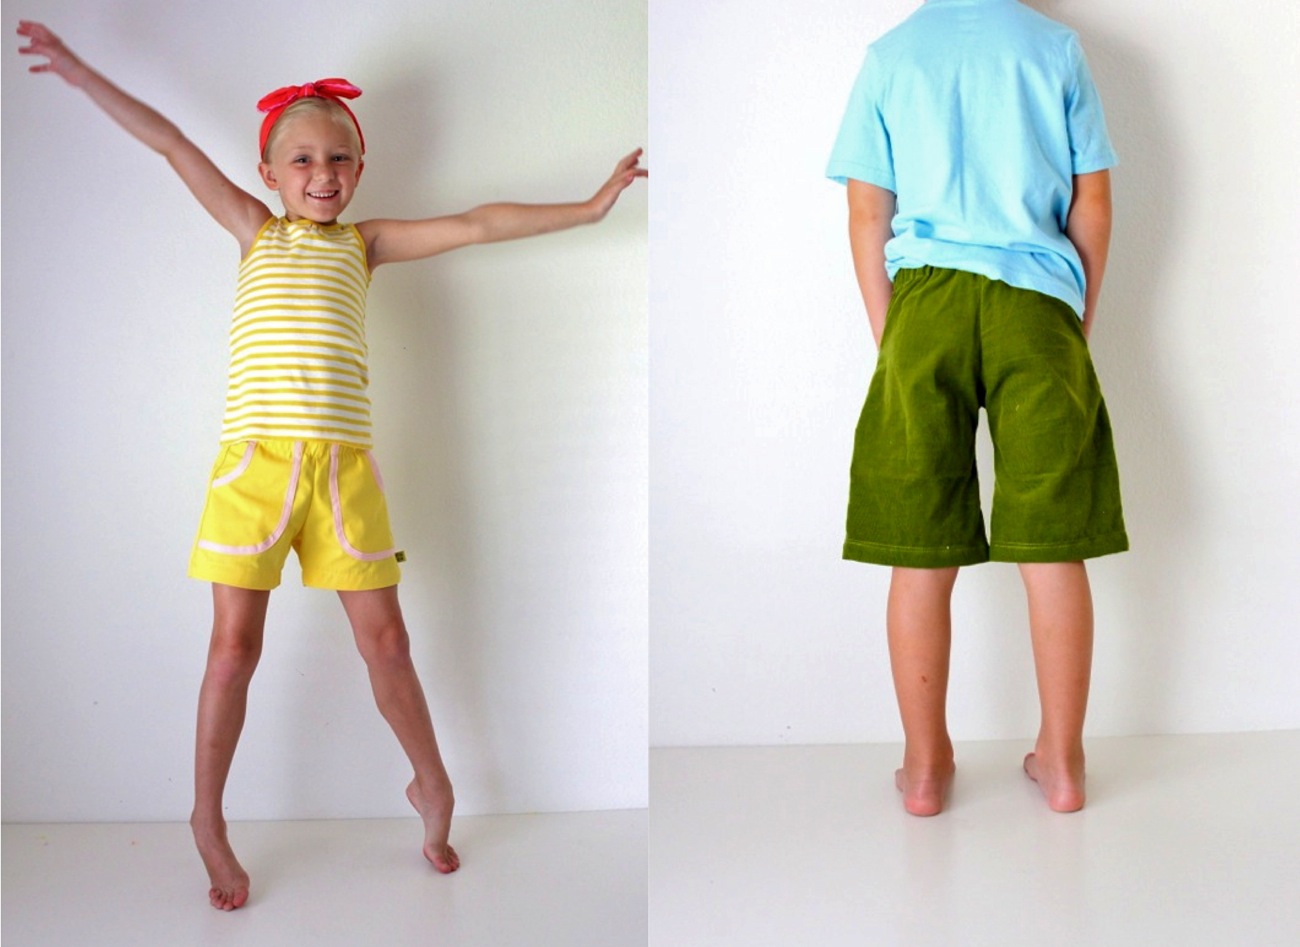
And we’ve got shorts!
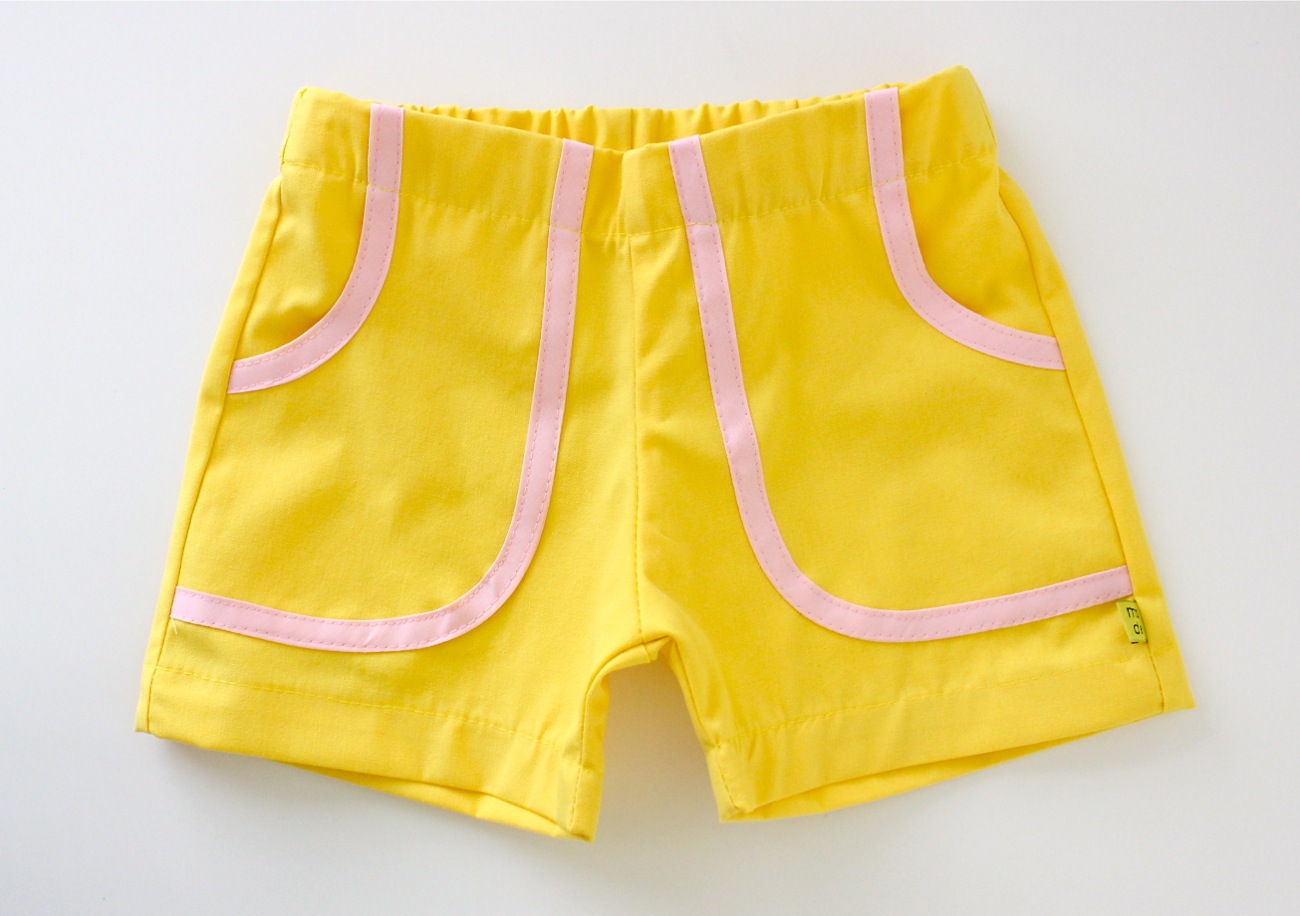
….totally stinkin’ cute, jump around, bright-sunshiney-day shorts!
Now let’s take it one step further….
(Sorry for all the exclamation points.)
((Colors and trim just make me happy.))
(((And goofy kids might have something to do with it.)))
Think they’re related?

Okay, back to the task at hand.
Piping pockets.
Piping is basically bias tape, with cord or rope sewn in the middle….so the color pops out from the pocket in a 3 dimensional way. You can WATCH A VIDEO all about Piping HERE.
It gives a slightly different effect as bias tape and it’s sewn a slightly different way. You can purchase piping in most fabric stores and online (check etsy.com) and you can make your own as well (tutorial to come, one of these days).

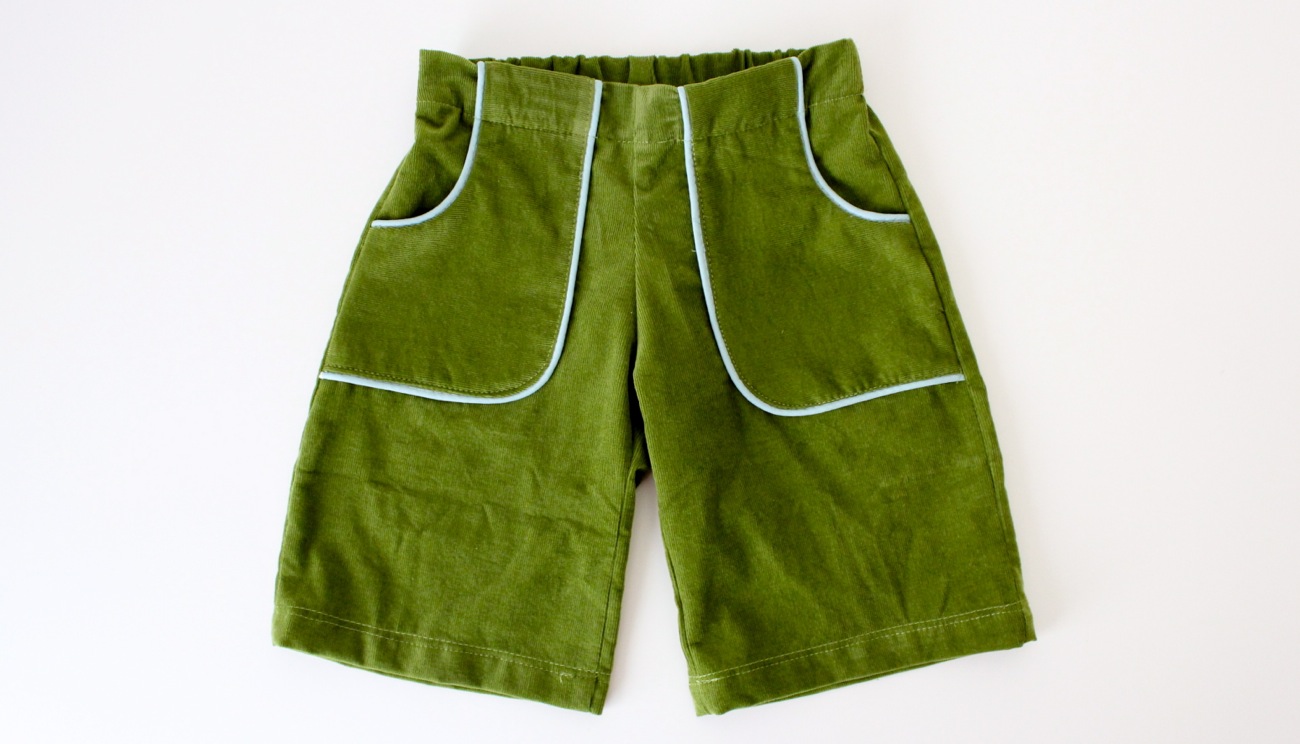
Piping is not a binding, meaning, it won’t finish off the raw edges of the fabric. It needs to be sewn between two layers of fabric, like a piece of cheese in a grilled cheese sandwich.
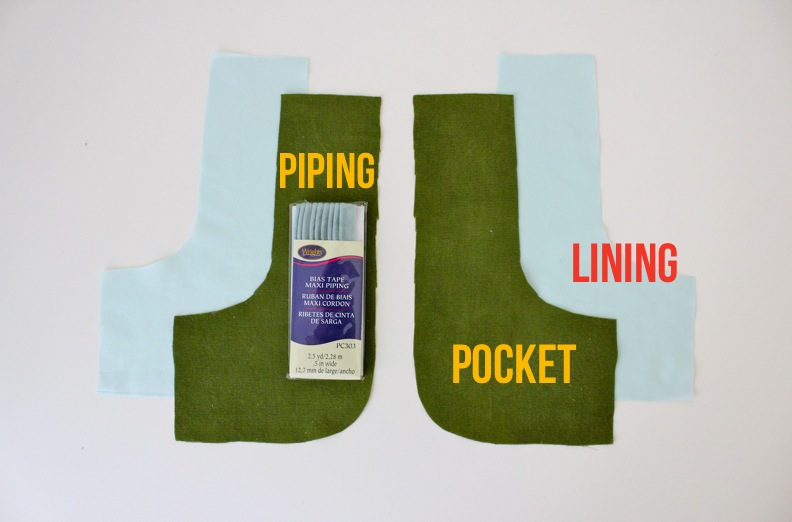
So, use your KID Shorts pattern to cut out 2 pocket pieces and 2 Lining pieces. Then grab your piping and let’s get started.
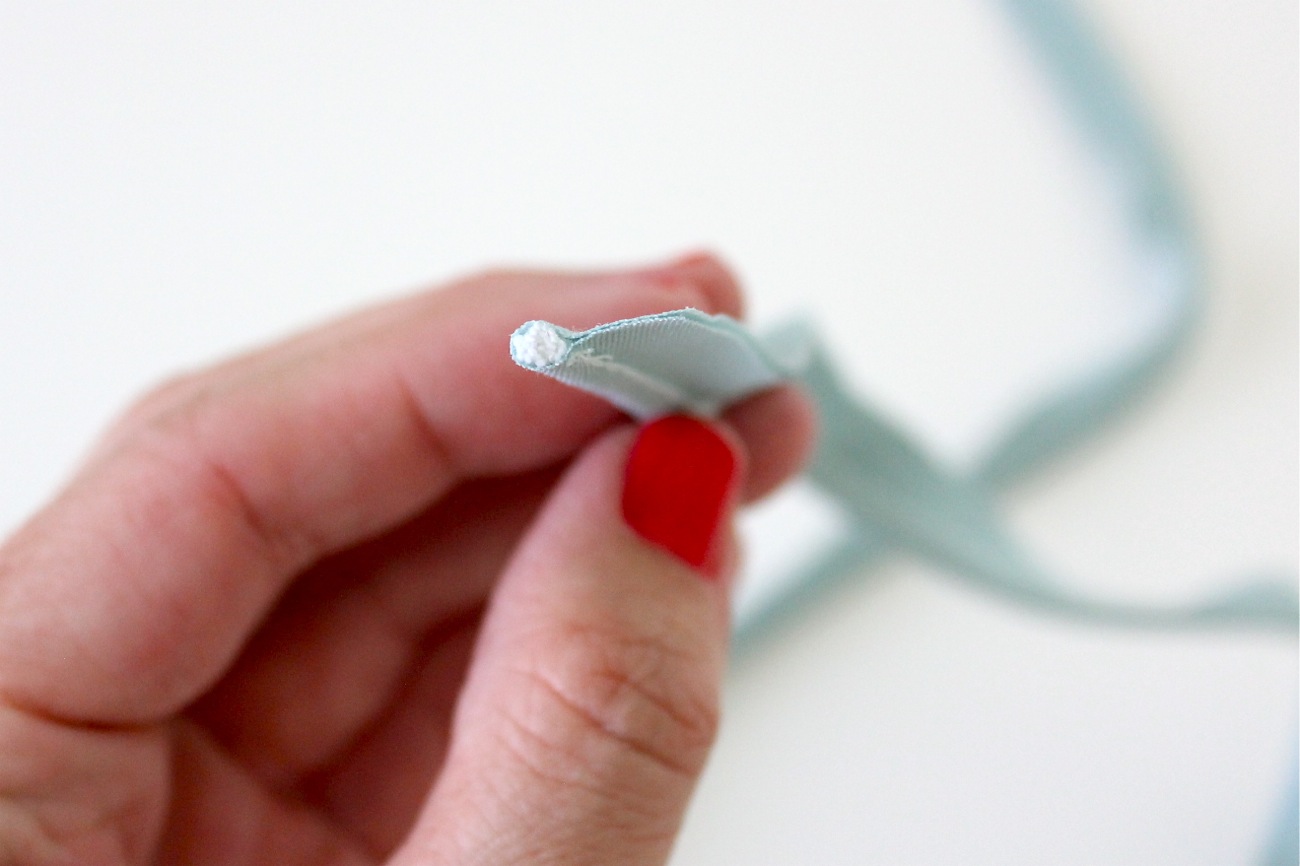
Note on store-bought piping that—just like the Bias Tape—there is a Right side (or Front side) and a Wrong side (or Back side). The Right side has nicer stitching. And since some of that stitching will show on the finished garment, it’s important to pay attention to which side is which.
Now your gut might be telling you to lay the piping on the pocket, lay the lining pocket over the top, pin that sandwich together and grill the grilled cheese out of it.
That’s mostly true.
But we’re going to do it sections to ensure a really nice finish.
So. Yes. Lay the piping around the curved sides of the pocket, just as we did with the bias tape.
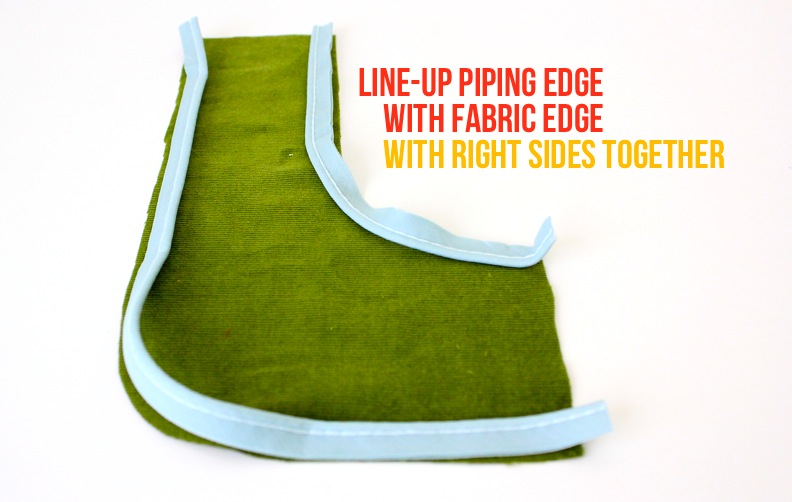
You want the raw edges of the piping facing out, so it’s lined up with
the raw edge of the pocket. And make sure the right side of the piping (the side with the nicer stitching)
and the right side of the fabric are facing each other.
Now sew it in place using your zipper foot.
I know, I just scared you off with the words zipper foot.
Come on back!
Most machines come with a zipper foot…and if you don’t have one, just use your standard sewing foot and wing it. Sewing is always an adventure; never let your machine stop you.
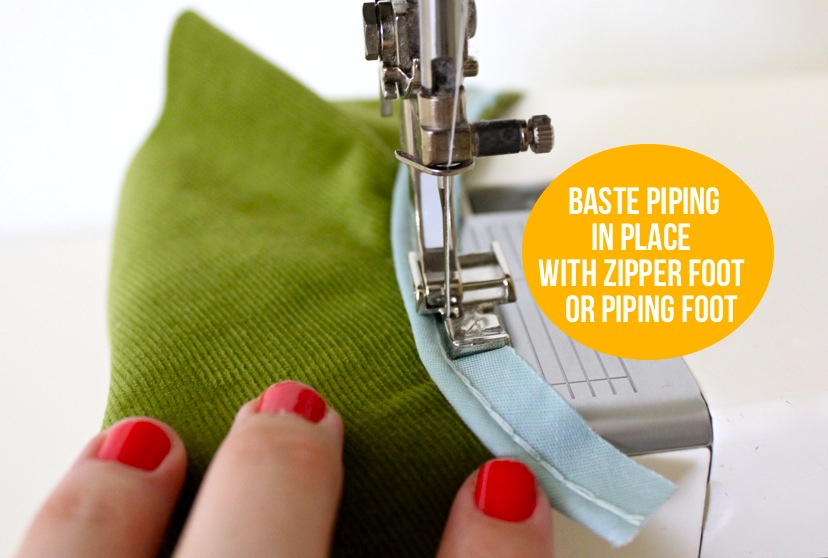
You can also buy a piping foot for this very purpose but I don’t have one, and my zipper foot works fine, so I like to keep it simple.
With your zipper foot on your machine, you want to sew as close as you can to that existing stitch that’s already on the piping. Sew right on top of it if you can. And if you can’t, it’s cool because that existing stitch will show (mine does) and it still looks pretty.
Sew both piping sides in place:

And now it’s sandwich time.
Lay the pocket lining piece over the top (with right sides of the fabric together), pin it in place, and sew the lining the same way we did above using your zipper foot.
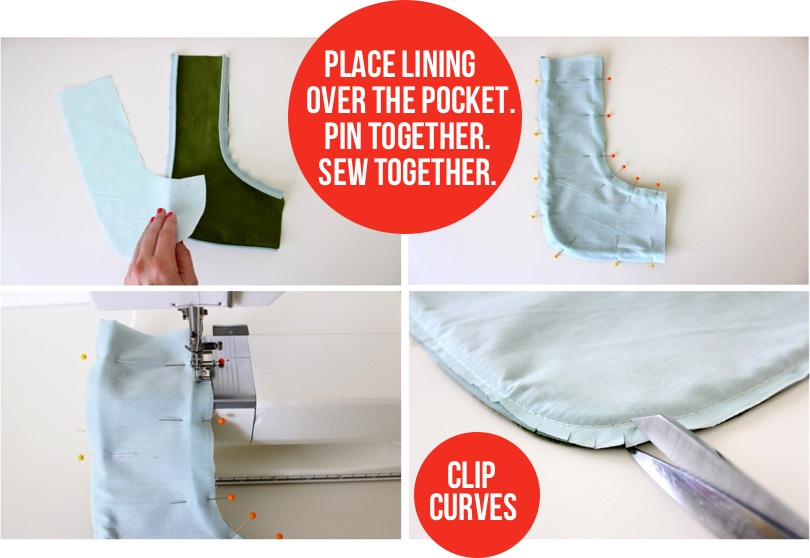
When you’re done, clip the curved corners of the pocket by snipping small 1/4 inch clips into the seam. This helps the pocket lay flat when turned right-side out.
Now turn your pocket right-side out, IRON it flat, and look at that!
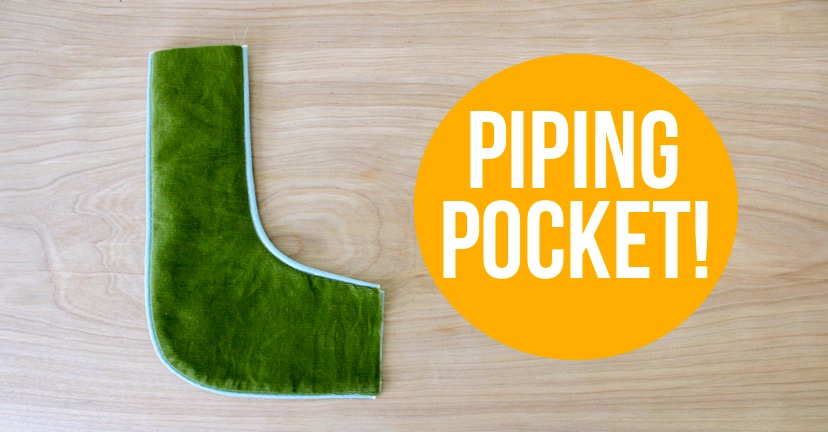
With a pretty lining inside.
Totally profesh.
(And check out how that existing stitch looks around the edge):

Now, do the same thing with the other pocket, then sew the pockets to the front of your shorts, finish them off, and you’re done!
Sweet piping shorts!

Perfect way to start out the weekend.
You can purchase the KID Shorts pattern HERE in the SHOP (and you can read extra pattern details HERE.)
KID Shorts PDF Pattern – $8


Absolutely LOVE those green shorts!!
Pretty shorts! Love the yellow one!
So stinkin cute. 🙂 Love the yellow and pink.
So cute! These sunshine-y shorts make me smile too!
Your photos make it look too easy!!! I think I will start with bias first as piping (although looking fantastic) looks a bit posh for me! 😀
Assalamoalikum..
Thanks man I appreciate your efforts..
You make everything easy for us literally no words to describe, just say you you make everything fun for us. Thank you so much..
Just wanted to stop by and say thank you for your tutorials…novice to sewing clothes but I managed to make a few skirts for my grand daughter and family friends because of you! 🙂 Here is my post showing the skirts! 🙂 http://www.thehomespun.com/just-keeping-on-learning-to-sew-girls-skirts-this-round/
Y O U A R E A W E S O M E ! ! !
I’ve been trying to purchase the pattern but seem difficult. How do I go about it?
These shorts are adorable and so are your kiddos! I’ve never made a pair of shorts before but the tutorial makes it seem easy. Thanks for sharing!
These shorts are so cute. I’ll be making them for my nephew! Do you ever use organic fabric? They are my preferred rout for sewing and usually I buy online at http://www.organiccottonplus.com or similar.
Dear Dana,
it is high time to say thank you! I have been a knitting maniac ever since but never felt like sewing as the German speaking sewing world is all about perfection. This can – an definitely does – intimidate people and keep them from starting to just do it. And hence explore the fun way until you hold the finished piece in hands. You and your tutorials just gave me this confidence to simply do things! Yes, my pants are not perfect, but they get better from one to the other. Ten pants, one skirt and one beach robe later,… What can I say?! My kids wear them with pride and exclusively and are arguing who’s next to get yet another pair. So once again: THANK YOU!
lioness from Vienna, Austria
Dear Dana,
I’ve recently bought your shorts pattern and absolutely love it.
Do you think I could use it to make pants for my daughter? I thought I would just make the shorts longer. Should I alter anything else? Best regards from Berlin, Germany.
I plan to do a tutorial for this but haven’t yet. Yes, you would just extend the legs of the shorts. But depending on the style you like, you may want to bring the legs in a bit so they’re not too wide.
Thank you Dana. I would leave them wide and have an elastic band at the bottom, so they are puffy. (Like harem pants).
sounds awesome! Go for it!
Well I have orders from granddaughter Miss seven and a half to make the little white with black dots shorts….hee hee. Little brother already has the beach coat which was so fun to make and very handy. They have a pool and it was great to wrap him up when he came out cold… Anyway, on with the shorts..
Nana
I’ve been trying to purchase the pattern but seem difficult. How do I go about it?
Hi I can’t purchase the pattern. Could anyone guide me in the right direction please?
How do I buy the pattern for the shorts I keep getting oh no
Would to by short pattern
I can’t seem to open the link for the shorts pattern and how to pay please