
Freezer Paper Stenciling: the poor-man’s version of Silk Screening and SO addictive!
 1. Make, purchase, or gather an item of clothing for stenciling.
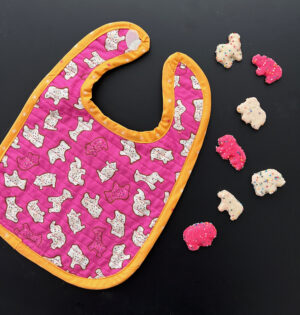
2. Find an image you like online or from your photo stash and print it off on a piece of paper. In this instance, Makenna loves goldfish crackers, so we’re making Goldfish Pants:
 3. Purchase Freezer Paper from your local grocery store. It must be actual Freezer Paper, not wax paper:
 4. Either trace or print your image to the Freezer Paper (on the DULL side of the paper).
If you choose to trace: place your picture/image under the freezer paper (with the shiny side of the freezer paper down) and trace. If it’s hard to see your image through the freezer paper, try outlining the image with a sharpie first.
5. Tape the freezer paper down on a cutting mat and cut your image. Using an exacto knife, cut the image out being careful not to cut anything beside just the image. You are creating a stencil. Any cracks or extra cuts in the paper will allow paint to seep through.
Note: If your image has additional images inside (such as a window to a car, or the inside of the letter “O”, etc) you’ll need to cut and save those pieces. They’ll be added to the stencil when you iron it on to your clothing. You have to envision everything as a negative image. Anything that’s covered in Freezer paper will stay the color of the fabric. Anything cut out will become the paint color:
 6. Iron the stencil onto your fabric, shiny side of the freezer paper down. Make sure you iron around all edges of the stencil so that a seal is created for your stenciled image:
 7. Purchase PERMANENT fabric paint (from craft stores, such as Michael’s). Prices range from $1.50 to $5/bottle. Some paints are thicker than others. You don’t want it too watery but if it’s too thick, add a pinch of water. Make sure the paint is Permanent so it doesn’t wash off over time. I like the brand Tulip best (make sure you get the Matte finish. You can find these at JoAnns, Michaels, and other craft stores):
 This brand is good too (but I like Tulip better):
 8. Mix your paints for desired color. I mixed the three Jacquard colors above for mr. goldfish:
 9. Using a paintbrush, paint directly over the stencil, making sure the paint is spread evenly. Be careful with your strokes that you don’t accidentally brush too far and paint onto the outside fabric. I’ve made that mistake in the past. You may need to apply additional coats. This stencil required THREE coats. I waited 2 hours between each applied coat. You may speed up the process by drying it with a blow-dryer. Lucy’s “I heart Milk” pants, however, only required 1 coat (hey, it looks like California):
 10. Let the paint dry. This can take anywhere from one hour to a few hours (depending on how many layers are on there). If you’re antsy, you can speed up the process by drying it with a blow-dryer.
11. Carefully peel off the freezer paper. This is the fun part!
 12. Admire your work and rejoice that it turned out as you envisioned!
 13. FINAL STEP (and an important one you can’t forget). Iron over the paint to seal the finish. I missed this step once and the paint faded the first time I washed it. Don’t iron directly on the paint. I place a cloth over the top:
 Iron for about 30 seconds or so. Read the instructions on your paint bottle for more details.
 You’re DONE! Freezer Paper Stenciling is fun and easy! Hooray for home-made remedies.
Here’s the final birthday gift. Makenna Loves Goldfish pants and matching headband:
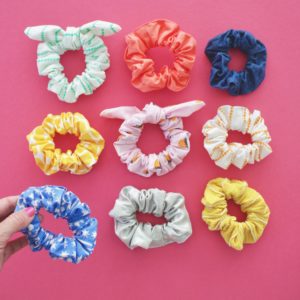
 I made the pants too long first time around so I cut off the hem and decided it made a good headband. I love salvaging the scraps:
 They fit great and looked super comfy:
 For more info on creating detailed stencils and making your own posterized images, continue on to THIS tutorial:


Thanks so much for introducing me to this! Your website is great and this is only one of the ideas I’m happily taking inspiration from. You can check out my results here:
http://resolvingcrazy.blogspot.com/2012/01/i-tried-it-she-liked-it.html#!/2012/01/i-tried-it-she-liked-it.html
(apologies for the not so great photos)
I’ve got ideas for more shirts, pillows, bags and badges! Yay!
I LOVE this idea, such a neat way to personalize simple t-shirts or yoga pants and make them unique. Out of curiosity, was the freezer paper pricey?
What does the texture end up being like? Is it stiff like paint or does it soften up like the fabric?
It depends on how many layers of paint you apply, but typically it’s “soft” compared to using acrylic paint.
Hey, thanks for sharing this great idea.
Just wondering, i don’t think i can find freezer paper in my country, is there any substitution for this type of paper?
Thank you
Thanks for the great tutorial! I’m thinking about trying this technique to cover up stains on an outfit. Have you ever tried that? Any idea if the stains would show through the paint?
Did you put anything between the 2 layers of the pant leg? I was thinking about it seeping to the other side.
yea. You should definitely do that. Sorry, I need to add that info in the tutorial
Freezer stencils strike again – I wanted to see how some text would turn out so I did a little test on a piece of cotton. Wasn’t quite sure what I was going to do with it but the perfect opportunity presented itself and it became a pillow. If you want to see the results, check here (the pics are getting better!)
resolvingcrazy.wordpress.com/2012/04/16/freezer-stencilling-strikes-again/
IS there a reason the paint finish should be matte? Will the slick finish work too? Wondering if I should return the slick finish paint for matte. If it will still work the same I would just keep the slick finish.
other finishes will work, I just personally like the matte look.
Hi Dana!! Thanks for the tutorial! I finally decided to give it a go today, and I am happy with it , however it’s not quite perfect. The lines are not as crisp as I would like them to be. It doesn’t look as professional as yours. Do you think this might be because the paint I used was too thin? I used it on a regular cotton fabric. It’s like the fabric seeped under the freezer paper just a little… Any advice would be much appreciated!
Naomi x
Hello Dana,
Great tutorial. I never thought of using freezer paper for stencils. I always used paper, which didn’t turn out so well because it stuck to the fabric and paint. I just bought some freezer paper today and going to try this method. Thanks so much for the tutorial.
Jenn
where did you get the freezer paper?? can’t find it anywhere!!??
it should be were the wax paper and tin foil is look along the bottum self.
I love this tutorial, very clear and easy! Just used freezer paper stenciling to create a tee and canvas bag for my college apparel day, as I am headed to Parsons the New School for Design.
http://dontmisit.blogspot.com/2012/05/parsons-diy-apparel.html
Thank you for the inspiration!
Hi Dana! I love your blog and this DIY here.., but I have a question.., I’m not American so I have no idea what freezer paper is and what is used for…, I don’t know if I can find it in Spain…, could you please tell me a bit about it just to see if I can find it?? Thanks a lot!!!!
Looooove your tips and all the stuff you made.., its so me..! I love it!
Thanks!
Questions! Can you send these through the dryer?? or does the stencil wear off?
I’ve washed and dried several of the t’s I’ve done. I have used Tulip paint, and also the paint medium that you add to regular acrylic. Both paints say on the bottle that it’s not necessary to heat set, but I did it anyways. Neither of them has faded yet. I did white lettering on a black T that is just now starting to look a little crackly I guess? It doesn’t look bad, just not new any more. Not faded though. Hard to explain. At any rate, I think it’s more from the material stretching with wear than from the drier. I would maybe just try to dry them inside-out, that may help a little.
I would LOVE to pin this! Is there anyway to make that possible?
can freezer paper be used as backing for machine embroidery
You did an amazing job explaining this! I have no idea what or for whom I am going to do one for- But I can’t wait to do it! Thank you so much-
Lovely, what a beautiful idea, i love it,
fentastic… thanks for the project..
Thanks Dana! I have been meaning to try this technique for a while and finally worked up the courage today. It worked fantastic and looks very professional. I’m so proud of me! (I couldn’t find “freezer paper” so used butcher paper instead – you know, the stuff steak comes wrapped in at the butcher’s counter. I asked them to double wrap it in order to get a free fresh piece for stencils.) Looking forward to the kiddies wearing their matching glitter moustache tees tomorrow! Now if only I’d made them in time for Fathers Day…
Does the fabric need to be washed before hand? I am making this as a gift with a brand new t-shirt and I am not sure if I should wash it first. Thanks
Thanks so much for the tutorial. I did this with the girls over the summer and they loved it. My two year old wanted to do it all herself and definitely didn’t want any help, no, none at all! I’m really pleased with the results, thanks again
http://littleblackduckblog.wordpress.com/2013/08/21/pinned-it-tried-it-freezer-paper-t-shirt-painting/
sorry, here’s a link that works!
http://littleblackduckblog.wordpress.com/2013/10/01/pinned-it-tried-it-freezer-paper-t-shirt-painting/
awsome tutorial, I had heard of this technique before but the concept didn’t really make sense. Now I am ready to try this and am quite excited to try it!
I was thinking in addition to cutting out my own I might use some of my dies for special shapes. awsome awsome awsome. thank you again!
Amazing!!! 🙂
this is an awesome idea! is there any way to pin this?
This is a fantastic tutorial. Thank you for breaking it down so clearly! 🙂
For those of you who aren’t sure what freezer paper is I’ve also seen/heard it referred to as ‘butcher paper’. Especially for those of you in a different country you may have better luck trying to find it at your local butcher. You can also buy it online from Amazon, etc. though I am not plugging any particular site (Amazon.com is just the one I know has it).
Love it! Do you think adding a puff paint border would work and make it look finished?
Thank you so much for making this tutorial! I’ve read a few and they seemed a little complicated by adding way too many details. Your tutorial is straight to the point and simple. I can’t wait to try this!
How did you get the paint not to bleed through the freezer paper? I tried and didn’t get precise lines. Also tried bleach pen. Also did the ‘bleeding’ part again
Thanks
Where can i fatehabad measurement or size chart in website