
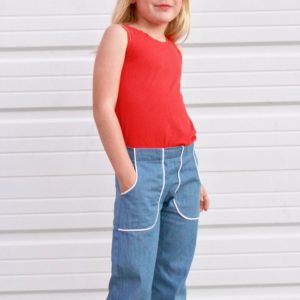
Welcome to the next version of KID Shorts….Racer Shorts!
This post is one of many tutorials that accompany the KID Shorts PATTERN, which you can purchase HERE.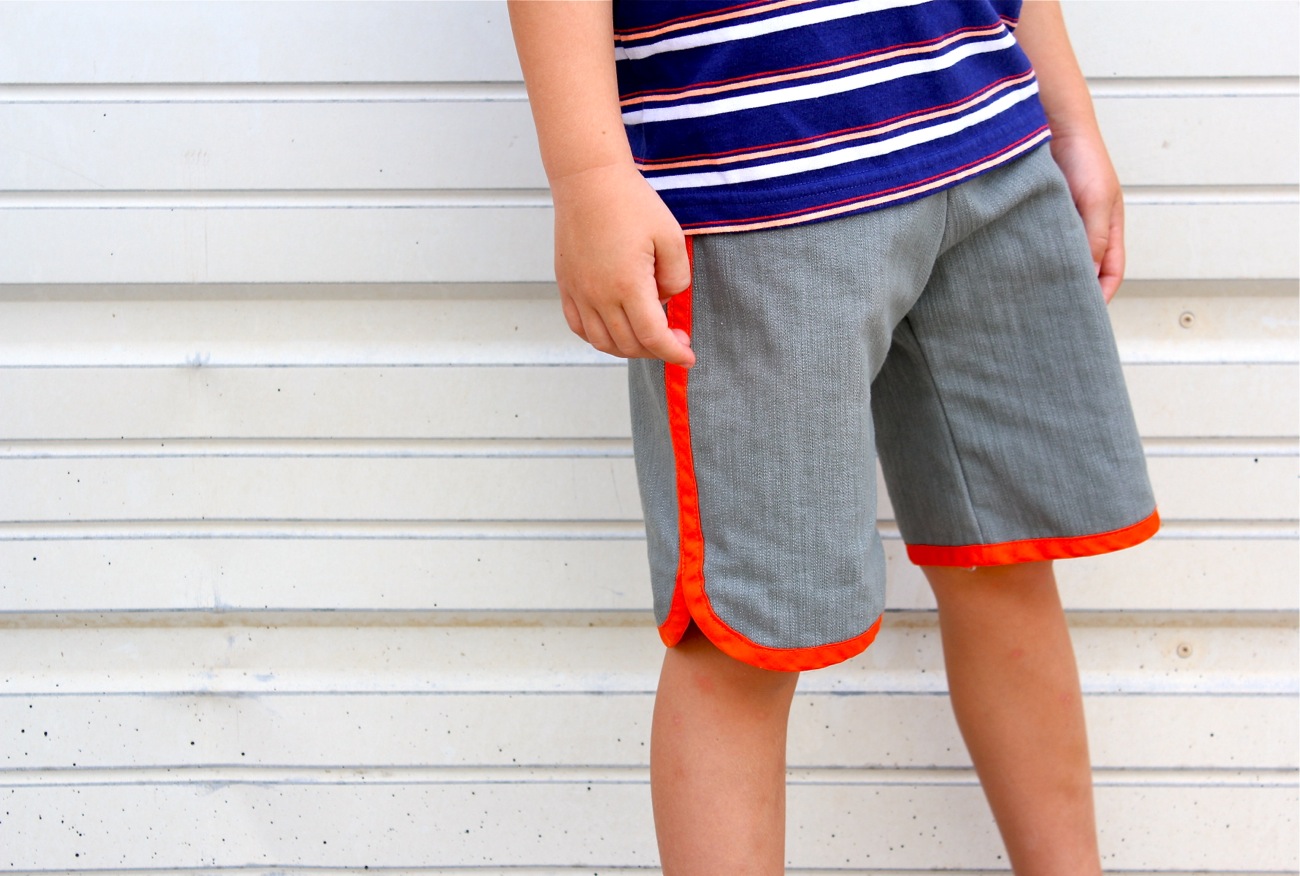
Of course you don’t need our pattern to sew these shorts but it’s recommended.
If you’re using a different pattern, or if you’ve created your own pattern, follow along with the instructions and make shorts with us!
So far we’ve tried:


Now it’s time to get a little retro.
I love these funny shorts with a racer stripe down the side because they add the perfect pop of color and contrast. And it’s just one more excuse to use…..yep! Bias Tape. We’re going to bind all the edges with it. And my love affair with 1/2 inch wide continues.

Racer shorts are great for girls, boys, babies.


It’s fun for everyone!


So let’s get started.
You’ll notice on the pattern the curved lines marked “Racer shorts”.
• Cut your pattern along the appropriate size, along the curved racer lines.
• You’ll also notice that the pattern hemline for Racer shorts is about 1 1/2 inches shorter than the standard hemline for each size. This is because we will not hem the racer shorts; instead they will be bound with bias tape (which we’ll talk about more in a moment).
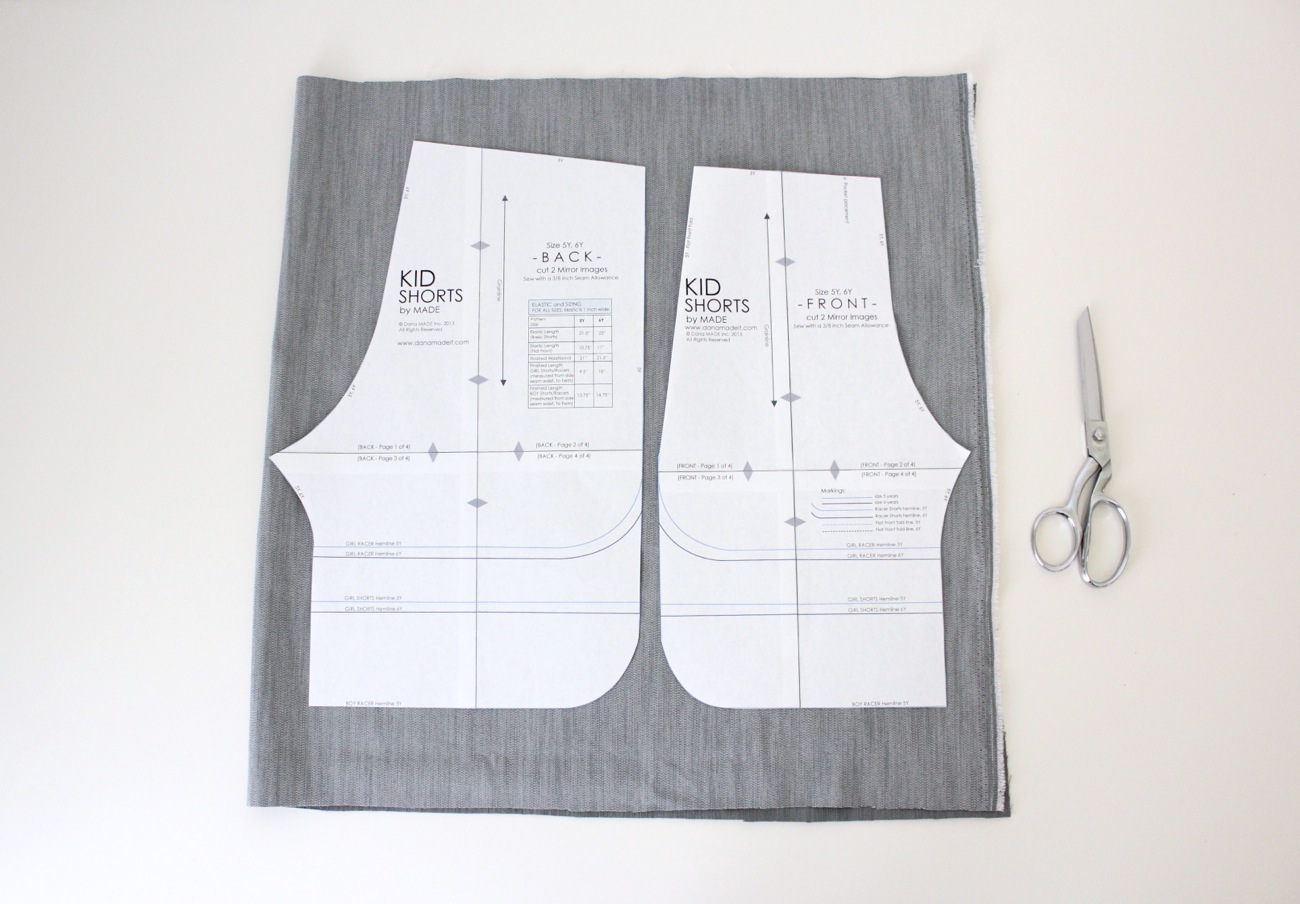
Following the same instructions for cutting your pattern pieces as we used for Basic Shorts and Flat Front Shorts:
• Fold the fabric in half (TIP: fold it with Right sides of the fabric together so your pieces are ready to sew!)
• Lay your pattern pieces on the fabric with the grainline parallel to the selvage.
• Cut. You should end up with 2 mirror images of the Front and Back 

And now let’s talk bias tape.
It’s all that cute colorful stuff down there…..


If you’ve never used Bias Tape, read all about it here and WATCH A VIDEO ABOUT IT HERE.
If you’d like to make your own Bias tape, read all about that here as well.
Bias tape is my favorite sewing trim/do-dad/embellishment/binding/whatever you want to call it. You can easily make your own or you can buy cute solid colors at most fabric stores.
One package (3 yards) or less of bias tape will trim out any pair of Racer shorts (see the pattern for exact bias tape amounts)

Okay.
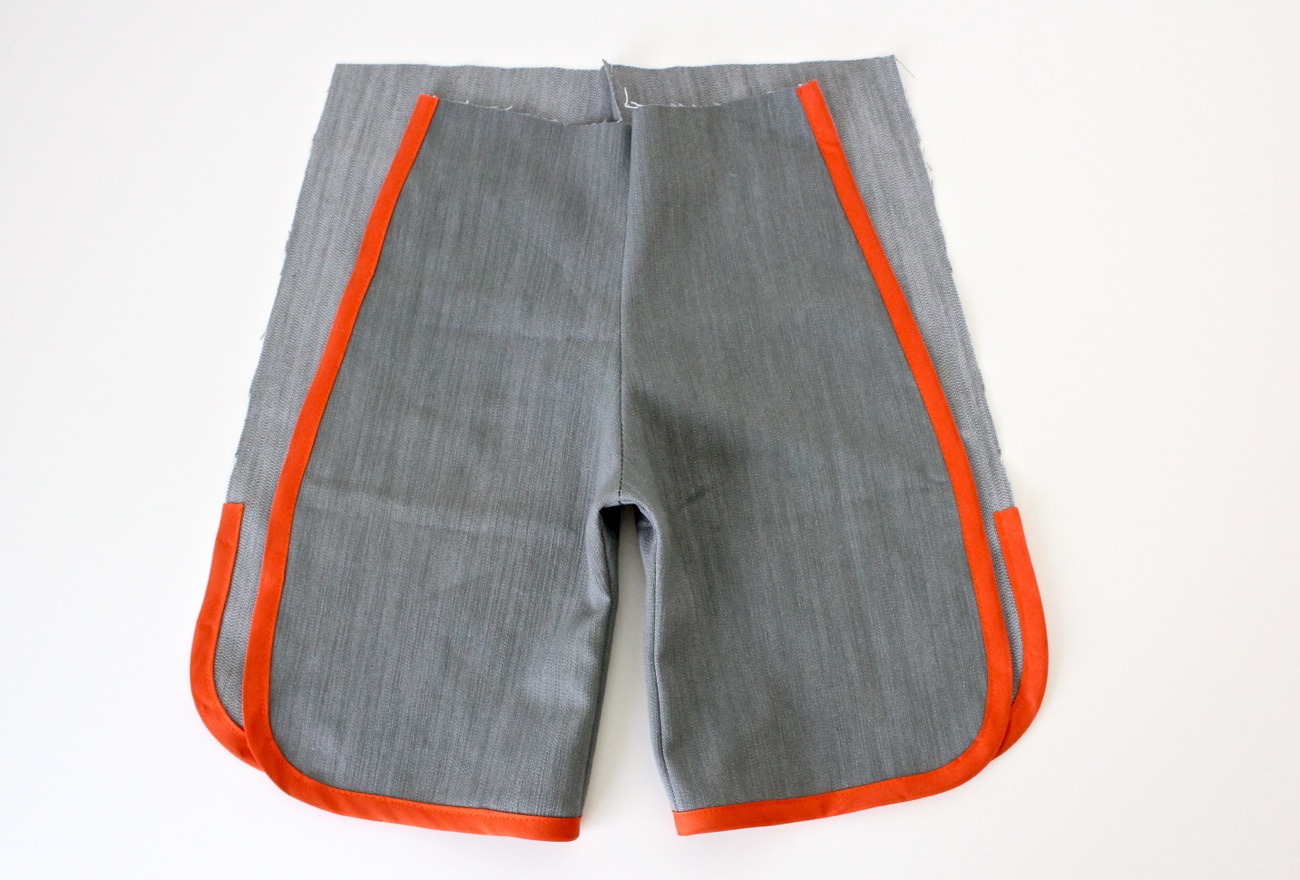
Start by sewing your shorts as we did in the Basic and Flat Front tutorials.
–Use a 3/8 inch Seam Allowance for this entire tutorial–
• With right sides together, sew the Front crotch seam, then sew the Back crotch seams.
• Iron out your seams
• With right sides together, sew the Front and Back together at the inseams.

Your shorts should look like this:

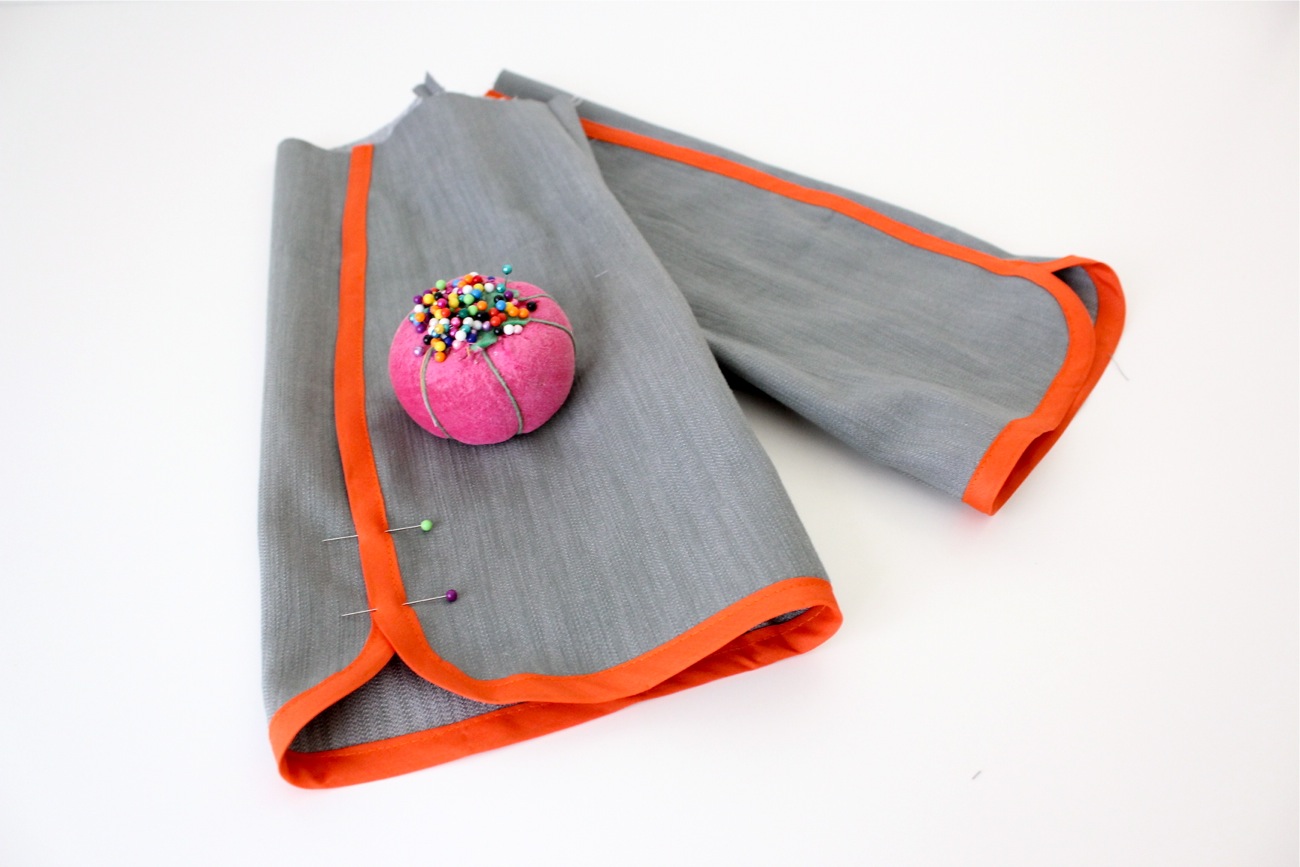
Now it’s time for the 1/2 inch wide double-fold bias tape. “Double-fold” means it’s folded in half, so we can easily sandwich the tape around the raw edges of the shorts and have a polished, fun, cool look.
The photo below shows one shorts leg, laid open flat. We’re going to bind the bias tape all the way down the Front sideseam, around the bottom hemline of the shorts, and up the Back sideseam, for just a few inches. Let me show you in more detail….

First, it’s important to note that the top side of the bias tape is slightly more narrow than the back side. So when you sew this top/narrow side to the top/right side of your fabric, it ensures that the thread will sew all the way to the back side without any gaps. So….

Start binding your bias tape around the Front Side seam of the shorts, with the more narrow side facing up.

When you get to the racer curve, do your best to curve the bias tape and pin it in place so it lays as flat as possible. Be liberal with your pinning.

Continue pinning all the way along the bottom hemline and then up the Back sideseam about an inch or so past the curved corner. The Front sideseam will eventually cover the Back sideseam, so it’s not necessary to bind the entire back seam (see photo below).
Now, sew the bias tape in place. Sew about 1/8 inch from the bias tape edge and remove each pin as you sew. This helps from getting unwanted tucks in the bias tape.

Now pin and sew the other side seam. This time you’ll start at the Back of the shorts (you only need to start about 2-3 inches above the curved corner) and then continue around the bottom and up the entire Front sideseam to the top of the waistband:

Sew that bias tape in place.
And your shorts should look like this:
Now we’re going to pull the Front sideseam over the Back sideseam. We’re NOT sewing them together as we did with Basic Shorts (with right sides of the fabric together), we’re simply going to overlay one seam on the other, about a 1/2 inch and pin them together.

Start pinning at the bottom where the curves come together. This can feel awkward, so keep your hand inside the shorts to help pin the two layers together (see photos below). After pinning at the bottom, then pin at the top, and then pin down the rest of the side seam.
Finally, sew down the side seam.

As you get to the bottom, be careful you’re not sewing any additional layers into the shorts. And stop sewing when you get to the curve

Then pin the sideseam on the other side of the shorts and sew down that seam as well.
Almost done!
Finish off the waistband as outlined in the Basic Shorts of Flat Front Shorts.

And….you’re done!

Ahhhh.
Time for a treat. 
Enjoy your afternoon!

Come back later this week and we’ll add pockets. Sorry it won’t be sooner but we’re taking a little break for the 4th of July holiday. So we’ll see you soon!
You can purchase the KID Shorts Pattern HERE in the SHOP (and you can read extra pattern details HERE.)
KID Shorts PDF Pattern – $8


I think these bias trimmed shorts are my favorite so far! I could see both of my kids wearing these day in and day out!
Hey Dana,
thank you for another great tutorial! Love your designs and LOVE your blog, especially the beautiful photos of your cute kids that you share with us. This time around, I have a question. While the edge of the front pattern-pieces are finished by the bias-tape binding, am I correct in thinking you left the edges of the back raw (above the curve, where the bias tape ends)? You don’t mention serging these edges, or stitching a zig zag to keep the seam-allowance from fraying, but maybe I missed something. I might be influenced by Raes super-seams-post here, but I would imagine that the fabric across the butt gets a lot of wear and is stretched a lot, so I wondered about that.
Love from Germany!
Anne
Hi Dana,
I have made pairs of shorts in the past four days (basic w/ pockets, flat front w/ pockets, flat front w/pockets w/ bias tape and finally last night, some racer shorts). I love the pattern and my little boy loves the shorts! I haven’t sewed since high school (half a lifetime ago!), and am really loving it.
I have the same question as Anne from Germany — my query comes from Denmark though! Do you recommend doing anything with the raw back side seam?
Best regards,
Karen
Cute cute stuff! I love those green shorts on Clara.
The red flower shorts with the white trim are my favorite! This racer strip pattern is adorable. I totally remember pictures of me as a kid in the 80’s wearing some awesome pink ones with purple edging. Love this series!
Cuteness!!! Although, I’m so craving a Big Red now. Too bad they don’t have it here in PA. People think I’m talking about gum and don’t know about the soda.
Cute cute cute
Sent over from Craft, Interrupted! Lots of cute things on your website. 🙂 I can’t believe all the tutorials you have. I just might have to make the Chewie shirt now. 🙂 Thanks for the giveaway over at Craft, Interrupted.
Just made my first pair. This style is just adorable on my little girl. Thanks!
Just made a pair yesterday! I used your old tutorial and since I had no bias tape (and was too lazy to make some) I used FOE. They turned out pretty good, only I bound them all the way up the back side and it got a bit thick. Still super adorable and my daughter loves them! Next time I’ll be using bias tape.
FANTASTIC instructions and photos! Thank you so much – I love the colours too!
Just made my purchase, very excited to have an actual pattern instead of endlessly drawing around shorts and never getting it quite right! I know my kids will be grateful!
Thanks for getting me excited about sewing. You’re doing a great job. Enjoy your holidays.
Love the pattern Dana! Made 2 pairs. These are next on the list!! Thanks!
Oh! I haven’t been checking blogs for awhile again…I’ve missed all you shorts posts! These are all adorable! Love them! What a great pattern!
-liZ
I LOVE these racer shorts!! I think my kids really need about 10 pairs each! 🙂 Lisa
Hi Dana,
Any chance you can make a metric version of your pattern for the rest of the world?
Would love to purchace it but can’t face the constant faffing of conversions…
I live in Canada and as someone who uses the metric system and Danas patterns regularly I just have to say its really not huge issue. For the elastic you insert just measure on your child in Metric so it fits perfectly any ways. For fabric requirements just remember that a Yard is smaller than a meter so if you buy it in meters then you are sire to have enough. I have never done a single conversion while using any of these patterns and haven’t run into a single problem. Good luck. Try with no fear!
I’m a metric girl too but have a tape measure with both units on it and it’s a non-issue really. Don’t miss out on some great patterns because of units of measurement 😉
I’m making my kids some pajama shorts right now and I’m thinking racer shorts would be perfect! Thanks for a great idea!
2nd pair of shorts – check!
My son LOVES his racer shorts. My daughter loves her girly shorts (added pintucks down front and ruffles to bottom…. fun fun fun). Thanks for the awesome pattern.
Hi Dana
My sister and I had a bit of a sew-in yesterday: she made the basic shorts for her daughter, and I did the racers for my son. Such fun, and what a great result!
Thanks!! The sewing bug got me… 🙂
Reine
I love this pattern, the racers are my favorite. I have made 4 pairs so far, three for my boys and one for a friends daughter. Your tutorials are really great, i love all the pics. Funny story, when I made the first pair of racers I cut the pattern out the wrong direction on the fabric so they would not go over my 2 year olds bum. I have been sewing for years but I rarely make clothing and I did not realize even woven fabrics have a bit of give in the selvage direction.. ooops. It drove me nuts for two days until I figured out what I did wrong. I won’t make that mistake again. Thanks for the great pattern.
Thank you for this pattern and tutorial! I did it from an old t-shirt of my husband. So it is also a refashion 🙂
Hi Dana,
Thank you for your wonderful website! I bought the shorts pattern and my 3yo son looooves his racer shorts. They are his favourite and even tho it’s winter here now he still prefers to wear his racers!!!
Thank you and keep up the good work!
Ps. For metric users – I use a conversion app on my phone and tablet but I’m so used to sewing in imperial now that it just becomes second nature.
awesome!
Thanks for sharing 🙂
And great idea on the app for metric conversions
thanks! I bought your pattern and made the racer shorts for my boy! can’t wait to try them on him !!
I made my girls a pair of flat front shorts each today – so quick and easy. They tried them on and wouldn’t take them off – not bad for Winter in Australia! Thanks for such a great pattern, I am off now to cut out some more…racers this time!
Wow, Dana! Totally adorable! Congratulations to you! (and not just for this pattern – for this whole wonderful blog!)
I’m sewing the girl racer shorts in size 2. But I’m having trouble with the inseam. The two pieces do not seem to line up along this seam. The front seems about 1/4″ longer than the back.
Is this the case? If so, should I try to gather the front a bit, so they line up. Or does it not really matter if they don’t line up exactly. Can I get by with just fudging it a bit, catching the difference in the seam of the bias tape?
Or am I just missing something? I wouldn’t be surprised if I was just being a little dumb for a minute, making a silly mistake. If you say they line up, then I’ll gladly take your word for it and recheck everything and find my mistake. 🙂
Thanks so much! I appreciate your help a lot!
this may be a silly question but what kind of fabric do you use to make your shorts? I am a serious beginner and I want to make sure I have the right materials. Thanks!
You can use all kinds of cotton fabric—standard cotton, like the stuff you would use for a quilt, or you can use a slightly heavier cotton like twill, corduroy, denim, even some canvas. It’s all about experimenting and trying stuff out!
If you want to learn about all types of fabric, I definitely recommend my book Fabrics A to Z. It talks about every kind of fabric and how to sew with it. You might check your local library for it, or you can find it here on Amazon
Haven’t done much sewing, but just made the basic and racer shorts for my son and they are super duper adorable!!!!!
Hi Dana. These are all super cute! I’ve made several pairs of your shorts, of different kinds and fabrics. They are fun indeed to make! Can you post a video of these ones and ones with the piping, to show what you do at the waistband to cut down on sewing over so many layers? My machine is good, but it doesn’t like that many layers. Also, I’m sure everyone is wishing you had larger kid sizes and adult sizes! I wish I could make myself and my nephews some razor shorts!
I made 2 pairs of shirts in size 5 and 6 and they are adorable. I am having difficulty lining up the inseam on the size 2 shorts that I am making for my twin granddaughters. It seams to be 1 /4 inch off on both sides when I match up the seam . I am an experienced sewer. Am I missing something?
HI Lenore,
Sorry about that. If the inseam is not matching up perfectly for you, you can just trim the excess off at the end, or fold it up in to the hem.
I had exactly the same problem…with size 2 (I measured the pattern with string and it is definitely out) . Then when I turned up the hem …1/2 inch then 1 inch it overlapped on to the seam. I stretched the fabric out on the inseam (ended up with a little pucker) and had to make the hem shorter than stated in tutorial. I too thought I was missing something! I have since made sizes 3 and 4 …no problems.
I ment to say 2 pairs of racer shorts
3 pairs so far. Yeyy
Thank you thank you so so much for these tutorials ! You are the one who got me into sewing for my kids! I never thought it would be that easy . Watching you sinplified things and made it so much easier!!! For that I thank you!! I purchased your kids shorts and absolutely love how easy the patterns are ! But was wondering how do I make them bigger like for my teens ?
I accidentally bought the single fold bias binding, I think it will be too narrow if I fold it in half. Is there any other way I could finish the shorts with the single fold?
If not can I use it for pocket trims on these or a future pair of shorts? I’m not really sure how I might do that…
Yeah …just finished a pair of size 4 girl racers …A lot easier than I thought and they look awesome! Great pattern Dana – you are a gem! Off to make a boy pair!
PS …Your children are gorgeous – perfect models!
Any thoughts on how someone might adapt the racer short pattern with binding to allow for inseam side pockets? If I sew the front and back parts of pocket together first on each side, and then add the binding to the front and don’t sew down the binding over the pocket opening, will that work or am I not thinking this through properly?
love the shorts, love the pattern!
It’s a little more complicated on the racer shorts because of the binding.
But check out this post from Melly Sews. Might be just what you’re looking for!
https://mellysews.com/2016/07/trimmed-lace-shorts-sew-shorts-free-pattern.html
I just made my first two pairs of shorts from this pattern for my toddler twins. The video and tutorial here were fantastic! One of my guys is obsessed with unicorns so I used unicorn fabric and made a rainbow bias tape for the racer stripes. It turned out fabulous; thank you so much, Dana!
Just made my first pair last night for my 3 year old son. Very cute! I used a John Deere tractor pattern and used a John Deere Green bias tape. We will see if I can ever get him back out of them. Also, this was the first pair of shorts I had ever made and I am so pleased with how they turned out.
Thanks again for all the tutorials. Sometimes I just listen to them in my car for fun! =)
hahah. I’m happy I get to “ride” along with you in the car 🙂
And yay! That makes me so happy to hear! I love making a project and seeing it transform into something new. It’s exciting every time!
Thanks for the comment Wendy 🙂
I love the racer shorts. I made them a few years ago for my older grandson and recently made them again for the little one in our life. they are so easy to make, I love the pop of color from the bias tape and they look soooo cute on. You have wonderful patterns and tutorials. thank you
Thanks for the tutorial! I got the patterns and can’t wait to make them for my 7yo son. But can I check how do I ‘upsize’ the patterns for my 11yo girl?
Hi Sharon – Be sure to check her measurements against the size chart in the pattern, because regardless of her age, there might be a size that works for her. If not, the pattern would need to be graded up. Have fun sewing!
Hi Dana.
I love the kids shorts pattern. Is there a video tutorial for the Racer shorts version I’m much better at following a video… Going to have a go at these soon I think.
X
Dear Dana,
Thank you again for the lovely pattern and thehelpful tutorials. I learnt how to sew children clothings thanks to you. I had made these shorts for my son 5 years ago. My son loved them. He is nearly 12 now and he asked me for a new pair of racer shorts as I have more time since lockdown started. So I obliged him. Your instructions are very clear and it is a delight to see your children grow on your website pictures.
Big thank you from London
Can you add pockets to racer shorts?