
My dear friend Katherine had a baby two weeks ago and I couldn’t help but pull up some newborn pics of Clara to remember that tiny stage. What a difference six months makes.

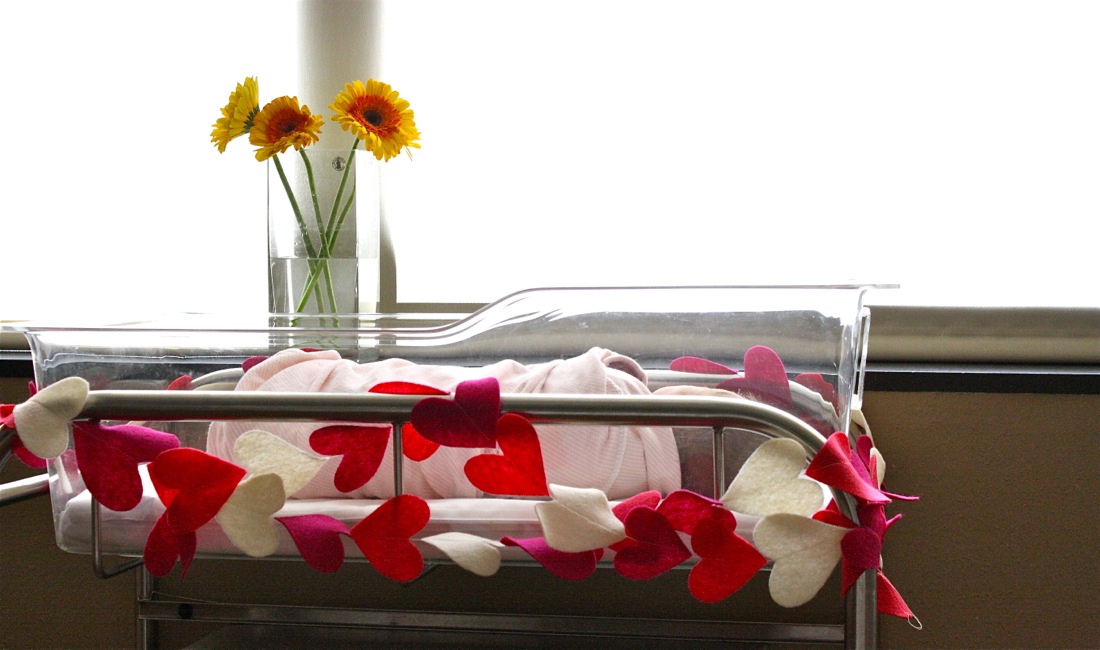
 Those first few days are so special and rare. I love thinking back on them, since my mind somehow forgets the aches and pains and instead remembers that cute heart garland we tied around her baby bassinet. It was so cheery!
 So I decided that Katherine needed a garland (or bunting) to welcome her new baby as well.
 You’ve likely made one of these before.
Garlands have been done and done, and then done again.
But it’s just one more excuse to use up that cute bias tape! (this is actually the reason I made the icy blue tape but in the end liked the pink from Lucy’s new Beach Robe better. Finicky)
So here’s what you do…
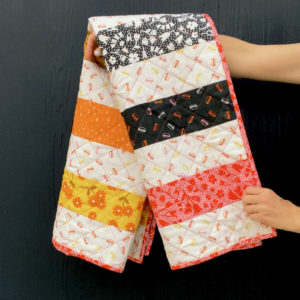
Pick out a few fabrics.
 • Trace half of a bowl to cardstock to create a pattern.
• Fold each fabric in half and trace/cut two scalloped pieces from each.
• Sew along the curve with a 1/4 inch seam allowance.
• Use scissors to clip the curve just slightly in the seam allowance (do not clip thru to the sewn line). This will help the seam lay flat inside the scallop
• Turn it right-side out and press very flat
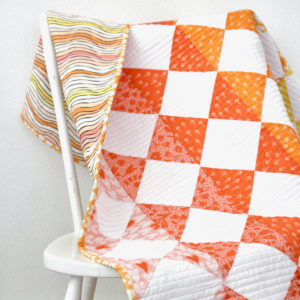
 You can make the garland any size of course.
• So keep making scallops till you have the amount you’d like. Then lay them out on the floor or table and decide which order you’d like.
• Make or purchase enough 1/2 inch wide double-fold bias tape to hold them all (to make your own tape see my detailed tutorial HERE).
• Grab your scallops and tape and we’re ready to assemble!

 • Leave about an 8 inch tail at the end (so the garland can be tied to a bassinet or chair, etc)
• Sandwich the first scallop into the bias tape, with the raw fabric edge inside the tape. Pin it in place (we’ll only do this for the first one to hold it while we start sewing).
• Start from the end of the bias tape and sew down the edge of the tape, sewing the tape ends together and then sewing the scallop in place.
• Sandwich the next scallop into the tape, hold it with your hand, and keep sewing (no need to pin them anymore; takes too long)
 And….you’re done!
One pretty little garland for any special occasion.

 Hang it up and admire the pretty colors.
 Or fold it up, wrap it up, and give it to a friend.

 For a mom giving birth to her third little girl it’s hard to think of a new gift idea. But everyone loves party decor. I might be making these for all my expecting friends.
Sleep tight little babe.
 And speaking of babies, check out baby Owen playing with the baby basket 3 years ago. Same head, same haircut, just a wee bit smaller.


This is darling. I want something like this for my baby when she comes in November. Time to make friends with people who know how to sew 🙂
Oh my – have you ever made a baby basket for a real-size baby? 🙂 I would love to make one!
Where oh where can I find that wrapping paper? Love it!
Ikea….. thanks Dana!
I LOVE the bunting AND that adorable baby basket…I’m curious too, do you think a real baby could actually use one like that? What a neat twist to a moses basket! I love it! {If only I had girls!}
Can we have a tutorial for the Moses basket?? The bunting is adorable BTW.
Lovely tutorial. I just made my first scalloped bunting a couple weeks ago and definitely would have found this post helpful! I would love for you to link this up at my Tutorial Link Party!!!
Tutorial Link Party
http://www.thecreativeorchard.blogspot.com/2012/08/tutorial-link-party.html
How sweet! I made one of these a few years ago for my niece’s birthday but I just used raw edges. This one looks so nice!
your garlands are so neat. love the scallops.
I’ve made 3 sets of six of almost these exact buntings for holidays. (If I’m making one, I might as well make six, no? So all my sisters-in-law and my mom can have their own?) Anyway, I’ve found the easiest way to do it is to fold my fabric in half, trace as many WHOLE circles as I can on the wrong side of the fabric, sew around the circles (double layered, still), and then cut closely around the circles and cut the circles in half. Does that make sense? When I’m on the tracing step, I put one pin in the middle of each of the circle to hold the two layers together. This method cuts out all those pesky steps like trimming threads and grabbing the next two semi-circles. I can now do all the tracing and sewing in one naptime and all the ironing and encasing in bias tape in the next naptime. Awesome! I do absolutely love your idea of using this bunting as a bassinet decoration in the hospital. Those plastic beds are so spare, right?
Darling banner. They are one of my favorite things to make. 🙂 Your babies are adorable, too. Hoping all is well.
beautiful! i love the colors and the fact that she can use it in the hospital!
I’ve certainly need to make one! all the different patterns and colors makes me happy 🙂
Cute! I just can’t get enough of your adorable bias tape!
Dana, this is such a sweet and simple project! I love the cheery fabric! I just made my own bias tape for the first time using your tutorial. Your posts are so thorough and beautiful. All of your tutorials are so well thought out and so easy to follow. Thank you for all of the time you put into each of your posts!
Welp. That’s it. You just cased me to have full blown baby fever with this post. I think I’m running at about 105 degrees right now. Those photos of tiny Clara are simply too much for any woman of childbearing age to resist! Cute bunting too. 😉
Hi Dana, I love the bunting! And…I LOVE the doll baby moses basket!! I found a blog with a tutorial to make one…I haven’t attempted it yet but it’s on my “to do” list…
http://juniberry.blogspot.com/2008/04/dolls-basket-tutorial.html
Darling!
I love bunting for babies! I made something similar, by sewing triangles of paper to make a quick garland for my son’s newborn photos. I even added a tiny paper party hat! He looks like a baby who partied too hard! I thought I would share and encourage your friend to use her bunting in a photo! Here’s the blog post with the pictures: http://lydiaburchett.blogspot.com/2012/07/joshuas-jc-penneys-portraits.html
This is such a genius idea for a hospital gift! I now remember seeing it in Clara’s photos, but this is great! I have so many friends having baby #2 or #3 that is would be perfect for. Only wish I would have had one for my 3 babes 🙂 Your friends are so lucky to have such a talented & thoughtful lady as their friend!
Hola me gusta mucho tu blog y me parece muy interesante. Gracias por compartir con todas nosotras tu cosas tan bonitas
Luisa
Oh i heart the heart bunting and this bunting tutorial x
Aw, you’re the best friend! What a sweet present.
This is so cute! I don’t have any babies or friends having babies. But I am making one of these to hang in my craft room. I think it would make a fabulous decoration. And a great way to use scraps from some of my favorite fabrics. I may cut some letters out with my Silhouette to applique onto the bunting pieces. That would be cool! Thanks for the tutorial.
I love this banner…I Aldo love the fabric baby basket…did u make that as well? I would love a tutorial on that as well!!! Your awesome!
I LOVE this idea. Such an unexpected gift to welcome a baby just right!
looks adorable! please do a tutorial on the basket .. would love to make one for my 2 yr old
Oh how I wish I had this when Nat was born. So pretty. Love love it! You make everything beautiful my dear.
I’ve got a little one coming in about 5 weeks and I think she needs one of these!!! Off to the fabric store!!!!
What a great idea to decorate the hospital bassinet! Wish I had thought about doing that for my baby girl. I think I might make one for her room out of the old clothes and blankets I have been saving that she has out grown. Some of them are so cute I couldn’t make myself give them away but they just sit in her closet. This would be a good way to reuse the fabric.
I can’t wait to make this. I’m going to make a bright green, pink and brown one. I will use it for a baby shower and then its going in the “girl room.” So excited!
Hey Dana! I just spent some time pinning some of my favorite Dana Made It tutorials – so brilliantly planned and beautifully photographed, I love them all! Anyway, I was wondering about this one – how long did you make the bunting to go around the bassinet? I have no kids, and don’t yet have close friends with babies (I’m sure that’s coming soon!) so I’m not sure how to estimate the length it would take to go around there. Do you have an approximation?
Thanks for all you do for this lovely blog!
-Anna
Yes Dana I’d also love to know how long the heart and scallop bunting were!! Thanks!
Hi Dana! I LOVE this idea for making the hospital room a little cheerier. I am also wondering (as I see others have asked) how long you made it? I am making the heart felt one, so I’m specifically interested in the length of that. I have several cut out already but am unsure of how long it should be. I like how yours appears to be wrapped around a few times. If you’d share the length I’d be oh-so-grateful! I LOVE your blog!! Thank you!!
Hi Angie.
Thanks!
I actually have no idea how long it is. There’s no rule on that. Just make it 3 yards or longer? I’ll have to look at the length when Valentine’s day rolls around again and I pull it out 🙂
Hello! I see some others have asked. Did you ever figure out how long the bunting was? I was just counting how many scallops you had- but then realized I don’t know the size of the bowl/plate you used so that doesn’t really help me. I’m trying to make bunting for a baby shower and birth. Your blog is very well done! Getting ready to use your pants pattern making tutorial and pattern for pajamas for my daughter and nephews! Thanks for sharing all this. I can’t imagine all the work you do. I appreciate it!
Sorry I gave the bunting away so I can’t measure how many scallops I made….but….typically I make a bunting about 3 yards in length (because that’s the size of a store-bought package of double-fold bias tape :))
For a baby bassinet though, you could prob make it 2 yards or so. Anything works!
WOW! I love the scalloped take on the traditionally triangle bunting. This is just fantastic. Thank you for the tutorial.