
 As I thought about making something yellow for Owen to help Celebrate Yellow, my first thought was Sesame Street characters…Big Bird, Bert, even Ernie. They’re all so colorful and boyish. And the sun is always shining on Sesame Street. It seemed like a perfect fit.
And then I remembered something even better that brought it back to my own childhood. It was one of those strange memories, stashed deep in your brain’s hard drive, only to be recovered when you’re sewing a funny project like this.
I remembered as a girl having this awesome pair of Yellow Ernie overalls that my mom had made. And I remembered specifically me wearing them in a photo with my sister and all the girl scout brownies taken in our back yard. So I called my mom and asked if she had the photo and she did! And here it is!
 Oh what a fun group of girls! I still know half of them today and their faces are still as cute, just a little more grown-up looking. That’s me in the front and my sister Camille is in the pink shirt in the back. I would say my bangs were hideous (okay they were) but I guess everyone else had the same awesome trend going on.
It was fun for my mom to reminisce about the overalls too. It was something she had completely forgotten about. And for a woman who doesn’t really like to sew, she got sort of happy about it, “I forgot I used to make cool stuff like that.” She totally did. She used to make fabulous prom dresses when she was in high school too.
Ernie’s face is a huge sew-on patch that she found at a garage sale. There was a Big Bird one too, I think, and she decided to sew them up into overalls. I’m so glad she did. I loved wearing them! I remember that part of it.
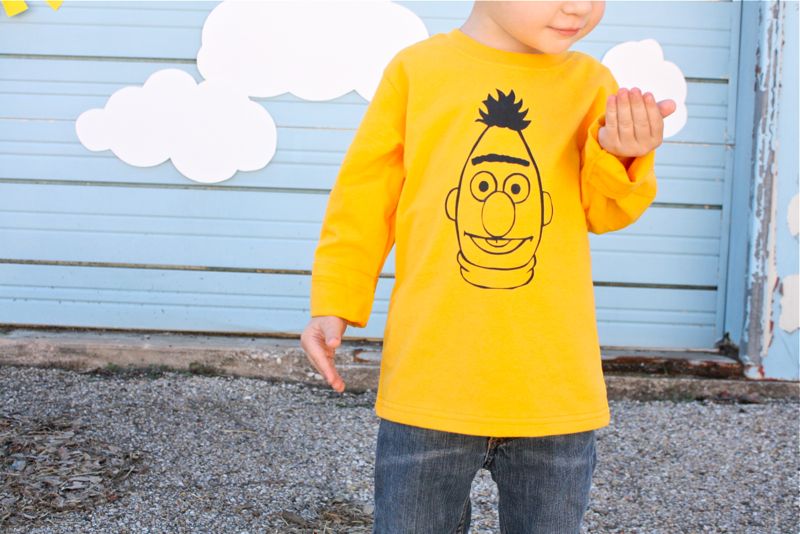
So….with the “little dana” image in mind, I thought that “little owen” would look cool in Ernie too. And here we are, like mama, like son.
 I’ve never thought that Owen and I looked alike until I saw this side-by-side. Sorry son, you have my nose. But you have my thick hair too! You’ll appreciate that in your later years.
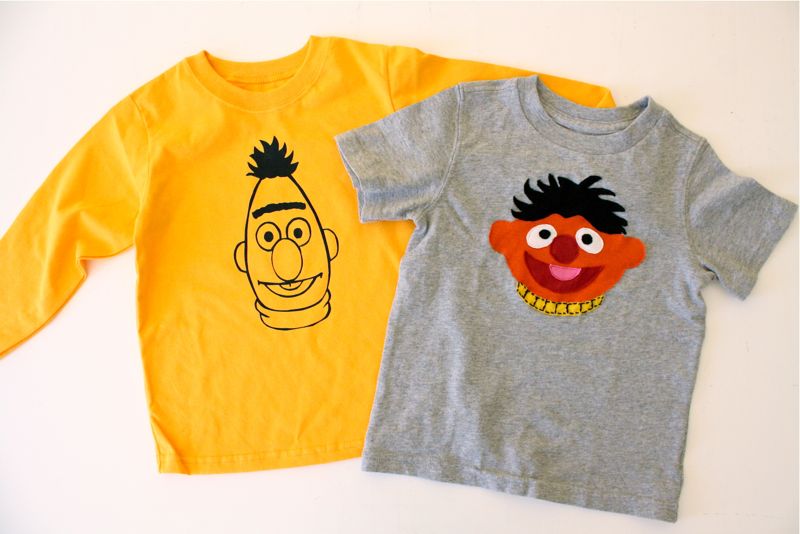
And of course you can’t make Ernie without Bert. In fact, you can’t even say the word “Ernie” with saying “Ernie and Bert”. So, I did this….
 Two Sunny Day shirts for my little guy:
 Would you like to make them? Then let’s get started!
I buy most of my kids’ solid colored T-shirts at Target or Walmart. The gray Ernie shirt is the Cherokee Perfect T-shirt from Target. I removed the pocket that was on the front. The yellow shirt is Granimals from Walmart. They carry these every year in short or long-sleeved, depending on the season, for $3.50. Right now they have really great striped Tees too (without crazy cliche sayings on the front). I already bought 3 of them.
If you’ve never done freezer paper stenciling before (the poor man’s version of silk-screening), please read through THIS tutorial first:
 And THIS tutorial explains how to do more detailed stencils, such as the Bert image we’re doing below:
Okay, let’s work on BERT.
Find an image online that you like. I often do a Google image search under whatever character I’m looking for as a coloring page, such as “Ernie and Bert coloring pages”. You’ll find a nice selection of black and white outlined images, meant for kids to color. They work great for stenciling.
I used this image:
 If you want to use that one, click on the image to enlarge it, save it to your computer, then open it in a Word doc or other software so you can zoom-in on various parts of the image. I did a close-up of Bert and then printed it directly to my freezer paper (on the DULL side of the paper).
I thought it would be pretty funny to do an outline of his head/hair and then only put the uni-brow inside but I’m sure Owen would be confused, so I did the whole face.
For more info on printing, freezer paper, and cutting, refer to the Freezer Paper Tutorial above.
 I did a very detailed cutting process, then ironed the stencil to the shirt, replacing all those little pieces inside the image.
 Make sure you place a piece of paper between your shirt just in case paint seeps through. Then grab your paint (I prefer Tulip, MATTE finish):
 Squeeze it on and paint. Hey Bert, you just got slimed! He seems pretty happy about it.
 Spread the paint evenly and let it dry.
 Then peel off the paper and enjoy!
 One yellow Bert, ready to go. Now let’s tackle Ernie.
 This is the close-up of Ernie from the image above. Sorry it’s so small, the resolution was pretty low. Click on Ernie and save it to your computer, or use another image.
 For the Ernie shirt we’ll follow the same info outlined in the President’s Day shirt tutorial for the George Washington shirt:
Print the Ernie image to normal paper. We will not be stenciling on this shirt.
Grab a handful of knit fabric scraps. I have a box of this stuff; leftovers from 90 minute shirts. They always come in handy.
 With your Ernie face printed out, cut out the various pieces of his face. Trace each piece to an appropriate fabric and cut them out of the fabric. Typically, knits curl up at the edges on one side of the fabric. I prefer the curls to be coming up and out on my image, so that Ernie’s hair kind of rolls up at the edges.

 Quick NOTE about using wonder-under or other stabilizers….
Most appliqué work is done by applying wonder-under or other adhesives to the back of your appliqué piece, then ironing it on to the shirt before you sew the image on. This helps to keep the image in place as you sew. Another method is to use a piece of cotton woven fabric under the knit fabric to help it stay in place and to keep it from stretching.
If you are going to use either of these, I recommend cutting them out as you cut the fabric pieces, so everything matches up perfectly.
HOWEVER, I actually don’t like using these methods because it makes the image slightly stiff on the shirt. So, 99% of the time, I just sew the image right on to my shirt, which is what I’m doing here. Center Ernie’s face on the shirt and pin it down:
 Sew it to the shirt. Go slowly, lift the presser foot periodically to keep the image from stretching. When his face is in place, sew on his hair, then his mouth, etc.
 When you’re done, it should look like this:
 But let’s add one final touch…..some hand stitching on his turtleneck collar:
 You can use any type of embroidery thread for this. I prefer crochet yarn. It looks like this:
 It’s thick but skinny enough for hand-sewing (you don’t have to separate the strands like you might with embroidery thread). You can buy crochet yarn in most fabric and craft shops in the yarn section for about $2-3.
Thread a needle and start stitching!
 We’re going to outline the entire collar with single stitches and do the inside ribs of his collar with double-stitches. Don’t let those terms scare you. This is SUPER easy.
 Start at the top and stitch down. Every time you come back up to the top side of your image, get the needle as close to the previous stitch as you can. Your stitching will look better.
 Go down the edge of his collar and then do two stitches around the bottom of his collar:
 Then move up his collar for the first rib. This is where you’re going to double-stitch. Come right back down on those same stitches. Try to stitch over the gaps as you go. This will make the line darker and “filled in”….

 like this:
 When you get back to the bottom of his collar, do two stitches over, then go back up for another rib in his collar and do a double stitch. Continue this all the way over:
 Then come up the other side of his collar and go across the top of the collar, in single stitches.
 And you’re done!
It’s Ernie!
 I mean….”Ernie and Bert.”
 We’re….on our way, to where the air is sweet!
 Can you tell me how to get, how to get to Sesame Street…..
 How to get to Sesame Street!


So beautiful your tutorial.
i love it. even i feel to do for my daughter’s dress…
thanks. its adorable…
Hi,
Do you know where I can buy Ernie’s classic blue&red striped shirt fabric?
Thanks a lot!
Adriana